Pages

10.16.2012

Lady A's Birthday Outfit

I wanted to get some pictures for Lady A's birthday with the wonderful fall colors out here in New England. Since I am not too familiar with the area I had a friend come with me. I love this little out-fit and even more excited about the top.

This is my first re-purpose design and I could not be more please with how it turned out.

After all day shopping I finally found everything I was looking for: Boots, skirt and a top. The top was a tank top, size 2T, it was too big and too cold for her to wear it so I had to do a little work to it.

First I cut the ruffle off around the bottom. I wasn't too worried about the bottom of the shirt rolling or fraying since her pictures were going to be done the next day but you can roll the bottom once or twice to put a hem at the bottom of the shirt.

I took the extra ruffles and used them to make sleeves and a piece to the front to make it go a little higher.

For the cap sleeves I cut two pieces about 6" long. Look at the picture to see where I have drawn a dotted line. After lining up the center of the 6" ruffle to the top o the shoulder I pinned the rest of the sleeve lining up the invisible line with the seem of the arm hole. Then I simply sewed right along the existing seem. 

I used some extra material, felt and mesh material to add a little flare dress up the cute little shirt and match her hair clip I made

I am sorry to say that Lady A dropped the camera so all the photos to go along with this tutorial were lost. There will be plenty of other re-purposed shirt tutorials but here are some photos of the our little girl in her fun little birthday outfit.

 She was NOT going to give up her blanket!


10.12.2012

Halloween Yarn Wreath

This is my first wreath I have attempted and am so excited to do more. I have seen a lot of yarn wreaths and love how they look so I wanted to try my own hand at it.

I have seen some tutorials where it has been suggested to use a straight piece of pipe foam and then use something like duct tape to bring the two ends together. This would definitely make wrapping the yarn around a lot easier but over time the pipe foam will start to slip. If you are planning on only using the wreath or other project for a one time display I would suggest using that but if you want your craft to last, just spend the time, buckle down and use a round foam wreath.

{Please excuse the photos. My daughter broke my camera so I have had to use my phone camera and Photoshop tricks to get photos up for the blog.}

Materials:
Foam circle
Yarn (1-3 colors of your choice)
Ribbon 6" x 1/4"
Felt to match yarn
Glitter (1-3 colors of your choice)
Hot glue gun
ModPodge


Hot glue about 1.5" of one end  of the ribbon to the back. Glue down the yarn on the inside of the ribbon. To help with winding the yarn I put the yarn onto yarn balls, it really helped lot.

I turned the wreath so the right side was facing me. Then sparsely wind the under colors to the left about 6", back to the right and left again. Now wind the black (top) yarn around the foam. As you wind over the first two colors leave little spaces to let the purple and grey peek through.

Hint: As working the sections, to keep the yarn tight, use the glue gun to hold the yarn in place at the end of the section.

It will take some time, but stick with it. Soon enough you'll have the whole thing done.

The rosettes:
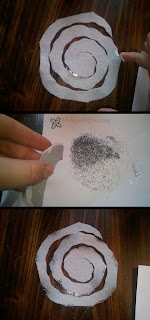
Cut a 4.5" x 4.5" square then round out the corners. Now cut a round in a spiral leaving a round piece in the center about the size of a quarter. I like to make it a little wavy, this way as the rosette is wound up the flower will have some dimension to it. {Do the same with creating a 2.5" x 2.5" square.}

Mix the glitter (if using more than one color) in a little pile on a piece of paper.

Use your finger or tongue depressor to place little dots of ModPodge around the outside edges of the of the felt cut spiral. Dip in glitter while still wet.

Hint: Once the ModPodge is dry I took the spiral piece of felt and shock off the excess outside.

Starting from the outside tail of the spiral roll the felt and use the glue gun to secure the quarter size center to the bottom of the rosette.

Glue the rosettes in place where you want to.

Draw out a simple bat, cut it out of card stock {scrap paper} laying around then use it as a template to cut a bat out of the black felt.

String two pieces of yarn across the back of the wreath and use the Glue gun to hold in place and secure the bat in a desired location.