Pages

12.15.2012

Christmas Chalkboard Art

Lately I have seen some really cute chalkboard art. Baby announcements, quotes, kid art etc.

I thought I would give it a try and love how it turned out. You can make your own too. I downloaded the chalkboard backgrounds from here. I put mine together in Photoshop but you can create it in Picasa just as well.

Simply open the chalkboard background in the color of your choice, then add your text on top. If you would rather, you can download mine and print so you can add it to your own Christmas decorations.

10.16.2012

Lady A's Birthday Outfit

I wanted to get some pictures for Lady A's birthday with the wonderful fall colors out here in New England. Since I am not too familiar with the area I had a friend come with me. I love this little out-fit and even more excited about the top.

This is my first re-purpose design and I could not be more please with how it turned out.

After all day shopping I finally found everything I was looking for: Boots, skirt and a top. The top was a tank top, size 2T, it was too big and too cold for her to wear it so I had to do a little work to it.

First I cut the ruffle off around the bottom. I wasn't too worried about the bottom of the shirt rolling or fraying since her pictures were going to be done the next day but you can roll the bottom once or twice to put a hem at the bottom of the shirt.

I took the extra ruffles and used them to make sleeves and a piece to the front to make it go a little higher.

For the cap sleeves I cut two pieces about 6" long. Look at the picture to see where I have drawn a dotted line. After lining up the center of the 6" ruffle to the top o the shoulder I pinned the rest of the sleeve lining up the invisible line with the seem of the arm hole. Then I simply sewed right along the existing seem. 

I used some extra material, felt and mesh material to add a little flare dress up the cute little shirt and match her hair clip I made

I am sorry to say that Lady A dropped the camera so all the photos to go along with this tutorial were lost. There will be plenty of other re-purposed shirt tutorials but here are some photos of the our little girl in her fun little birthday outfit.

 She was NOT going to give up her blanket!


10.12.2012

Halloween Yarn Wreath

This is my first wreath I have attempted and am so excited to do more. I have seen a lot of yarn wreaths and love how they look so I wanted to try my own hand at it.

I have seen some tutorials where it has been suggested to use a straight piece of pipe foam and then use something like duct tape to bring the two ends together. This would definitely make wrapping the yarn around a lot easier but over time the pipe foam will start to slip. If you are planning on only using the wreath or other project for a one time display I would suggest using that but if you want your craft to last, just spend the time, buckle down and use a round foam wreath.

{Please excuse the photos. My daughter broke my camera so I have had to use my phone camera and Photoshop tricks to get photos up for the blog.}

Materials:
Foam circle
Yarn (1-3 colors of your choice)
Ribbon 6" x 1/4"
Felt to match yarn
Glitter (1-3 colors of your choice)
Hot glue gun
ModPodge


Hot glue about 1.5" of one end  of the ribbon to the back. Glue down the yarn on the inside of the ribbon. To help with winding the yarn I put the yarn onto yarn balls, it really helped lot.

I turned the wreath so the right side was facing me. Then sparsely wind the under colors to the left about 6", back to the right and left again. Now wind the black (top) yarn around the foam. As you wind over the first two colors leave little spaces to let the purple and grey peek through.

Hint: As working the sections, to keep the yarn tight, use the glue gun to hold the yarn in place at the end of the section.

It will take some time, but stick with it. Soon enough you'll have the whole thing done.

The rosettes:
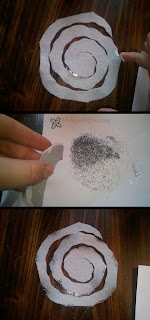
Cut a 4.5" x 4.5" square then round out the corners. Now cut a round in a spiral leaving a round piece in the center about the size of a quarter. I like to make it a little wavy, this way as the rosette is wound up the flower will have some dimension to it. {Do the same with creating a 2.5" x 2.5" square.}

Mix the glitter (if using more than one color) in a little pile on a piece of paper.

Use your finger or tongue depressor to place little dots of ModPodge around the outside edges of the of the felt cut spiral. Dip in glitter while still wet.

Hint: Once the ModPodge is dry I took the spiral piece of felt and shock off the excess outside.

Starting from the outside tail of the spiral roll the felt and use the glue gun to secure the quarter size center to the bottom of the rosette.

Glue the rosettes in place where you want to.

Draw out a simple bat, cut it out of card stock {scrap paper} laying around then use it as a template to cut a bat out of the black felt.

String two pieces of yarn across the back of the wreath and use the Glue gun to hold in place and secure the bat in a desired location.


9.24.2012

Seek & Find ~ for the kiddos

My husband was so excited when we found out we were having a baby. There are all the normal and obvious reasons but there is one I wasn't really expecting. We went over to his parents house where he had one last box that he was leaving there until this very reason. The box had a couple of his stuffed animals that he wants to pass on to his own kids. There was also a seek~&~find that his Aunt had made using a soda bottle. She filled it with rice, put a bunch of trinkets in it then typed out a list of the items so he could mark them off with a dry erase marker as he found them.


How cute is that, he liked it so much that he held on to it all this time so that he could pass it along to his kids. I love that about him. I thought it would be fun to make a couple of changes and give it to Lady A.

First I made the bag from flannel scraps that I had but the material pilled and got even worse when I needed to wipe it clean from dirty prints. The second go around I used apulstry material. This was for a couple of reasons: it would be easier to wipe clean, the material wouldn't pill and the more sturdy material would help it last longer.

You will need:
Ribbon, plastic vinyl, fabric {3 if you want to vary the colors like mine}, silicon beads, little trinkets, sewing machine and thread, dry erase marker, binding ring and funnel.

*1/4 inch sewing allowance


Cut material, plastic, ribbon
Plastic Vinyl: 4 1/2" x 5 1/2"
Material A {front sides}: 4 1/2" x 2" {2 pieces}, 8 1/2" x 2" {2 pieces}
Material B {back}: 8 1/2" x 7 1/2"
Material C {pocket}: 8 1/2" x 5"
Ribbon: 5"
Silicon Beads: 2 cups


Sew the short sides from Material A the vinyl.
Sew top and bottom on to front.
{Make sure that the hems from the previous step fold out so that you won't see them through the vinyl}.
I used the serpentine stitch to add a little bit of fun and to help lay the hems down.
*Tip: Since I was using vinyl I needed to make sure not to perforate it so the vinyl, when sewing the sides on, wouldn't tear out so I used the longest stitch length. The serpentine stitch was done with a smaller stitch length and was to help secure the vinyl and not put too much tension on the vinyl.


Getting the pocket ready. 
{ONE} For this fold one of the long sides down about 1/4", then fold it a second time. This is a small piece so you can pin it or use your finger to press it, really no need for the iron. Now stitch down the hem.

{TWO} Now mark a line where you want to put a stitch to separate the pocket for a dry erase marker and photo. Place the pocket piece face up on the back piece, also face up. Stitch along the line. 


Now we need to sew the front and back together. First place the front face up and fold the ribbon and line up the edges along the outside edges. I put mine on the top right corner and also lined it up with the seam of the top piece. Put the back piece face down on top of the front. When sewing all four sides be sure to leave a generous opening so you can turn the bag right-side out. Since I don't have a surger I did a zig-zag stitch as well.
{I would suggest leaving it a bit bigger so that the plastic can fit through.}


Turn the bag right-side out.
Before you add the trinkets you have collected for the seek-n-find bag take a picture of them for your search card. I took out some items because they fell apart being in a pliable seek~&~find bag, there were also sharp items that I couldn't put in since they would pock through the material and plastic.
Now add the trinkets to the bag.
Pour the silicon beads in, the funnel makes this part a lot easier
{you can add more to make it more full if you want}.
Last thing to do is sew closed the opening.


Here is the back with a spot ready for the photo once I get it printed and laminated. I'll put a hole in the corner and hook it to the ribbon. There is also a place for the dry erase marker to cross of the pictures as the items are found.


I am pretty pleased with how it turned out and love that it has a little bit more meaning as a handmade gift passed down from her dad. Right now Lady A is too little to really seek out the trinkets but she loves to slap the plastic window and hear the fun noise it makes.


The kiddos can find all the items or you can suggest categories, ie: all the silver pieces, hearts, beads etc.

9.22.2012

Hanging a Frame ~ Right Where You Want It!

Over the first four and half years of our marriage we stayed in the same place but the last year and half, we have moved a handful of times. From all of this experience there are a few things that, I have become pretty good at, I think anyways.

One of these things is hanging frames. I love to have stuff up on the walls, family photos, frames, shelves, vacation memories, etc. My husband does not love this so much because I am a bit of a perfectionist when it comes to making sure everything is right where I want it and that it is hanging straight on the wall, this usually means we have more nail holes in the wall than actual nails.

Here is a great, fast way to make sure I get the nails in the right spot the first time.

What you'll need:
Hammer, Nails, Level, Tape, Thumb tacks, Frame {or other item to hang}.


First lay your thumb tacks so that the needle part is up. Take a piece of tape, sticky part down, and press over the point of the thumb tack so the point pokes through and press the tape firmly against the back part of the tack to make sure it sticks.


Then you will tape the thumb tack on the back of the frame right where the nail will go to hang it.

If your frame requires two nails, {like mine} put the second thumb tack in place.


Now with the level {you might have someone help you with this part} place the frame in the desired location and use the level to make sure that the frame is straight.

With a little bit of pressure you will push the frame where the thumb tacks are so that they will mark the wall. You can have them leave a superficial mark or push hard enough that they will push into the wall. {I pushed into the wall so I could get a photo and show you.}

You can always double check your work to make sure you didn't slip when you were marking the wall.
 

All that is left to do is hammer the nails in place and hang the frame.

Perfect!! Two nails and only two holes. My husband is so pleased.


9.21.2012

Baby Bear Beanie with Fuzzy Ears and Brim

I wish I had this little beanie finished when my little lady was born. How cute is that!?!?!


This soft and cozy Bear Beanie is an adorable finishing touch for your little ones outfit to out out on those chilly days. It's also a great photo prop, you won't be able to resist those round cheeks. This one fits up to 14 inches and is stretchy.

MATERIAL & CARE:
100% Super Soft Acrylic - Cap
98% Acrylic, 2% Polyester - Ears/Brim
CARE: Use gentle detergent, warm water. Pat dry, lay flat to re-shape and finish drying. Do not bleach or iron

If you want to order one for your little darling check out my shop here.

Open Weave Beanie with Ear Flaps and Tassels ~ Choose You Colors

~*~*~*~*~*~ Can I just say how much I LOVE this beanie ~*~*~*~*~*~


I made a beanie for my niece the first Christmas after she was born. Her parents tell me all the time how much she loves her beanie and share pictures of her in her every day activities wearing the beanie. Over the summer I made a larger one for her {she is growing} so that her mom could take turns washing them and in case the beanie gets left somewhere on accident {it happened once and was not pretty}. The beanies are the exact same color and style so my niece won't realize when she is wearing the 2nd beanie.

She now has a sister and of course I need to make her one but I wanted to make sure it was one just for her. This is the beanie I came up with and could not be more pleased. I immediately made one for my little girl ~ now I just need to get her to leave it on her head, she doesn't even like bows clipped in her hair. But the beanie is cute enough that I will keep putting it on her until I win the battle.

Check out my shop if you want one for your little one too!

9.11.2012

Cowl Scarf Pattern ~ Simple

Fall is coming and what better time then know to get ready for the cooler weather!! You can never have too many scarfs so today I am going to share with you the simple cowl I made.

My brother likes to crochet his beanies for the slopes and over the summer he gave me a huge bag of yarn. That is where the yarn came for this pattern and unfortunately I don't know exactly what type of yarn I used, but I do believe it was some kind of baby soft yarn.

I wanted the cowl to have a loose, open feel with the stitches and for that I used a larger hook than what I am sure was recommended on the label.


Supplies:
Scissors
Hook of your choice {I used 'N'}
Yarn {I was using stuff given to me but I imagine it was about three {3} half skeins of yarn.}

Start with a chainless foundation stitch {cfs}. You can find the instructions here. This is a great stitch to use when starting a project, where using a simple chain stitch to start, will not give enough stretch.

RND 1: CA 200 cfs, sl st to first cfs to form ring.
RND 2: ch 2, dc in same st from previous row, *dc in next st,* repeat * 197 times, sl st to second sc of ch 2.
RND 3: CB ch 1, sc in same st from previous row, *sc in next st,* repeat * 197 times, sl st to ch 1.
RND 4: ch 2, dc in same st from previous row, *dc in next st,* repeat * 197 times, sl st to second sc of ch 2.
RND 5: CC ch 1, sc in same st from previous row, *sc in next st,* repeat * 197 times, sl st to ch 1.
RND 6: ch 2, dc in same st from previous row, *dc in next st,* repeat * 197 times, sl st to second sc of ch 2.
RND 7: CB ch 1, sc in same st from previous row, *sc in next st,* repeat * 197 times, sl st to ch 1.
RND 8: ch 2, dc in same st from previous row, *dc in next st,* repeat * 197 times, sl st to second sc of ch 2.
RND 9: ch 2, dc in same st from previous row, *dc in next st,* repeat * 197 times, sl st to second sc of ch 2.
RND 10: ch 2, dc in same st from previous row, *dc in next st,* repeat * 197 times, sl st to second sc of ch 2.
RND 11: ch 1, sc in same st from previous row, *sc in next st,* repeat * 197 times, sl st to ch 1.
RND 12: CC ch 2, dc in same st from previous row, *dc in next st,* repeat * 197 times, sl st to second sc of ch 2.
RND 13:  ch 1, sc in same st from previous row, *sc in next st,* repeat * 197 times, sl st to ch 1.
RND 14: CB ch 2, dc in same st from previous row, *dc in next st,* repeat * 197 times, sl st to second sc of ch 2.
RND 15:  ch 1, sc in same st from previous row, *sc in next st,* repeat * 197 times, sl st to ch 1.
RND 16: CA ch 2, dc in same st from previous row, *dc in next st,* repeat * 197 times, sl st to second sc of ch 2.
RND 17:  ch 1, sc in same st from previous row, *sc in next st,* repeat * 197 times, sl st to ch 1.
RND 18: ch 1, turn {now the inside of the scarf is outside and facing you}, *sc in next st,* repeat * 198 times, sl st to ch 1.
RND 19:  ch 1, *hdc in next st,* repeat * 198 times, sl st to ch 1. Finish.
The edges were curling and that is why I decided to do those last two rows. Now to do the same to the other edge.
Keep cowl turned inside out and attach yarn color of your choice to RND 1.
RND -1: ch 1, *sc in next st,* repeat * 198 times, sl st to ch 1.
RND -2:  ch 1, *hdc in next st,* repeat * 198 times, sl st to ch 1. Finish.

With this pattern it is simple enough to make it as thick or thin as you would like. Mine ended up being approx. 7" in width. I love that it is very light and definitely cozy enough and keeps me warm on walks when the even chill is in the air.

Next time I think I'll try to do a shawl that will wrap around my shoulders.

4.24.2012

Thank You Notes

When we first moved to Connecticut we didn't know anyone or even know what we were getting ourselves into. We had so many people reach out to us and help with finding Dr.'s {our baby was due 6 weeks after moving here}, an apartment, and this being our first baby, everyone helped to make sure that we had what we would need for our little lady. Well, now that the school year is coming to an end we have decided to go to Utah for the summer for work and to spend time with family. Needless to say, I can't procrastinate sending out my 'Thank You' notes any longer.

I love how they turned out. Super simple but from the heart.

What you'll need: Card stock, cutter, photos, spray mount, white pencil.


I cut the card stock in to pieces a quarter inch bigger than the photos. In my photo editing program I added 'Thank You' to the photo of me and Lady A then just had it printed at a local photo print shop. Then I spay mounted the photos to the card stock and wrote a little note on the back using a white colored pencil.

4.14.2012

Baby Blankets

I LOVE having tons of blankets around.

As I walked out to my living room the other day I suddenly realized how many blankets we have, and it is such an eclectic bunch. Blankets from far off places, ones that I have made for my husband and daughter and many more that others have made for us. I think giving someone a blanket is a wonderful way to say 'I Love You!' They are warm on a cold day, comforting when you need to curl up, perfect to take out side and lay on the lawn during a wonderful summer evening. We have them all over the house for whenever the moment calls for a nice cuddly blanket.

After seeing all the wonderful handmade blankets our little girl received from family I decided I wanted to help share that love that a handmade blanket can bring. Check out my ETSY store for the latest and great deals. Find that special blanket that says you love them.


3.13.2012

St. Patrick Day Leg Warmers

Have you ever tried making your own legwarmers for you special little one?

My cousin made a pair  for my little munchkin and we love them. They work great to go with any outfit and when it is time to change a diaper the legs can stay warm ~ this works great especially in the colder months. To help her dress up for the festive day this month, and to make sure she has her green on, I made her a pair or St. Patrick Day leg warmers.
I think the pictures do a pretty good job of explaining how to make these, but I'll add a few comments just to help out.

Here is what you need:
Knee high socks
Cutting board, ruler and blade {or you could use a pair of scissors}
and thread and needle

I lined up the tops of the socks and then cut the bottoms off at the same length.

Ta Da!!

Now I rolled a hem at the bottom where I cut...

...and stitched using the machine. This is simple enough that you could hand stitch it too.

WaLa...fun little leg warmers for my cute little one.

Here she is!!