Pages

12.29.2013

New Tradition for the New Year

This year was our first Christmas season, since we have been married, that we decided to stay home instead of packing up and heading out to stay with family for the Holidays. I know, seven years and we are finally going to start our own traditions. Part of the reason for this is because I am pregnant and still dealing with being sick and also because our daughter is two this year and we wanted to start making some of our own family memories and traditions.

What is our new tradition you ask.....well it comes out of procrastination. 

I was super late with getting Christmas letters out then found that Staples had a deal on cards, 50 for $5. SWEET!!! Even after Christmas came and went, I still hadn't gotten them done but the deal was still good at Staples.

Friday I designed our cards and sent them in, for the extra $5 I put a bunch of photos from the year on the back so everyone could see how much Lady A has grown. I LOVE how they turned out. 


The reason this is going to be my new tradition......getting them ready and sending them out after Christmas means there is one LESS thing to try and fit in, we got to make personal photo cards at a great price and if I wanted to {since everything is digital now} I can also include some of our photos from Christmas morning for grandparents and others.

It looks like the sale is over now but watch for it next year if this sounds like something you want to do. Unfortunately the my local Staples customer service was lacking quite a bit, but next year we will be somewhere new and I enjoyed doing New Years cards so much this year, I'll still end up doing them again.

8.21.2013

How to Clean the Sticky off Jars

I love finding new uses for jars. The hardest part is getting all the sticky off the jar that is left behind when taking the wrapper off. I am here to tell you that there is an easy way to get it off.

All you need is baking soda and some kind of cooking oil. For the second step I used dish soap and a simple dish sponge.

FIRST: I mixed equal parts baking soda and oil then rubbed the mixture all over the jar.
*note: If exploring the Internet has taught me anything, it is that baking soda can clean most anything. The oil helps spread it on the jar.

Let the jars set for about 10-20 minutes.

SECOND: I put a bit of soap on the jar and used the sponge with a bit of water to wash off the paste.
*note: The sponge helps rub the sticky off and the soap is to clean the oil from the jar.

Now I'll spray the lids some fun colors and use them to help organize my storage/craft space.

8.15.2013

Diapers for Dolls ~ Tutorial and Free Pattern


The other night as we were getting ready for bed, Lady A decided that she needed to get her babies ready for bed. She went through the last of the wipes making sure the babies were clean then we spent a half hour putting diapers on and off ... on and off.

I love watching her as she figures out new things on her own and tries to copy things that Paul and I do....but....It's time to make some diapers for her babies so we don't use all of hers up.

Flannel or Cotton material
Sewing machine and thread
Velcro {or snaps}
Scissors
Pattern
Optional: Ribbon

Click here to get my template, it has three sizes.

Size 1: Small dolls
Size 2: Cabbage Patch (mine is from the 80's)
Size 3: Homemade doll

Decide what size of diaper you need and cut out the pattern {I used some scrap canvas material so it would hold up as I use it over and over again}. 

I am going to add Velcro on but it was just a bit wider than the ribbon so I cut that down to size. The Velcro pieces ended up being 1" {inch} long.

I suggest cutting one piece from the fabric first {step 2} and placing it on the doll to check the size before cutting out all the diapers from the material.

Optional: Sew the ribbon to the the diaper {step 4}. I usually place it on the front of the outside fabric and this will be where I place one side of the sticky Velcro.

Get the opposite piece of Velcro ready by placing it on a piece of ribbon that is approx. 1.5" long. {step 5} Place the Velcro in the center so that there will be 1/4" seem allowance. Place on the back of the outside fabric with the Velcro up and the pattern of the ribbon down. Now place the right side of the inside fabric down.
Note: be sure to pin the loose pieces in place so they will stay where you want them until you sew.

Sew together with a 1/4" seem allowance leaving an opening approx. 3" wide along one side of the waist, trim off the corners so they will lay flat when you turn the diaper right side out {step 6 & 7}.

Not pictured~oops: {step 7.5} along the curved part for the legs make a couple of small snipes in the fabric {careful not to cut the stitches}. This will help it lay flat when you turn the diaper right side out.

Do a top stitch to help make everything look nice and crisp {step 8}.

Place Velcro on the front ribbon. {I placed mine in 1.5" in from the edge. It's not an exact science but I just placed the diaper on the baby doll and did a best guess.}

Trim down and finish the edge of the ribbon so it won't become unraveled {I used the singe technique}.

Do you sometimes giggle to yourself when you are so pleased with how a project turned out. I am uber please with these and showed them to everyone. My MIL's boss asked for some too for her grand-daughter so I have to get working on the next set.

And now we have enough diapers to fill her little hearts content.


8.07.2013

Wipes Case Cover

I needed to add a bit of style to my diaper bag so I decided to start with the wipes case. It seems like I have been using grey in everything lately but it seems to go with everything. This combination of yellow and grey from my material is great, made even better because it was in the remnant bin at Joann's so it was super cheap.


 Wipes Case
Cotton material
Felt sheet
Ribbon
Glue gun
Scissors
Template that you can down load from here.


Print the template and cut out the pattern for the material. Use it to cut two pieces of fabric.
Now cut the pattern down to the size for the felt piece and cute two pieces from the felt.

*This is a rough template and designed to help give the basic size and design you'll need.

Hot glue the felt to the top and bottom of the wipes case, keeping it centered.
Tips: To help keep the felt centered I used tape on either end and hot glued sections at a time. I kept my hot glue thin so it wouldn't be bump. At the corners cut a little triangle out so that it will lay flat then glue down the sides.

Hot glue the cotton fabric in place, trim any edges that need it. The order I did glued down the fabric was: back, front, sides, corners. Then trim any excess around the edges.

Now use the hot glue to place the ribbon around the edges.

Now there is a bit of color to the diaper bag. Yea!! From here you can add any embellishments you would like. Lady A loves to tear things apart so I opted not to add any embellishments to this one.

6.13.2013

Quick Fix ~ Heat Transfer

I have to admit, I have always been a bit timid to use no-sew permanent adhesive. Many years ago when I used it for other projects, the edges always seemed to lift and curl.

For baby showers, one of the items I love to give are hand made blankets. This cute one was meant for a friend when I noticed a little hole that would eventually fray and then be a perfect hole for a little girl to stick her finger in and tear it even bigger.

Here is my chance to get over my timidness about the heat bond.

 What you'll need:
No-sew Permanent Adhesive {I used Heat-n-Bond}
Extra Material
Pencil
Iron & Ironing Board
Scissors

Prep material as directed on package.

Cut a piece of patch material and adhesive.
*Tip: cut the adhesive piece just a bit smaller than the patch material so that as it is heated it will not stick to the ironing board.

Iron as directed on package.

Draw your desired shape and cute out the patch {mine was a heart}.

Proceed with adhering the patch as directed on package.

Pretty much, it was so super easy. I couldn't tell you what my hold up has been all this time. Simply didn't work years ago when I tried and so I have stayed away ever sense. Well, not any more!! This heat transfer material has opened up a whole world of possibilities for me. Yea!!

Keep Creating
~Mindy

6.10.2013

Love Notes Picture Frame ~ Take Two


I love when I finish a project and get to share it with all of you. These frames turned out great and were so simple to put together.

Two more family wedding presents. I was holding out for the right frames and wouldn't you know that I found the perfect ones at Wal-mart for $3!

 
What you need:
Frame
Photo
Pattern Paper {card stock works great}
Spray Mount
X-acto knife and/or Scissors
Metal Ruler
Cutting Mat
Masking Tape
Dry Erase Marker

The frame advertises that it has spots for two 4"x6" photos, that's a lie, it is 3.5"x 5.5". I already had my 4x6 photo picked out and ready to go so I had to cut the opening a bit but no biggie.

Spray mount the front of the cardboard mat and place face down on the back side of your patterned paper.
{American Crafts - Take Note - Pink Pearl}
{American Crafts - Classic Calico - Frequency}

*Tip: I held the cardboard mat and patterned paper up to the window {kind of like a light box affect} and marked roughly where I wanted it to line up.

Cut off the excess around the cardboard mat and cut out the opening where you want the photo to go.

*Tip: On the wrong side I marked the four corners for the photo opening by making little cuts with the x-acto knife. Then on the right side I used the metal ruler as a guide to make a nice straight cut for the photo opening.

It looks a little low tech but I used masking tape to place the photos. This would hold it nice and tight and I wouldn't worry about a liquid glue warping the material as it soaked in. This will also allow the couples receiving these frames to change out the photos without worrying about ruining the cardboard mat.

They are done and wonderful! A good sign that they are perfect is when I want to keep them for myself instead of giving them away.

I used an image transfer technique that you can find here.


Go Create!!
Mindy

6.07.2013

Fit Friday ~ Keeping up with it All

This week I have been working on doing all those things I have set out to do over the past few months: drinking more water, getting out for walks more often, more sleep etc.

I have been getting headaches lately and been super tired {usually taking a nap the whenever Lady A took one} so I went in for a physical. Secretly, I was thinking if there were something in my blood work it would be the kick I need to do some more intense workouts. Well, it was all normal. I was in the middle all across the board. So I guess I will continue going to bed earlier since that is the only thing that has helped to keep the headaches from coming on.

I still think that the best thing I have done so far is drinking more water. It is simply amazing how much this can affect your body, weight, skin, health and so much more. I highly recommend that if you are looking to feel better, this is a good place to start.

~Mindy

5.31.2013

Fit Friday ~ the odd couple

When we first moved into these apartments, we knew it was only going to be for about a year and half. With such little time I could keep to myself and not worry about making friends with my neighbors. Instead I decided that I was going to force myself to say 'Hi' and get to know as many neighbors as possible. The biggest hurdle for this resolution is that probably only half of all those living here speak English.

A couple doors down is a grandpa who is always out with his grandson. I don't know how much English he understands but I have only ever heard him say 'hi' and 'bye' and he LOVES it when Lady A waves at him. There are also quite a number of fun toys out in front of their place and Lady A has to stop by at least once or twice a day to make sure they are all working.

Now when we step outside the first thing she does is look over to see if the little neighbor boy is out, but if the Grandpa is out she'll gasp with excitement, wave and shout 'eye' {that's 'Hi' in toddler}. Before you know it, Lady A has gotten the little boy {he's only a month younger than she is} into his stroller and either me or the grandpa will be holding her so she can push the stroller. I have to laugh to myself a little bit as I think of what it must look like to see us walking around the complex with the little kids, knowing that we can't talk with each other.

This has been my exercise this week, rain or shine {and it has been mostly raining}, helping Lady A push the neighbors toddler in his stroller. So I have gotten out of my bubble and made friends with some neighbors and it has been a really great experience. My little girl has even gotten comfortable enough with the Grandpa that she will walk right up to him and hold her arms out so he'll pick her up, or help her at the top of the playground to go down the tube slide. She's busting out of her shell and I love it.

With all the rain this week we have also gotten a lot of puddle jumping in.

What have you done this week to get your exercise in?

5.24.2013

Fit Friday ~ Rainy Days

This past week we have had a LOT of rain.

It comes and goes but it is usually raining when Lady A is up so we can't go on our walks. She does however, love the rain. We have spent a lot of time outside this week puddle jumping and changing into dry cloths.

This week we have been doing more inside for our workouts. {I say 'we' because Paul is done with classes for the summer so he is working out with me right now.} Paul was looking on-line and has put together some exercises for us to work on in the evening.

Some of them are......
Squats, push-ups, sit-ups, crunches, lunges plus a couple other core strengthening exercises. Get out there and make up your own exercise routine.

5.21.2013

Image Transfer Onto Fabric Using a Gel Medium

 How great did these images turn out?!?
I love them!

These were super easy but will take time because they need to set overnight.

Image transfer tutorial: Using a gel medium to transfer an image onto fabric.

Materials Needed:
Image printed on a laser printer {or a magazine clipping}
Fabric {Plexiglas, stretched canvas boards, pieces of wood}
Gel Medium {I used non-water based acrylic paint and modeling paste}
Sponge brush 
Scissors
Wax Paper
Tape
Water Spray Bottle
Towel
Acrylic Coating Spray {oops, not in the photo}


Cut out the images. Cut fabric pieces to size. Mine are approx 6" x 9".

*To prepare the image I added some text "I love you because..." then flipped it to print. I use Photo Shop but this can also be done in Picasa and most photo editing programs available. If your image doesn't have a right/wrong way, skip this step and just print your image.


To prep the area, tape a piece of wax paper down then tape the fabric on top of the wax paper. The Acrylic Paint spreads easily but the Modeling Paste stays pretty thick. To help know exactly where to apply the gel so to be able to work fast enough before it started to dry, place tick marks to help know exactly how big of an area to apply to the fabric.

*The wax paper is used to keep any of the gel medium from getting onto the table as it might soak through the fabric.


Apply the gel medium to the fabric then immediately place the image face down and press with fingers to make sure that the entire image presses into the gel medium. 

Be sure to press the edges down, excess gel medium will press out from underneath the image.

Before moving onto the next step, be sure that the gel medium has time to dry completely. I recommend letting it set over night.


Now grab your water bottle {or bowl with water and sponge to apply water to image}, towel and photo.

1 ~ Get the paper wet. {I let it sit for about 30 seconds or so, this will help the paper soften up}
2-3 ~ Start rubbing the paper with your finger tips. It will ball up and rub off. {You will have to keep the paper wet as you go}
4 ~ Every once in a while I would dab the image with the towel to get the paper residue off and see how well the image is coming along. {Using an image with so much white takes a little bit more care since it will blend with the white background of the gel medium, so...be careful not to rub too much}

Repeat until all the paper has been rubbed off the image.

*The image looks great while it is still a bit damp but as it dries, any paper residue left behind will become very noticeable.

Use a coating over the image. This will put a nice finish on the image and get rid of the paper residue look. I used an Acrylic Coating gloss finish in a spray can but something like Mod Podge would work as well.

I love how these images turned out! Eeek!

For the B/W image I used the Acrylic Paint. This gave the image a soft aged look. Photo by Michelle Andersen Photography. Photo courtesy of Adiel.


For the coloured image I used the Modeling Paste. It dries a bit faster and in those spots the image lifts up when taking the paper off. The over all image, however, stays more crisp so it is ideal for images with a lot of detail. Photo courtesy of Manda Jane Photography

Go Create!
~Mindy

5.17.2013

Fit Friday ~ the Sun is Out

I missed last week...sorry about that. It has been super busy around here, getting ready for the summer, planning trips, Paul finishing up another year of Grad School.

The past two weeks we have enjoyed going out for walks. Lady A and I would walk {she was in the stroller, we would not have made it to the bottom of the street if she was walking} to the University and meet up with Paul. It felt great to get out and stretch our legs after the long winter and cold spring. 

Lady A really enjoyed it too. She would point and 'oh' and 'ah' over everything as we walked by.

My recommendation this week is a good pair of walking shoes to go use. My Dr. told me that New Balance are a great walking shoe but also good for your feet. They aren't too thin and will squish your foot and the cushion in them has been just right for me.

Get out and Get walking
Happy Trails

5.06.2013

Love Notes Picture Frame

I am so excited to finally share my project with you!!


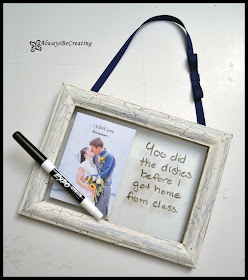
This frame was designed for Paul's cousin as a wedding gift. She had some decor windows at her reception, one with a phrase and another with a scripture quote. This was designed to match them and I have to say, I am pretty pleased with the way it turned out.


What you need:
Frame
Photo
Ribbon
Hot Glue
E6000
Dry Erase Marker


With the glass and back of the frame in place, set the image on top of the glass where you would like it then make simple marks at the corners so you know where to place the image once you have glue on it.

Put E6000 glue on the back of the image, I used a toothpick to help spread it around. You won't need a thick layer, just make sure the whole surface is covered. Place and spread a thin amount of E6000 on the glass within the marks.

With the glass out of the frame and on a flat surface place and hold the image down
*When the E6000 is placed on both surfaces the bond will be a lot stronger.


I used 3/8" ribbon and cut a 20" piece. At the top of the frame, use the glue gun to adhere the ends of the ribbon to the underside of the glass opening.
*I used the hot glue gun here because it would dry a lot faster.


To add a little personality to the ribbon I added a bow.
1. Place two folds in the ribbon approx. 5 1/2" apart.
2. Cut a second piece of ribbon that will be long enough to wrap around the bow. Glue the two folded corners to the end of the small piece of ribbon.
3. Place a small drop of glue down where the two fold meet and press the center of the loop down to make the bow.
4. Wrap and glue the smaller piece of ribbon around the bow.
*I used the hot glue gun here because it would dry a lot faster.
DONE!!


Using the same technique, spread E6000 around the inside of the frame where the glass will rest. Carefully place the glass in the frame {make sure it is facing the right way and not upside down} and press the glass into the glue.
*As you are placing the glass, watch where it is going so the image will be centered as you place the glass. If the glass is set in the glue then wiggled around, the edges will get all gunky and be seen from the front.


I love it!!!
Hopefully they will too.


If you want to create your own frame with the crackle technique, check it out here.


I used an image transfer technique that you can find here.


5.03.2013

Fit Friday ~ Getting Enough Sleep

Like I talked about last week, I was going to focus on getting more sleep this week.

I can't believe how hard this has been. For the past while we have been staying up late, this seems to be the only time that we can spend time together. First we get Lady A to bed then Paul gets to work on his homework, then we finally get to spend a bit of time together. On average we get to bed around 2 a.m. and Lady A wakes us up between 7-8. This week I have been getting to bed around midnight but my internal clock wakes me up at 5...AAHHHHHH!!!!

The first couple of mornings I spent the morning just laying in bed until Lady A woke up. Maybe I could have gotten up and been productive but that would keep me from getting more sleep....since this is my goal. This week I was baby sitting for a friend and realized just how sleep deprived I am. When Lady A goes down for a nap I can too but since I was babysitting that was not an option. Those two days were pretty long.

Finally by the end of the week, I have been able to get at least 7 hours of sleep at night. I have forgotten how wonderful that can be and my days have been more productive.

5.02.2013

Mothers Day Donation Digital Downloads

  Here are the latest Digital Downloads for Donations

 
My husbands cousin, Hunter, is a young man {14 years old} who loves his family and being a brother to an older and younger sister and one younger brother. He is very spirited and enjoys to play games and play jokes on people. At eighteen months old his Dr.'s diagnosed him with Cystic Fibrosis Pancreatitis, that causes him daily pain. He had to have a Total Pancreatectomy with Auto Islet Transplant, in short, that means a full day of surgeries. Check out his page on FaceBook to read more about his story.

Hunter and his mom were in Minnesota for a few months while Hunter had surgery and has been recovering. It has been a long road to recover, meanwhile, he has had multiple other surgeries do to complications and the bills are adding up. The surgery takes a year to recover and the family needs to raise money for medical expenses.

Hunter and his mom made the long drive home to Utah a couple weeks ago. As I have followed them, thinking about what Jen has done as a mother, well, very inspirational. Hunters family is doing what they can to help lift some of the financial burden for Hunters parents. Because we are in Connecticut we haven't been able to participate in the fundraiser dinners, benefit concerts or other activities I have come up with another way for us to help. For Mothers Day I have designed cupcake toppers and other printable pages that you can purchase, the money from this will go toward Hunters medical bills. I love these little tags because they can be used for so many different things: cupcakes, party favors, cards, scrapbook/memory albums, the list goes on.

Just go to my Donations tab, choose which set of tags you want, enter your donation amount then checkout. You will be emailed a link for an instant download. Come back again to check out my next Digital Downloads for Donations that will be available for Hunters fight.