Showing posts with label Crochet. Show all posts

3.24.2014

Tulip Stitch Baby Afghan

It has almost been a year since I posted about Lady A's Star Burst Crochet Stitch Blankie and it is time to share my latest one with you.


I am so excited. Lady #2 will be joining us in April so I got it done just in time. The yarn I like to use for the little ones is Caron Simply Soft Yarn because it is just that, nice and soft for their soft skin.

Like the Star Burst afghan I pulled a stitch from my go to book and turned it into an afghan again.


Since I only used three colors I was able to leave the different skeins attached instead of constantly cutting and re-attaching the next color with every row. For example, as I finished up the row of purple and would need to move onto white, I simple grabbed both yarn strands to create my chain. Then let go of the purple and carried on with the row of white.

When placing the grey binding around the sides where the two yarns were used to create the chain,  it was covered up nicely. So it was a win win!!

Does that make sense? I hope so. If not please leave me a comment and I'll try to re-explain it.


Items needed for this project:
'Handbook of Crochet Stitches' by Betty Barnden
Hook I/9-5.50MM 
Scissors
Colors used for this blanket.
White
Sunshine
Orchid
Grey Heather
{I used about 8 oz of the first three colors, so 1 1/3 skeins of each and just enough Grey Heather to go around for a binding} 

Good luck on your next project. Be sure to share with me if you decide to make one. I would love to see it.

2.06.2014

Project Crochet-a-Long for February

I noticed that a few of the ladies I follow are doing a crochet-a-long for the month of February and I thought this would be great to get in on. There are a couple of projects that I am wanting to get done {and soon} before Lady #2 gets here.
Hosted by Kim from 733blog
and Mandy from Sugar Bee Crafts

These ladies have all chosen some great projects to work on and I'm excited to see how they turn out.

Here are some of my past crochet projects and designs.
Star Burst Blankie
Cowl Scarf

For the #ProjectCrochet this month I need to do a blankie for Lady #2. I think I have finally decided on colors and a pattern, now to just buckle down and do it. I am going to make a floor pouf, boot cuffs and little booties ~ maybe a matching ones for big and little sister. I'll be making up these patterns as I go, if they work out I will be sharing them later when all the projects are done.

You can follow my progress on Facebook and Instagram.
Twin Dragonfly Designs

3.25.2013

Star Burst Crochet Stitch Blankie

Lady A has a blankie that she absolutely loves. This thing has been all over with us and the white yarn is more of a gray color now. I made her a new one but it was the wrong type of yarn, she used it a couple times but doesn't really cuddle with it like she does the original.


I found this Star Burst pattern on pinterest, loved it and so I wanted to give it a try. The stitch came from the 'Handbook of Crochet Stitches' by Betty Barnden. A very reasonable price for a book of 200 stitches. To make the stitches a bit more loose I used a hook one size larger than the suggested hook on the yarn packaging. I simply repeated the stitch until it was the width I wanted and just kept going, row after row, until it was done. Because I wanted the scallop to frame the entire blankie, once I finished the last row, I continued doing the same stitch pattern around the entire piece.

As I was going along with the stitch I noticed how similar this stitch was looking to one I had designed. I will share my stitch with you but you will have to get the handbook if you want the Star Burst stitch that I used for Lady A's blankie.


I got the yarn type right this time but it is super thick compared to her favorite one. Great for cuddling and keeping warm. Now I think I will move onto making one for the summer, a simple one that she can wrap around her like a shall or scarf, the same way she uses the one she has now.

Items needed for this project:
'Handbook of Crochet Stitches' by Betty Barnden
Hook I/9-5.50MM
Scissors
Colors used for this blanket.
White
Sunshine
Pistachio
Grey Heather
{I used one 6oz. skein of each}

Half Shell Stitch
Key:
CH ~ chain
ST ~ stitch
SC ~ single crochet
DC ~ double crochet
TOG ~ together (this is done like a decrease stitch but with more than just two stitches)
{} ~ from precious row
* ~ repeat

Foundation: ch st in multiples of 4, +1
Row 1: Skip 2 CH, *5 DC in next CH, skip 1 CH, 1 SC in next CH, skip 1 CH* end with 1 SC in last st, turn.
Row 2: 3 CH, skip SC, 2 DC TOG, * 2 CH, 1 SC in next DC {center of 5 dc}, 1 CH, 5 DC TOG {over 2 dc, 1 sc, 2 dc}* end 3 DC TOG {2 dc, 1 ch}, turn.
Row 3: 4 CH, 2 DC {in top of 3 dc tog}, *skip 1 CH, 1 SC {in sc}, 5 DC {top of 5 dc tog},* end 3 DC {top of 2 dc tog}.
Row 4: 2 CH, skip DC, *5 DC TOG {2 dc, 1 sc, 2 dc}, 2 CH, 1 DC {center of 5 dc}, 1 CH,* end 1 SC {in 4th of 4 ch}, turn.
Row 5: 1 CH, skip SC *skip 2 CH, 5 DC {top of 5 dc tog}, skip 1 CH, 1 SC {in sc},* end SC {first of 2 ch}.
Repeat row 2-5

9.21.2012

Baby Bear Beanie with Fuzzy Ears and Brim

I wish I had this little beanie finished when my little lady was born. How cute is that!?!?!


This soft and cozy Bear Beanie is an adorable finishing touch for your little ones outfit to out out on those chilly days. It's also a great photo prop, you won't be able to resist those round cheeks. This one fits up to 14 inches and is stretchy.

MATERIAL & CARE:
100% Super Soft Acrylic - Cap
98% Acrylic, 2% Polyester - Ears/Brim
CARE: Use gentle detergent, warm water. Pat dry, lay flat to re-shape and finish drying. Do not bleach or iron

If you want to order one for your little darling check out my shop here.

9.11.2012

Cowl Scarf Pattern ~ Simple

Fall is coming and what better time then know to get ready for the cooler weather!! You can never have too many scarfs so today I am going to share with you the simple cowl I made.

My brother likes to crochet his beanies for the slopes and over the summer he gave me a huge bag of yarn. That is where the yarn came for this pattern and unfortunately I don't know exactly what type of yarn I used, but I do believe it was some kind of baby soft yarn.

I wanted the cowl to have a loose, open feel with the stitches and for that I used a larger hook than what I am sure was recommended on the label.


Supplies:
Scissors
Hook of your choice {I used 'N'}
Yarn {I was using stuff given to me but I imagine it was about three {3} half skeins of yarn.}

Start with a chainless foundation stitch {cfs}. You can find the instructions here. This is a great stitch to use when starting a project, where using a simple chain stitch to start, will not give enough stretch.

RND 1: CA 200 cfs, sl st to first cfs to form ring.
RND 2: ch 2, dc in same st from previous row, *dc in next st,* repeat * 197 times, sl st to second sc of ch 2.
RND 3: CB ch 1, sc in same st from previous row, *sc in next st,* repeat * 197 times, sl st to ch 1.
RND 4: ch 2, dc in same st from previous row, *dc in next st,* repeat * 197 times, sl st to second sc of ch 2.
RND 5: CC ch 1, sc in same st from previous row, *sc in next st,* repeat * 197 times, sl st to ch 1.
RND 6: ch 2, dc in same st from previous row, *dc in next st,* repeat * 197 times, sl st to second sc of ch 2.
RND 7: CB ch 1, sc in same st from previous row, *sc in next st,* repeat * 197 times, sl st to ch 1.
RND 8: ch 2, dc in same st from previous row, *dc in next st,* repeat * 197 times, sl st to second sc of ch 2.
RND 9: ch 2, dc in same st from previous row, *dc in next st,* repeat * 197 times, sl st to second sc of ch 2.
RND 10: ch 2, dc in same st from previous row, *dc in next st,* repeat * 197 times, sl st to second sc of ch 2.
RND 11: ch 1, sc in same st from previous row, *sc in next st,* repeat * 197 times, sl st to ch 1.
RND 12: CC ch 2, dc in same st from previous row, *dc in next st,* repeat * 197 times, sl st to second sc of ch 2.
RND 13:  ch 1, sc in same st from previous row, *sc in next st,* repeat * 197 times, sl st to ch 1.
RND 14: CB ch 2, dc in same st from previous row, *dc in next st,* repeat * 197 times, sl st to second sc of ch 2.
RND 15:  ch 1, sc in same st from previous row, *sc in next st,* repeat * 197 times, sl st to ch 1.
RND 16: CA ch 2, dc in same st from previous row, *dc in next st,* repeat * 197 times, sl st to second sc of ch 2.
RND 17:  ch 1, sc in same st from previous row, *sc in next st,* repeat * 197 times, sl st to ch 1.
RND 18: ch 1, turn {now the inside of the scarf is outside and facing you}, *sc in next st,* repeat * 198 times, sl st to ch 1.
RND 19:  ch 1, *hdc in next st,* repeat * 198 times, sl st to ch 1. Finish.
The edges were curling and that is why I decided to do those last two rows. Now to do the same to the other edge.
Keep cowl turned inside out and attach yarn color of your choice to RND 1.
RND -1: ch 1, *sc in next st,* repeat * 198 times, sl st to ch 1.
RND -2:  ch 1, *hdc in next st,* repeat * 198 times, sl st to ch 1. Finish.

With this pattern it is simple enough to make it as thick or thin as you would like. Mine ended up being approx. 7" in width. I love that it is very light and definitely cozy enough and keeps me warm on walks when the even chill is in the air.

Next time I think I'll try to do a shawl that will wrap around my shoulders.

9.21.2011

Custom Order to Australia

This was a custom order that I did over the summer. How cool is that, my largest order so far is also my first international order too. She knew exactly what she wanted and was great to work with. Check out all the fun colors she chose for her family. If you would like to make a custom order go to my store {AlwaysBeCreating} and send me a convo.


11.04.2010

Cute Little Santa

Oh my goodness, I'm in love.

For the Holiday Season I decided that I wanted to try and make a Santa Hat. After looking on line I found a pattern that I thought would work. Boy was I wrong. I don't know if I misunderstood the pattern or if it was the pattern it's self but it was a NO GO. So instead I decided to design my own. I LOVE it! My neighbor was wonderful enough to let me take some pictures or her little boy with the hat on. He was going to stay asleep no matter what so we took some pictures anyways.


Look at how cute he is. I must say, I really like the Santa Hat too!

9.27.2010

Scarves ~ Four Fun New Styles

Game Day Scarf

With my husband in his last semester I have an overwhelming desire to attend a game before we leave. To attend the game I’ll need some game day attire. Well, here is a fun, flirty and warm scarf.

With this purchase you will receive a Game Day Scarf {approx. 100 inches} you choose the colors. Leave a note to seller at time of purchase and let me know what color you would like for your Game Day Scarf.

Alais Scarf

I have an afghan blanket made with this weave stitch and have been trying to figure it out for some time. Well I finally figured it out and thought it would be fun to make a scarf. It's a simple stitch but adds just enough character that this scarf can be worn with any outfit.

With this purchase you will receive a Alais Scarf {approx. 70" x 4 3/4"} in grey heather/sunshine or you can choose the colors. Leave a note to seller at time of purchase and let me know what color you would like for your Alais Scarf.

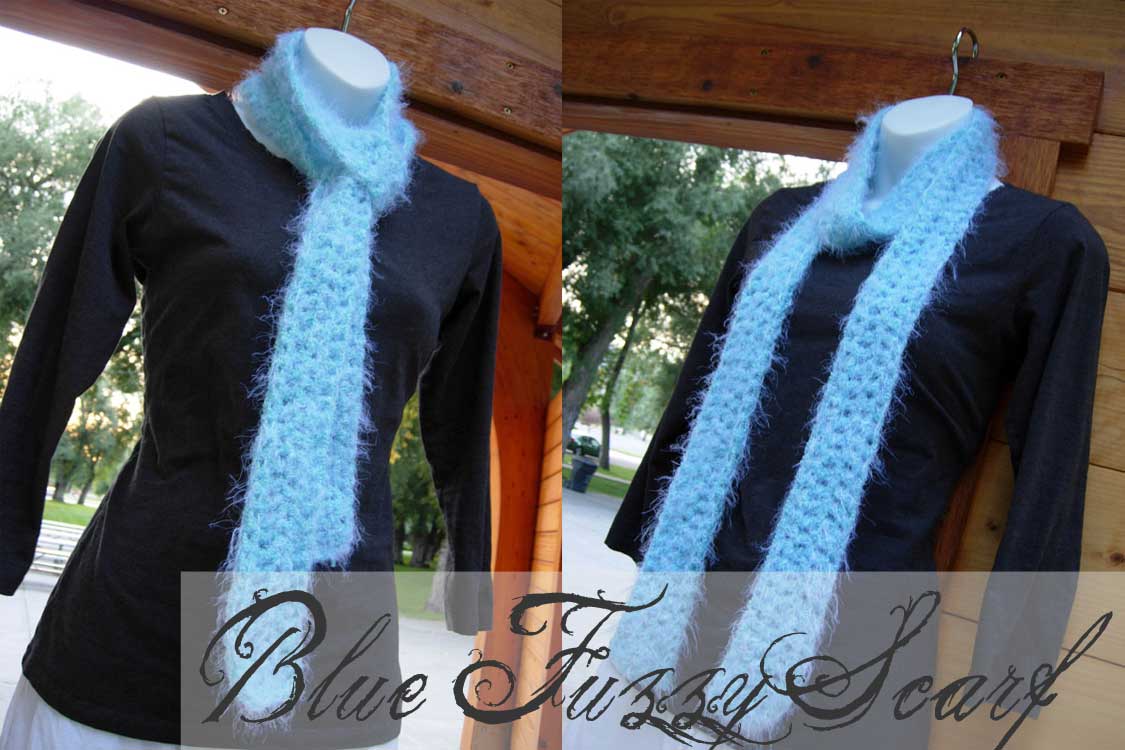
Blue Fuzzy Scarf

Oh so soft!! This yarn is so soft, it almost feels like it will just puddle in your hand, I love the feel of it up against my cheek. Long and slim this is the perfect accent piece and will make you feel oh so cozy as soon as you put it on.

With this purchase you will receive The Blue Fuzzy Scarf {approx. 74" x 2 1/2"} in soft blue.

Square Cluster Scarf

This is a fun cluster pattern that adds volume and character to the scarf. Oh so soft and warm and this is a great scarf for those colder days.

With this purchase you will receive a Square Cluster Scarf {approx. 82" x 3"} in regal earth. This yarn comes in a number of colors, if you are looking for a specific color send me an e-mail or leave me a note. I'll let you know if I have the color available to me and would be happy to do a custom order for you.

8.07.2010

Fall is Coming

I went into my local craft store the other day to look for a couple of items and all the fun fall items are out. I love the colors of fall, they are such warm colors that make you feel wrapped up in a nice cozy blanket. This inspired me to work on some fall projects.


I love these frames!!
They are so much fun to rearrange for every holiday.


The Black and White flower is the pattern that I designed.
I think the Green flower with the little bead in the middle turned out so great.

I am so excited I finally learned how to do flowers they are going on everything.

8.05.2010

My Perfect Flower

Well, I have been looking for a flower pattern to use and add to my beanies but I haven’t been able to find one that is what I am looking for. The ones I have found either don’t have a pattern or one that makes no sense to me. After playing around with a couple of patterns and understanding how a flower pattern works ~ I finally came up with my own. I love how it turned out. It works perfect with the beanies and I’m sure it will work great on the headbands. I have been thinking about using a giant button in the center or getting some beads and putting a cluster in the center.

What do you think?.....

7.20.2010

Organize

As I am sure you have gathered, I love to create things ~ easy, hard, simple, intricate ~ whatever it is, I always find a release in creating and designing. One thing I love to do is sew, it's one of those skills that my mom made sure we knew how to do growing up that has turned into a hobby. When I was in high school I designed clothes. The past couple of years the spark for quilting has been rekindled and someone can never have too many bags. For the past couple of years I have been designing patterns for the perfect bag. I have come to find that there is no 'perfect' bag, just a perfect bag for each situation.

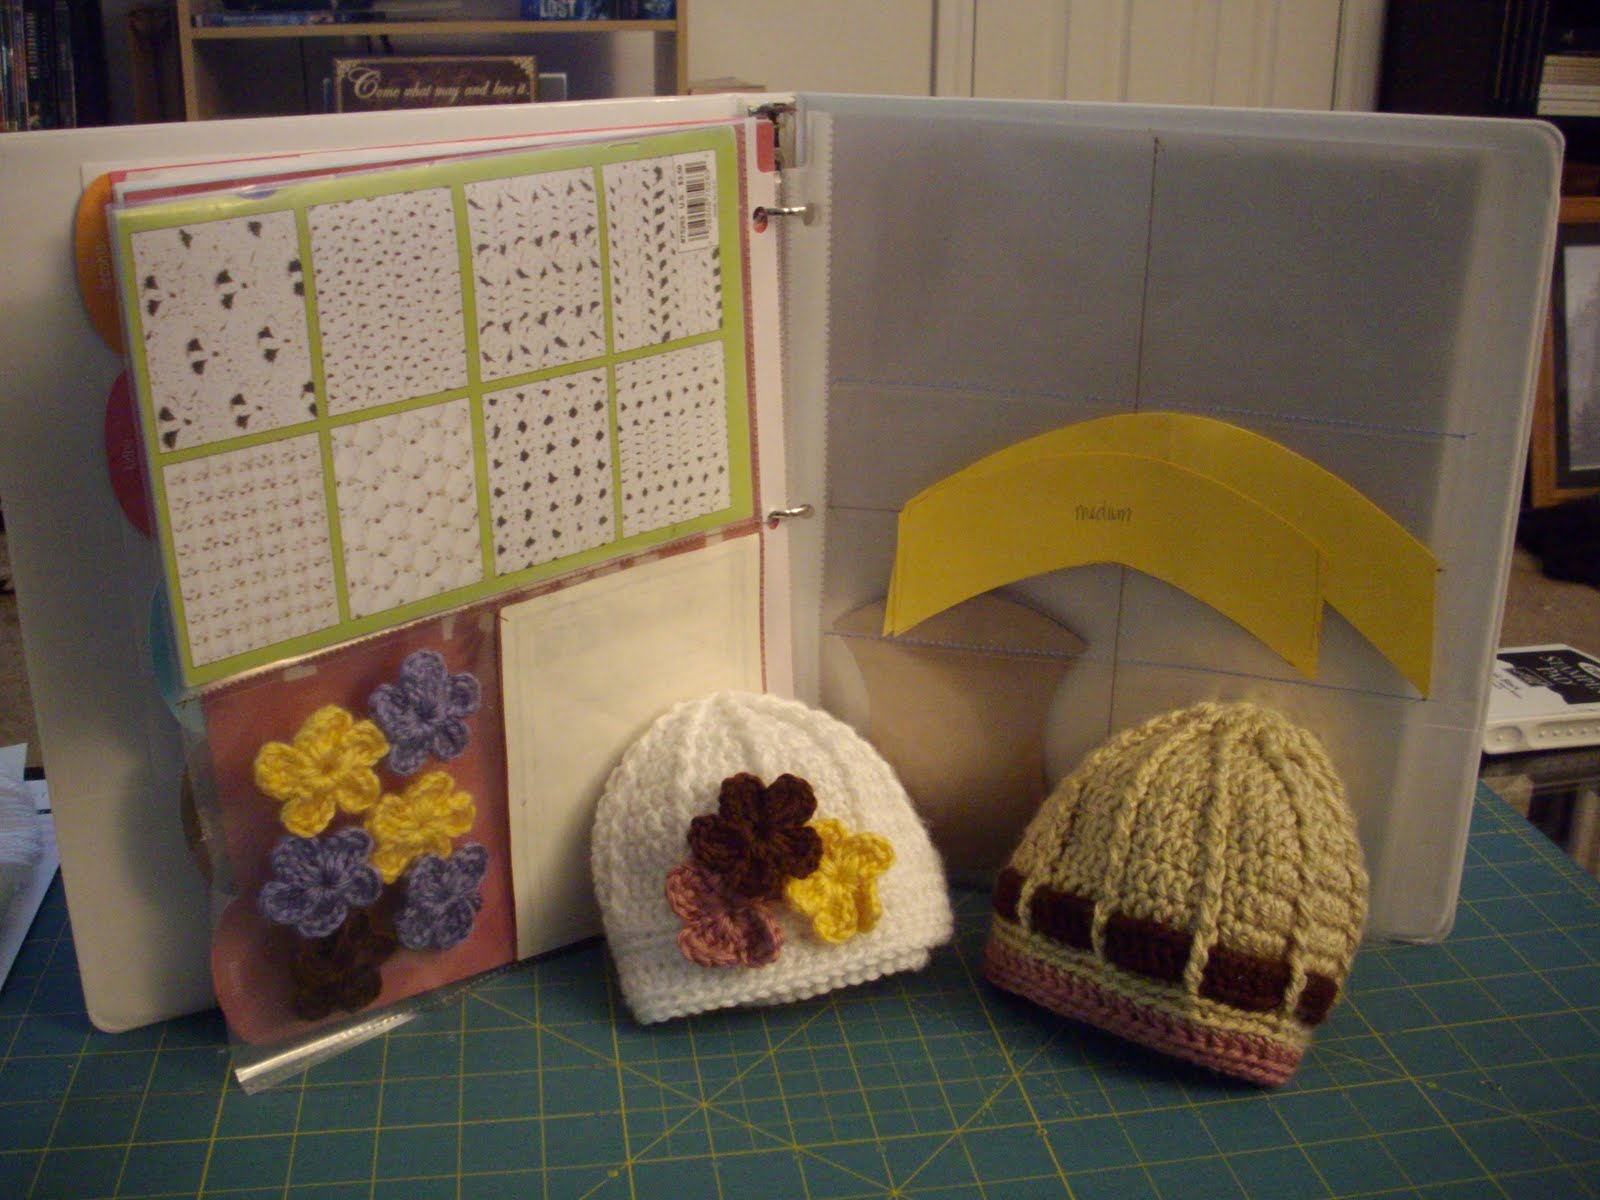
I have this small old binder that I have been putting my crocheting patterns in along with templates for quilts and other little nick-knacks. I was just using page protectors to toss everything in if I couldn't put a hole punch in to. It worked out pretty well to hold all those things and keep them in one spot. The only problem is that everything sinks to the bottom and the binder becomes lopsided.


How I fixed the problem was this. I took those page protectors and sewed pockets into them.

1st Step: take a thin piece of cardboard that fits into the page protector and draw a line on it as to where you want to make the pockets for the lower sections.


2nd Step: Take an exacto and cut along that line. {If you stitch before you cut the extra openings it hard to then cute it without going through the other side.}


3rd Step: When setting up my machine I put the length of the stitch to almost as long as it would go. If the stitches are too close together then as the needle goes through it will end up perferating the page protector and make it easier for it to tear along the stitches.

4th Step: Since the page protector is clear it was easy to look at the guides on my machine. If I was stitching where a cut was I left an 1/8th in seem allowance.


On the one's where I wanted to do a vertical stitch I took a piece of masking tape and placed it further in on the arm as my guide.


5th Step: Back stitching is out of the question, again, because we don't want to perforate the page protector to the point that it tears. I pulled both piece of thread to the back and simply tied them in a knot.


Final Step: Fill and stay organized!!! The binder has tabs that I have used to seperate the different types of mediums {for example crocheting and sewing}. These 'new' page protectors help me to keep my instructions and templates organized with everything else as well!!


I hope you enjoyed the tutorial.

As always ~ with every tutorial, if you like the idea but would rather purchase, leave me a comment. I'll set up a sale on my ETSY shop.

5.06.2010

Beanie Sale ~ 20% Off

Now that the weather is warming up,
{except up here where we are at}
we need to sale a bunch of the left over beanies from this last winter.
Every Beanie is 20% off.
Click on the banner to go to my store!

4.07.2010

With all the crocheting I have been doing lately to keep myself busy I have acquired a number of hooks ~ and I was misplacing them all the time. To help me stay more organized I made this little holder. I know my husband thinks I hold onto way to much stuff but you just never know when it will come in handy. The elastic is from a project I was working on ~ well, I won't tell you how long ago ~ but I could never bring myself to toss it. The two materials are from school. They were samples that were gathered to work on design projects but I never ended up using them, so I used them in a different way. All in all I think it turned out pretty handy and I haven't misplaced a hook since I made it.


4.02.2010

Coming Soon!!!

Ok, I know it has been awhile, but it has been crazy around here. Just last night I was over at my directors house ~ I am a beauty consultant for MK as well ~ and she had the cutest headband on with a flower. As we got talking I told her that I made beanies and found out that she made the headband and flower. I tried looking at some patterns for flowers ~ lets just say I am more of a visual learner instead of a pattern person when it comes to these flowers designs. Anyways, I am so excited, we are going to get together in the next little while so she can show me how she made the headbands and flowers and I will teach her how to make my beanies. I am so excited to finally learn how to do crocheted flowers, they will look so cute on the beanies.

Watch for them to come soon!!

11.08.2009

Spiral Two Toned Beanie - Child Teen Adult

Spiral Two Toned Beanie - Child Teen Adult

These beanies have been fun to make. There were two different patterns that I liked so I decided to pick the parts I wanted and put them together. They fit child, teen and adult. I love how they fit me and a younger girl (maybe elementary / Jr. High age) purchased one the other day, it fit her just a little big so it covered her whole head and her hair flipped out from under it. She loved it.

The last photo shows some of the available colors. If you have specific colors in mind but do not see them here convo me.

MATERIAL & CARE:
100% Acrylic - they don’t shrink, won't itch.
CARE: Machine wash, warm gentle cycle. Machine dry, low heat, delicate cycle.
INFO ON SIZE AND COLORS
..........................................
AVAILABLE SIZES:
0-3 months fits heads up to 14"
3-6 months = 15"-16"
6-12 months = 16"-17.5"
12-24 months = 17.5"-18.5"
2T-4T years = 18.5"-19.5"
5T-preteen years = 19.5" to 20.5"
Teens = 20.5"-22"
Adult = 22"-24"
~Larger adult sizes are available upon request
~Sizes in inches are approximate and will usually stretch larger

Color chart coming soon to help you pick your own custom color combination.

Note: Colors may vary slightly from picture due to current yarn dye lots and computer monitor projections.


8.18.2009

New Hobby

I was looking through some pictures of a friend and saw a really cute crocheted hat. I have not been able to find a job and the ones that are available my doctor told me I can't take since I would spend most of the time standing, I have recently had surgery on my foot. To help me fill my time I asked my friend for the pattern to her hat but there was no way I was going to be able to figure it out. The most I have done is really simple scarves with the basic stitch. So I sent the pattern to my Aunt to try and help me figure it out. That night, Friday, I decided that I should try to figure out some of the basics so that when I saw my Aunt on Sunday I would be able to better understand what she was talking about. From a website of free crochet patterns I found a beanie that looked pretty easy (the stripped one). A friend came over and we sat in front of the computer looking up stitches on YouTube to figure it out and by the time she left we both had a beanie. I made two more that weekend, but took one of them apart because I didn't like the way it turned out.

When I saw my Aunt last Sunday she showed me how to do the spiral using the front post stitch. Then I made the pink/brown beanie with the spiral using the basic pattern from the brown one but just changed it up a little bit. It has been really fun to figure this out and see the beanies take shape. Now I will need to make them every so often just so I do not forget everything I have learned.


LinkWithin

Related Posts with Thumbnails