Showing posts with label Silhouette Portrait. Show all posts

12.19.2015

Silhouette Ornaments


Remember that tutorial I shared on how to create a silhouette using Adobe PhotoShop? Well, now we are going to create a project with it.


Be sure to look over my tutorial on how to use Photoshop to create a Silhouette. Don't forget that Amazon has a free 30 trial that comes with access to their Creative Cloud. I am over the moon excited about how these turned out!!!

Ok, that is enough. Now to show you how I did it.


: : : : : : : : Material/Supplies : : : : : : : : 
Glass/Plastic clear ornament bulbs {I used the flat ones, the image stays better in them}
Printed image

: : : : : : : : Tools : : : : : : : : 
X-acto Knife {or scissors}

: : : : : : : : How To : : : : : : : : 
Once you have your silhouette created, open up a blank page in PhotoShop, bring the image over onto the new page and scale to a size that will fit within the clear ornament, mine are 3" bulbs. Create duplicates if you need them.


Print out on normal printer paper. 


Cut out the silhouette image.

Here is how I did it:
Mark on the circle cutter for the size you want {3"}. Place on the silhouette image then spin the tray to make sure the image is centered in your 3" diameter.

NOTE: I only moved the cutting wheel once I had it marked to take a photo and show you how it looked. Normally I would not move it because lining it back up takes too much time.


Cut the circle around the silhouette leaving a small section at the top. Take the x-acto knife {or scissors} and cut a 'neck' on top.
TIP: This will help keep the paper from rolling around in the bulb and keep the image upright instead of sideways.


Roll the cut out around the handle of the x-acto knife {or pencil}.
NOTE: I kept the image facing out because once it is placed in a bulb it will keep a little bit of a curl.

Stick the handle of the x-acto knife {or pencil} in and help to unroll and flatten the paper.


Use an ornament hook or ribbon to hang the bulbs.


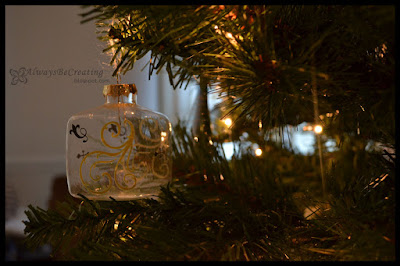
Sometimes simple really is easy and best. I love how these look on the tree, will treasure them forever and we are so excited to send some to grandparents as well.

I would love to hear from you and see your projects. Leave a comment or #AlwaysCreate on your photos in Instagram. Find me on Instagram {@AlwaysCreate} and follow along for behind the scenes.
Other Handmade Ornaments


Fast and simple ornaments


Pony Bed Ornaments

1.19.2015

Lady A's Birthday Party Bunting

Lady A. turned three a few months back, all she wanted was Princess everything. While I couldn't do everything, there were a few fun things I could do, and that was going to require my Silhouette. Yippy!!!

We couldn't have just any princess either, it had to be Princess Sophia! Which I don't mind. She is a cut little princess and a lot closer to my daughters age, dealing with the same stuff....friends, telling the truth, etc.

Bring on the purple!


First things first....we needed the invite. Check it out over here. So easy and we found some great images to use. I also like to send cards to family, even though we know they won't be able to come since we live too far away, but we want to make sure they feel included. With a digital card, since it was so last minute, I could just email it to them.

It would be fun if I had all the time and money needed to put on one of those perfect Pinterest parties that you see everyday, but I don't, so I do the best I can with what I have. We had just moved again and most everything was still in boxes.

Instead of having the perfect Pinterest party I sat back and reminded myself that this was for Lady A., not to keep up with someone else, not for me and she turned three, she was more excited to have friends over and make a mess then posing for photos.


Now for the bunting. I was going to hang it but LadyA. wanted it close enough to touch and show her friends so we taped it to the wall ... no biggie. Happy to please her with such a simple request.


I am going to break this up into two tutorials because this can get really long and involved. This one will explain what I did and the other will cover simple techniques and tricks on how to design in Illustrator for projects that will be transferred to Silhouette Studio once it is ready to cut. O.K. maybe three. The final one will give instructions on how to transfer your project from Illustrator to Silhouette Studio. I think simple, basic tutorials are better than one monster post that becomes too much to read and follow.


*This tutorial takes into consideration that you know how to work out certain steps. It is NOT for the beginner unless you,  like me, are willing to work out things on your own to help you learn. Trial and error are sometimes the best teacher.

MATERIALS/SUPPLIES
Cardstock to fit the size of your cutting machine {two different colors}
Silver Sharpie
Adhesive for the wall

TOOLS
Silhouette Machine or other cutting machine
Exacto Knife
Glue Stick

INSTRUCTIONS
Find an image of Princess Sophia's tiara to trace. When tracing or creating designs to cut I like to use Adobe Illustrator, it is what I am familiar with, I can do so much more in it and I already have it on my computer instead of paying for the design studio.

Trace the image making sure not to double and triple your lines. Trace only where there will be a cut. Since the tiara is symmetrical I did one side then mirrored it. I thickened the line to 4 pt so you could see exactly where I traced. In your project use a line thickness of 1 pt.


Now copy the shape as many times as you need for your bunting. Lady A's name is 7 letters long but two of the letters are used twice....hence 5 tiaras.

Decide on a letter, font and size, overlay it on the shapes until you have the look you want. Change the letters to 'outlines', remove the fill color and copy and paste a second set, then place them off to the side of your 'design board' or even on a different layer {lock it or hide it}**. Offset the the out lines to be a bit larger than the actual letter, this will give the illusion of a tracing or a thicker outline for your letter. You can see that I left the original letters in place so I could get a better sense of what the letters would look like once put all together. Then cut out overlapping lines to 'merge' the two images.


**If any changes need to be made to the letters doing it once they are outlines would be the perfect time, before the copy is made and placed to the side. I did not like the 'L' in the font I chose so I manipulated it until I was satisfied.

*You can also merge the shape with the letter once in Silhouette but keep in mind it will just do an over all exterior tracing, the interior detail will be lost.

Time to create your 'pages' that will be transferred to Silhouette Studio. I fit two of the tiara letters on a page then put all the original letters {the ones we copied and moved to the side of the 'design board'} on another page since I wanted them to be a different color. The font I chose also had interior detail so I deleted all that for the tiara alphabet outline. Then left it for the white alphabet so that the background purple would pop through.


Open in Silhouette Studio {Tutorial coming soon}

Cut out accordingly, assemble, add some bling {silver Sharpie, sticker gems would work great too} and wa-la!!

I used the Exacto knife to help cut out some of this tiny little accents inside the letters.


Yes, that was involved. But I LOVE how they turned out and so does Lady A. Three months later and we still have them up because she loves them so much.

5.05.2014

Canister Labels

The other day I went looking through my baking items and found one of my peppermint baking bars nibbled all up and down the sides. Breath. Do not freak out. Aahhhh!!

Naturally the next step is to re-organize the closet and put just about everything in a canister. 


I love creating designs in Silhouette Studio and this would be a great chance to see what I could come up with. As well, this would be my first time cutting vinyl. *So excited*

First thing is first: Deciding what will all go into canisters so I know how many labels to create and what size to make them.

Choose the colors: For Christmas we got a little bit of spending money from family and I told Paul it was time for a change in our kitchen decor and colors. The vinyl for the labels will match the new colors so well.

Items needed:
Canisters {purchased at Wal-Mart}
Vinyl in color{s} of choice
Clear Contact Paper
Small clear Omnigrid rulers
Cut file*

Tip: For something a little more worthy of the counter top check out this
I used the 2 1/2" x 2 1/2" square ruler from this Ruler Value Pack
 and the 1" x 6" ruler from this Basics Ruler Set

First wash the canisters. After they dry use rubbing alcohol to clean the surface where the vinyl will be placed. 

Design the labels or purchase a cutting file. Here is the label design* I came up with for my canisters. I love how they turned out and they were actually pretty easy to create. Give it a try, after seeing your first design come out you will be hooked.

Cut the design into the vinyl then weed out the parts that you will not be using. Since I am not a very avid cook I also have solid labels for the backs of the canisters and I will be putting the expiration dates on them to remind myself when it will be time to switch out the contents.. A dry erase marker can be used on the vinyl so this will work out perfect.


Tip: on some of my vinyl pieces that had a lot of negative space I cut a bunch of 3/8" circles so that Lady A could use them as stickers. We ended up using the green dots on a simple white bedroom clock. After we used the dots on our clock project I weeded out the rest so they would not get in the way of transferring the labels.


Tip: on smaller vinyl images and ones that are not to intricate I use normal clear contact paper that comes in a huge roll. While it is not as 'sticky' or as thick as transfer paper, it works great on these smaller projects and costs a lot less.

Bring the vinyl up with the clear contact paper. Then center on the clear ruler to the height that you want the label and let your clear contact paper stick to the ruler. Line up the ruler to the center of the canister and simply press the top of the label onto the canister, making sure to start from the center and smooth out the label so no air bubbles get trapped. Remove the ruler and press the rest of the label down, then remove the clear contact paper


It gets just a little bit trickier when placing the labels with words. If the lettering lays over the clear ruler at all they will want to stick to the ruler. Expose the bottom of the label so that it can still be lined up on the ruler. Leave the vinyl baking where the lettering is. Follow the same process as above for centering and placing the labels but be sure to remove the vinyl baking when the ruler is removed.

Finish pressing/laying the vinyl into place and remover the clear contact paper.


TaDa!! Nice wonderful canisters labeled and ready to go in the closet.
The colors turned out great as well and will match the rest of the kitchen. 
*Eeek*


If you have a Silhouette machine but are maybe a bit intimidated by it like I was {this is my first electronic cutter of any kind} I would suggest watching the introduction DVD that comes along with it. Seriously, it helped me so much, with just enough instruction on how to use it and a lot of the different features ~ now there has been no stopping me.

*Download files are not to be sold, redistributed, or altered without permission. Items using this cut pattern are not to be sold. Please send your friends and family to my blog if they want a copy as well. Thanks! I am excited to see what everyone come up with.

4.18.2014

Sharpie Marker Easter Plate

Do you remember me sharing on Instagram that I keep some designs that would normally be weeded out on transfer paper until I can use them in another project? Well, that is what I did with this bunny.


It is time to try the hot trend of a Sharpie Marker on a dollar store dish...again. I have tried this over and over again and all those claims of the dishes being dishwasher safe and the marker is permanent ~ well, that has never been the case for me. Just using dish soap and water has always taken the Sharpie marker off. Here goes another attempt.

I used the bunny silhouette saved from my Peter Cottontail burlap decor piece to create this plate. Originally I was going to use a couple different colors but ultimately decided to go with straight black on white. Remember, the dollar store dishes {or cheaper dishes from Wal-Mart and other stores} will work best because the glaze on them is thinner and will help in the baking process.


Use rubbing alcohol and a cotton ball, wipe down the dish to clean and remove any dust or oils.

Because this image used a pom-pom for the tail I had to improvise and find something to create a tail. Lady A loves stickers and we have a few of these sticker packets on hand for her. So I used one that  looked like it was the right size...and am pretty pleased with myself for my quick improvisation.

Now take the Sharpie marker and start dotting around the image.


Bake the dish in the oven by placing it on a cookie tray. With your dish in the oven set it to 425 degrees, once the temperature is reached bake it for 30 minutes. Let the oven cool and prop the oven door open with the dish still in it. 

Letting the dish warm up and cool down with the oven will help to keep the shock of the temperature changes from cracking the dishes. One of the perks is that the paper stickers on the bottom of the dishes were baked off so I didn't have to put any effort into removing them.


I love how this turned out! It will be fun to bring it out year after year and remind us of this time in our lives, as we wait for Lady #2 to join our family, as our lives change with Paul graduating and we get ready to move. We have a lot going on this Spring.


***MY IMAGE STAYED AFTER WASHING***

I attribute it mostly to the higher baking temperature, every tutorial I read said to bake at 350. It should also be noted by washing I mean with warm water, a washcloth and soap and no scrubbing ~ just lightly going over the surface to wash it off.

Tips from this project:
  • Rubbing alcohol will help the marker make better contact to the dish.
  • I called Sharpie and they do not recommend using dishes with this Sharpie technique for food or drink. The markers are not food safe according to the USDA.
  • An acrylic spray can be used to cover the dish and will help keep the images from fading or washing away {remember not to use the dish for food with an acrylic coating}.
Check out my Peter Cottontail  post for the Silhouette Studio file where you can find this bunny.

4.17.2014

Peter Cottontail Framed Easter Decor

I loved using the burlap panels from Micheal's Craft Store when I created my Valentine sign I used them again to create some Easter Decor.

First I designed my vinyl cutout in Adobe Illustrator {I am more familiar with that program and feel like I can do more using it, including creating this cute bunny silhouette} then transferred it over to Silhouette Studio so I could cut the vinyl using my Portrait.

Here is what you will need to create this burlap sign:
Burlap panel
Paint in your choice of color {one or more}
Sponge brushes
Vinyl to cut & Transfer paper
Silhouette cutting machine
Silhouette Studio File {a .Studio3 file}
Frame
Hot Glue


First weed out the image from the vinyl after it has been cut. Then use transfer paper to set the vinyl onto your burlap panel. 

I tested a couple of colors on the back of the burlap to see which I liked best and decided to go with the blue for text and white for everything else.


The white paint is Liquitex and I love it because it is a thicker paint so not as many coats are needed. but it is more expensive so I only have it in a few colors. The pastel blue is Craft Smart, a normal satin acrylic paint. I ended up doing two coats of white because when the first coat dried too much of the burlap brown color was coming through. The blue I did 3-4 coats because it was being absorbed into the burlap more so I needed to try and make it thicker.

After the paint has time to fully dry remove the vinyl and be sure to add a pom-pom to Peter Cottontail.


Originally I was planning on spray painting the frame white but it has been raining non stop and since I have a toddler at home and am 39 weeks pregnant, spraying in the bathroom and just turning on the fan was not an option :)


I love the blue color but with the vinyl removed it does not stand out as much as I was hoping. I'll see how I like if over the next few days and if I need to, figure out some way to change it just a bit. 

Here are some of my tips and tricks for painting on burlap using a vinyl stencil:
  • The font used in this project is Harrington, it is one that was already on the computer.
  • When using transfer paper do not worry about sticking the vinyl image to firmly to the transfer paper. Since the burlap surface is not the best surface for sticking vinyl to, it will come up with the transfer paper instead of staying on the burlap.
  • Go over the edges of the vinyl with your finger. This will help create a bond to keep the paint from seeping under the vinyl.
  • Dab, do not brush. This helps keep the paint from going under the vinyl, keeps the woven texture of the burlap and gets paint into all the crevasses.
Other projects using burlap:
I Love You Because...

LinkWithin

Related Posts with Thumbnails