Showing posts with label Image Transfer. Show all posts

11.18.2015

Create a Silhouette of Your Kiddo Using Photoshop

I have wanted to try creating silhouettes of my girls and this is what I came up with.

I remember doing these as kids. We would place a flashlight on the edge of a counter or chair, stand in front of it to cast our profile onto a paper hanging on the wall. Then someone would trace our shadow, it was not a perfect system. Depending on how close you were to the flash light your silhouette could end up pretty big, too far away and it would be smaller but fuzzy and some detail would be lost.


One day I was working at the desk and I caught a glimpse of LadyA with her cute pony tail. That's it! I'll do a silhouette for her, she will love it, we can even use it for Christmas ornaments. And she did!

There are a lot of ways to go about creating a silhouette. Here is how I did it on my computer with Photoshop. I am by no means a top expert but I am excited to share with you some of the techniques and keyboard shortcuts I use.

Did you know that Amazon has a section for Subscription Software? I know, I had no idea either!! Right now they have a free 30 day subscription for Adobe Photoshop then you can go month to month or do a 12 month subscription.

Warning: this project could take a little bit longer than you think as you follow along the first time, but then you will be a professional and can wiz through making the next ones, just like when I thought you how to bring a cut file from Adobe Illustrator into Silhouette Studio.

Alright, here it is. This might be a bit long but I am trying to be VERY thorough.

: : : : : : : : How To : : : : : : : : 

1. Once the kiddo has their hair done and a shirt on {if you want a collar at the base of their neck} have them stand in front of a contrasting background. Our backdrop was a yellow set of drapes, the light coming in helped create a good contrast. The problem area was the end of the ponytail and the moving boxes but the rest of the image has a great contrast.
   

2. Upload and open the image in Photoshop.
Change the levels of the image.
Go to: --> Image --> Adjustments --> Levels
Use the Input Levels grid to play with the contrast of the your image by moving the black and white levels to the middle until you like the contrast achieved.
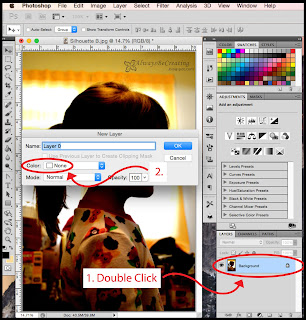

NOTE: At some point you will need to unlock the photo layer. Double click on the layer, set color to 'None' and click ok. This will allow parts that need to be deleted, to be completely removed instead of just changing it to an overall color wash.


3. Change the image to Black & White.
Go to: --> Image --> Adjustments --> Black & White.
Change the different levels until you get a good contrast. I changed the yellow because of the drapes and red to increase the contrast with her skin.


4. Now use a combination of the Rectangular Marquee Tool and the Magic Wand Tool to select all the background image that is not needed.

*First use the Rectangular Marquee Tool to select the big parts of the image that will be deleted.

*Now use the Magic Wand Tool and click around the image to finish selecting background. This helps to select items with odd shaped edges, ie: around the face and hair.

NOTE: After making the first initial selection with the Rectangular Marquee Tool, hold down 'shift' on the keyboard. This will allow you to add more to the original selection.

NOTE: If you select something that you do not want selected {which can easily happen using the Magic Wand}, release the 'shift' key and press CTRL Z to undo your last step. Then press 'shift' again to continue selecting the background.


5. It's time to fine tune the selection. At the bottom of the toolbar click the Edit Mode button. I like this to help fine tune my selections. Using the Paintbrush with either black or white {change the size of the brush stroke up at the top left side of your screen or I use the '[' and ']' on the keyboard to decrease or increase the size of the brush.

When white is being used, anything you click on will clear the pink away. If black is being used than anything you click on will appear in pink.

Click on the Edit Mode button from the side tool bar to go back to the Standard Mode.


6. Click the 'delete' button on the keyboard and everything that is selected will be removed. Then turn off the selection by clicking CTRL D on the keyboard.

Use the move arrow to move the silhouette if you would like to where you want it on the page.

Create a new layer and move to the bottom of layers.
--> Over on the layers tool box is a little button on the bottom to create a new layer then just drag the new layer to the bottom of the stack.

NOTE: Because the photo layer is unlocked, the background will be completely cleared. This will allow you to do some other edits but we will not get into them right now.

Use the paint bucket to drop white {or color of your choice} into the bottom layer.

NOTE: Make sure you have selected the correct layer that you want to work on to finish the project.


7. Create a new layer. Make sure it is the top layer.

While on the original image layer use the Magic Wand to select the empty space around the silhouette image. Then change the selection to the inverse.
Go to: --> Select --> Inverse

Switch to top layer, use the paint bucket and black {or color of your choice} to drop black into the selected silhouette space.

Deselect silhouette.

Now you can go in with the eraser or paintbrush and help fine tune any areas that might need it.


Now you are done!!


When I save my files for a project like this I will save it as a .jpg to print as well as a PSD. The PSD file will keep the different layers and then I can go in and try different things on it if I want to, such as adding text, color, etc.

NOTE: Be sure to save your image as you go along so that you won't loose any of the work you have already done.

Don't forget to stop by Amazon to check out their Subscription Software and get a free 30 day trial of Photoshop.

The great thing about doing this project digitally is that you can use the silhouette in so many different ways. Share your silhouette project with me in Instagram. Be sure to tag me in your post and add #PhotoShopSilhouette.

5.21.2013

Image Transfer Onto Fabric Using a Gel Medium

 How great did these images turn out?!?
I love them!

These were super easy but will take time because they need to set overnight.

Image transfer tutorial: Using a gel medium to transfer an image onto fabric.

Materials Needed:
Image printed on a laser printer {or a magazine clipping}
Fabric {Plexiglas, stretched canvas boards, pieces of wood}
Gel Medium {I used non-water based acrylic paint and modeling paste}
Sponge brush 
Scissors
Wax Paper
Tape
Water Spray Bottle
Towel
Acrylic Coating Spray {oops, not in the photo}


Cut out the images. Cut fabric pieces to size. Mine are approx 6" x 9".

*To prepare the image I added some text "I love you because..." then flipped it to print. I use Photo Shop but this can also be done in Picasa and most photo editing programs available. If your image doesn't have a right/wrong way, skip this step and just print your image.


To prep the area, tape a piece of wax paper down then tape the fabric on top of the wax paper. The Acrylic Paint spreads easily but the Modeling Paste stays pretty thick. To help know exactly where to apply the gel so to be able to work fast enough before it started to dry, place tick marks to help know exactly how big of an area to apply to the fabric.

*The wax paper is used to keep any of the gel medium from getting onto the table as it might soak through the fabric.


Apply the gel medium to the fabric then immediately place the image face down and press with fingers to make sure that the entire image presses into the gel medium. 

Be sure to press the edges down, excess gel medium will press out from underneath the image.

Before moving onto the next step, be sure that the gel medium has time to dry completely. I recommend letting it set over night.


Now grab your water bottle {or bowl with water and sponge to apply water to image}, towel and photo.

1 ~ Get the paper wet. {I let it sit for about 30 seconds or so, this will help the paper soften up}
2-3 ~ Start rubbing the paper with your finger tips. It will ball up and rub off. {You will have to keep the paper wet as you go}
4 ~ Every once in a while I would dab the image with the towel to get the paper residue off and see how well the image is coming along. {Using an image with so much white takes a little bit more care since it will blend with the white background of the gel medium, so...be careful not to rub too much}

Repeat until all the paper has been rubbed off the image.

*The image looks great while it is still a bit damp but as it dries, any paper residue left behind will become very noticeable.

Use a coating over the image. This will put a nice finish on the image and get rid of the paper residue look. I used an Acrylic Coating gloss finish in a spray can but something like Mod Podge would work as well.

I love how these images turned out! Eeek!

For the B/W image I used the Acrylic Paint. This gave the image a soft aged look. Photo by Michelle Andersen Photography. Photo courtesy of Adiel.


For the coloured image I used the Modeling Paste. It dries a bit faster and in those spots the image lifts up when taking the paper off. The over all image, however, stays more crisp so it is ideal for images with a lot of detail. Photo courtesy of Manda Jane Photography

Go Create!
~Mindy

4.30.2013

Image Transfer Using Acrylic Paint


I have been working on different techniques for transferring images and finally got this one perfected to the way I wanted it....so now, it's time to share with you friends.

Materials Needed:
Image printed on a laser printer {or a magazine clipping}
Plexiglas {fabric, stretched canvas boards, pieces of wood}
Acrylic Paint {non-water based}
Sponge brush 
Scissors
Water Spray Bottle
Acrylic Coating Spray

To prepare the image I added some text "I love you because..." then flipped it to print. I use Photo Shop but this can also be done in Picasa and most photo editing programs available. If your image doesn't have a right/wrong way skip this step and just print your image.

To make sure I got the image centered right where I want it. I placed the Plexiglas over the image, traced around it then cut the image.

I used a piece of Plexiglas to transfer my image onto for this specific project. These are pieces left over from another project but a small stretched canvas panel would work just as well. To get the Plexiglas prepped, simply take the plastic off of one side or clean the surface with a cloth and glass cleaner if the plastic was removed previous.


Put some acrylic on surface, use the brush to spread the acrylic. While paint is still wet place the image face down and smooth out making sure to get out any air bubbles so the entire image is pressed into the paint.

*Make sure you get a non-water based acrylic paint or gel medium.


LET IT SET OVER NIGHT!!
Make sure the paint has had plenty of time to dry.


Now grab your water bottle {or bowl with water and sponge to apply water to image}, towel and photo.

1 ~ Get the paper wet. {I let it sit for about 30 seconds or so, this will help the paper soften up}
2 ~ Start rubbing the paper with your finger tips. It will ball up and rub off. {You will have to keep the paper wet as you go}
3 ~ Everyone once in a while I would dab the image with the towel to get the paper residue off and see how well the image is coming along. {Using an image with so much white takes a little bit more care since it will blend with the acrylic paint, so...be careful not to rub too much}
*Repeat until all the paper has been rubbed off the image.


Once the image is dry take it out and spray with Acrylic Coating Spray. {Mod Podge will work great as a top coat as well}
*The clear coat will help protect the image since it is not going to be placed behind a piece of glass in a frame. It also helped the image pop out a bit and made it nice and crisp.


photo courtesy of Manda Jane Photography


Check out the steps to the Antique Frame that will be going with this image.


*I tried using this same image transfer technique with an Ink Jet image and it didn't work as well. Most of the image came up when rubbing the paper off and my fingers were blue for about a day and a half. Using an ink jet image might work well for an abstract project, where it doesn't need to be crisp.

3.08.2013

St. Paddy's Day Pillow

The truth: the pillow form tutorial came about because I already had a purpose for it, my St. Paddy's Day Pillow. NOW I can create as many covers as I want and just switch them out.

This Tutorial is two-fold today. First is the pillow cover design and tutorial and second is the image transfer. 


Pillow cover
Items needed:
Material of your choice
Flannel
Felt: Green and Fuchsia {one of each}
Text and Shamrock transferred onto material {transfer using nail polish remover}
Thread to match material {or felt}
Pins


First thing is first, everything needs to be cut out.
Material for pillow cover: One {1} piece: 15 1/2" {inches} x 10 1/2" {inches}
Two {2} pieces: 10 1/2" x 10 1/2"
Fuchsia Felt: One {1} piece: 2" x 9"
Image Transfers and Flannel: Place the transfer imaged material on top of flannel then cut out, this will help ensure that the pieces are cut to the same size. For mine I cut the material to leave 1/2" around the text and image. Making my pieces approx.:
'Lucky' 2 5/8" x 7 1/2",
'IN' 2 5/8" x 1 3/4",
Shamrock 4 1/2" x 4 7/8"
L V E letters: You can find a font you like, print them out then use that as a stancil to cut the letters out of the felt. I wanted very simple letters and it was faster for me to come up with my own then look through a bunch of fonts. Each letter is approx.: 2 1/2" x 4"

On the front piece of the pillow cover lay down the cut outs how you would best like.
*Remember that you will loose 1/4" on each side for seem allowance.


Pin down 'Lucky,' the fuchsia felt piece, 'IN' and the shamrock. I wanted the thread to match my pillow case colour and like how it stands out against the felt pieces. Sew approx 1/8" from the edges. Go around 'Lucky' and the shamrock. Sew a square on the top and bottom of the fuchsia felt and then around 'IN.'
*When the edges of the material start to fray, the flannel placed under the material with the transfers will fray as well and make it look more full instead of scraggly.


Now place and pin the L, V and E.
*Remember that when you need to pivot on a corner, leave the needle down before you lift the foot, this will help keep everything in place and lined up.
{Can you spot my mistake? I hate having to redo something because of simple mistakes. Argh! However, because of the mistake I figured a better order to attach the pieces on the cover, so the pictures are just a smidgen off of the tutorial.}


For the two back pieces, along one edge fold a crease at 3/4" and then at 1 3/4" so the material will fold in on the wrong side {just like your pant hem}. Fold twice on the creases and sew hem down. I sewed mine at 7/8" so it would be close to the fold on the inside.


Lay the front piece of the pillow case cover right side up. Place the back pieces right side down so that the hems are in the center and over lap while the edges match up with the front piece. Pin all the pieces together and sew with a 1/4' seem. When you get all the way back to where you started, lift the sewing foot and move the pillow case over slightly so that you can go around the pillow case using the zig-zag stitch.
*With the pieces over lapping in the back and the pillow being a bit longer for how short it is, there is no need for ties or buttons in the back. It will stay closed really well on it's own.


With the opening in the back be sure to sew all the way around the pillow case. Turn the pillow case right side out and make sure the corners are pushed out. Now stuff your pillow in there and watch your own handy work bring a bit of seasonal cheer to your room


My little girl loves it too! It's just the perfect size for her.

Get Creating!
~Mindy

3.07.2013

Image Transfer

I love playing around with photos and so I thought I would do a series on transferring images to different surfaces and share my findings with you {the good and the bad}.

Materials Needed:
Words and Shamrock PDF printed on a laser printer {download here or come up with your own}
Material {cotton works great}
Nail polish remover {not just any, look further down to see my explanation}
Sponge brush
Spoon


*Remember this will be a worn or vintage look, the transfer won't be crisp. It is best done with monotone images or images that don't have a great deal of detail.

Cut the image out leaving as much white space around it as possible.


Lay down an extra piece of cardstock, cardboard or anything you might have laying around, secure it with tape. Place the material on the cardstock face up {make sure it is flat and tight, secure it with tape} then place the text or image face down in desired location and secure it with tape.}
*From my material I cut pieces a bit larger than I knew I would want them and placed my text or image in the center. This would give me a bit of extra wiggle room and allow me to cut down to size.


With sponge brush or cotton ball apply a generous amount of nail polish remover to the paper over the text or image.
*Instead of covering the hole text or image at once, I did it one letter at a time. This way I could keep up with the nail polish remover before it dried.
*You can see in my image I used the Wal-mart brand nail polish remover, nothing too fancy or expensive. But I did find that the 'Regular' didn't work, it was the 'Strengthening' that ended up working like a champ. There are two extra ingredients listed, they are: benzophenone-1 and propylene glycol.


With the back of the spoon press and rub firmly across the text or image. The paper and material will shift so use your other hand to hold them firmly as they start to shift.
*Tip: You are applying a liquid to paper so try to work fast, don't take a brake in the middle of a section. Too much liquid and too much rubbing will dissolve/tear the paper and you'll have to start over. Too much rubbing will also cause the paper to be 'ground' into the material and leave paper behind with transfer. If this happens let the transfer sit and completely dry, then use a towel to get the paper residue wet and rub away with your finger. DON'T press hard or you will lift up the text/image transfer too.


*Tip: I had to repeat these last two steps a couple of times for every section of the text or image. Check  your transfer by lifting up one section of the tape and pulling the paper away from the material.


Once you are happy with your results, take the paper completely off.

I found that the larger the image, the more vintage it looked. Working with a smaller area, like the word 'IN' from my tutorial, it is easier to get most of the image to transfer and be a bit more crisp.

I am so excited about how it turned out. I think the text worked a lot better than the larger shamrock.

Check back to see the final project I use these image transfers for.

LinkWithin

Related Posts with Thumbnails