I have wanted to try creating silhouettes of my girls and this is what I came up with.
I remember doing these as kids. We would place a flashlight on the edge of a counter or chair, stand in front of it to cast our profile onto a paper hanging on the wall. Then someone would trace our shadow, it was not a perfect system. Depending on how close you were to the flash light your silhouette could end up pretty big, too far away and it would be smaller but fuzzy and some detail would be lost.

One day I was working at the desk and I caught a glimpse of LadyA with her cute pony tail. That's it! I'll do a silhouette for her, she will love it, we can even use it for Christmas ornaments. And she did!
There are a lot of ways to go about creating a silhouette. Here is how I did it on my computer with Photoshop. I am by no means a top expert but I am excited to share with you some of the techniques and keyboard shortcuts I use.
Did you know that Amazon has a section for Subscription Software? I know, I had no idea either!! Right now they have a free 30 day subscription for Adobe Photoshop then you can go month to month or do a 12 month subscription.
Warning: this project could take a little bit longer than you think as you follow along the first time, but then you will be a professional and can wiz through making the next ones, just like when I thought you how to bring a cut file from Adobe Illustrator into Silhouette Studio.
Alright, here it is. This might be a bit long but I am trying to be VERY thorough.
: : : : : : : : How To : : : : : : : :
1. Once the kiddo has their hair done and a shirt on {if you want a collar at the base of their neck} have them stand in front of a contrasting background. Our backdrop was a yellow set of drapes, the light coming in helped create a good contrast. The problem area was the end of the ponytail and the moving boxes but the rest of the image has a great contrast.


2. Upload and open the image in Photoshop.
Change the levels of the image.
Go to: --> Image --> Adjustments --> Levels
Use the Input Levels grid to play with the contrast of the your image by moving the black and white levels to the middle until you like the contrast achieved.
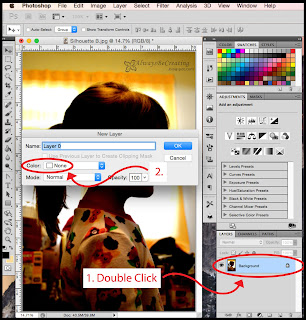
NOTE: At some point you will need to unlock the photo layer. Double click on the layer, set color to 'None' and click ok. This will allow parts that need to be deleted, to be completely removed instead of just changing it to an overall color wash.

3. Change the image to Black & White.
Go to: --> Image --> Adjustments --> Black & White.
Change the different levels until you get a good contrast. I changed the yellow because of the drapes and red to increase the contrast with her skin.

4. Now use a combination of the Rectangular Marquee Tool and the Magic Wand Tool to select all the background image that is not needed.


Go to: --> Image --> Adjustments --> Black & White.
Change the different levels until you get a good contrast. I changed the yellow because of the drapes and red to increase the contrast with her skin.

*First use the Rectangular Marquee Tool to select the big parts of the image that will be deleted.
*Now use the Magic Wand Tool and click around the image to finish selecting background. This helps to select items with odd shaped edges, ie: around the face and hair.
*Now use the Magic Wand Tool and click around the image to finish selecting background. This helps to select items with odd shaped edges, ie: around the face and hair.
NOTE: After making the first initial selection with the Rectangular Marquee Tool, hold down 'shift' on the keyboard. This will allow you to add more to the original selection.
NOTE: If you select something that you do not want selected {which can easily happen using the Magic Wand}, release the 'shift' key and press CTRL Z to undo your last step. Then press 'shift' again to continue selecting the background.


When white is being used, anything you click on will clear the pink away. If black is being used than anything you click on will appear in pink.
Click on the Edit Mode button from the side tool bar to go back to the Standard Mode.

Use the move arrow to move the silhouette if you would like to where you want it on the page.
Create a new layer and move to the bottom of layers.
--> Over on the layers tool box is a little button on the bottom to create a new layer then just drag the new layer to the bottom of the stack.
NOTE: Because the photo layer is unlocked, the background will be completely cleared. This will allow you to do some other edits but we will not get into them right now.
Use the paint bucket to drop white {or color of your choice} into the bottom layer.
NOTE: Make sure you have selected the correct layer that you want to work on to finish the project.

NOTE: Make sure you have selected the correct layer that you want to work on to finish the project.

7. Create a new layer. Make sure it is the top layer.
While on the original image layer use the Magic Wand to select the empty space around the silhouette image. Then change the selection to the inverse.
Go to: --> Select --> Inverse
Switch to top layer, use the paint bucket and black {or color of your choice} to drop black into the selected silhouette space.
Deselect silhouette.
Now you can go in with the eraser or paintbrush and help fine tune any areas that might need it.

Now you are done!!

NOTE: Be sure to save your image as you go along so that you won't loose any of the work you have already done.
Don't forget to stop by Amazon to check out their Subscription Software and get a free 30 day trial of Photoshop.
The great thing about doing this project digitally is that you can use the silhouette in so many different ways. Share your silhouette project with me in Instagram. Be sure to tag me in your post and add #PhotoShopSilhouette.
Don't forget to stop by Amazon to check out their Subscription Software and get a free 30 day trial of Photoshop.
The great thing about doing this project digitally is that you can use the silhouette in so many different ways. Share your silhouette project with me in Instagram. Be sure to tag me in your post and add #PhotoShopSilhouette.