Showing posts with label Sewing. Show all posts

3.17.2014

Burp Cloths out of Cloth Diapers ~ Tutorial

These burp cloths are the best. Since they are made from cloth diapers they are SUPER absorbent. But carrying around a cloth diaper is not all that cute so we dress them up with a bit of fabric and ribbon.

What you need:
Cloth diapers
Ribbon
Fabric Scraps
Rotary Cutter and Board {or Scissors}
Sewing Machine
Thread

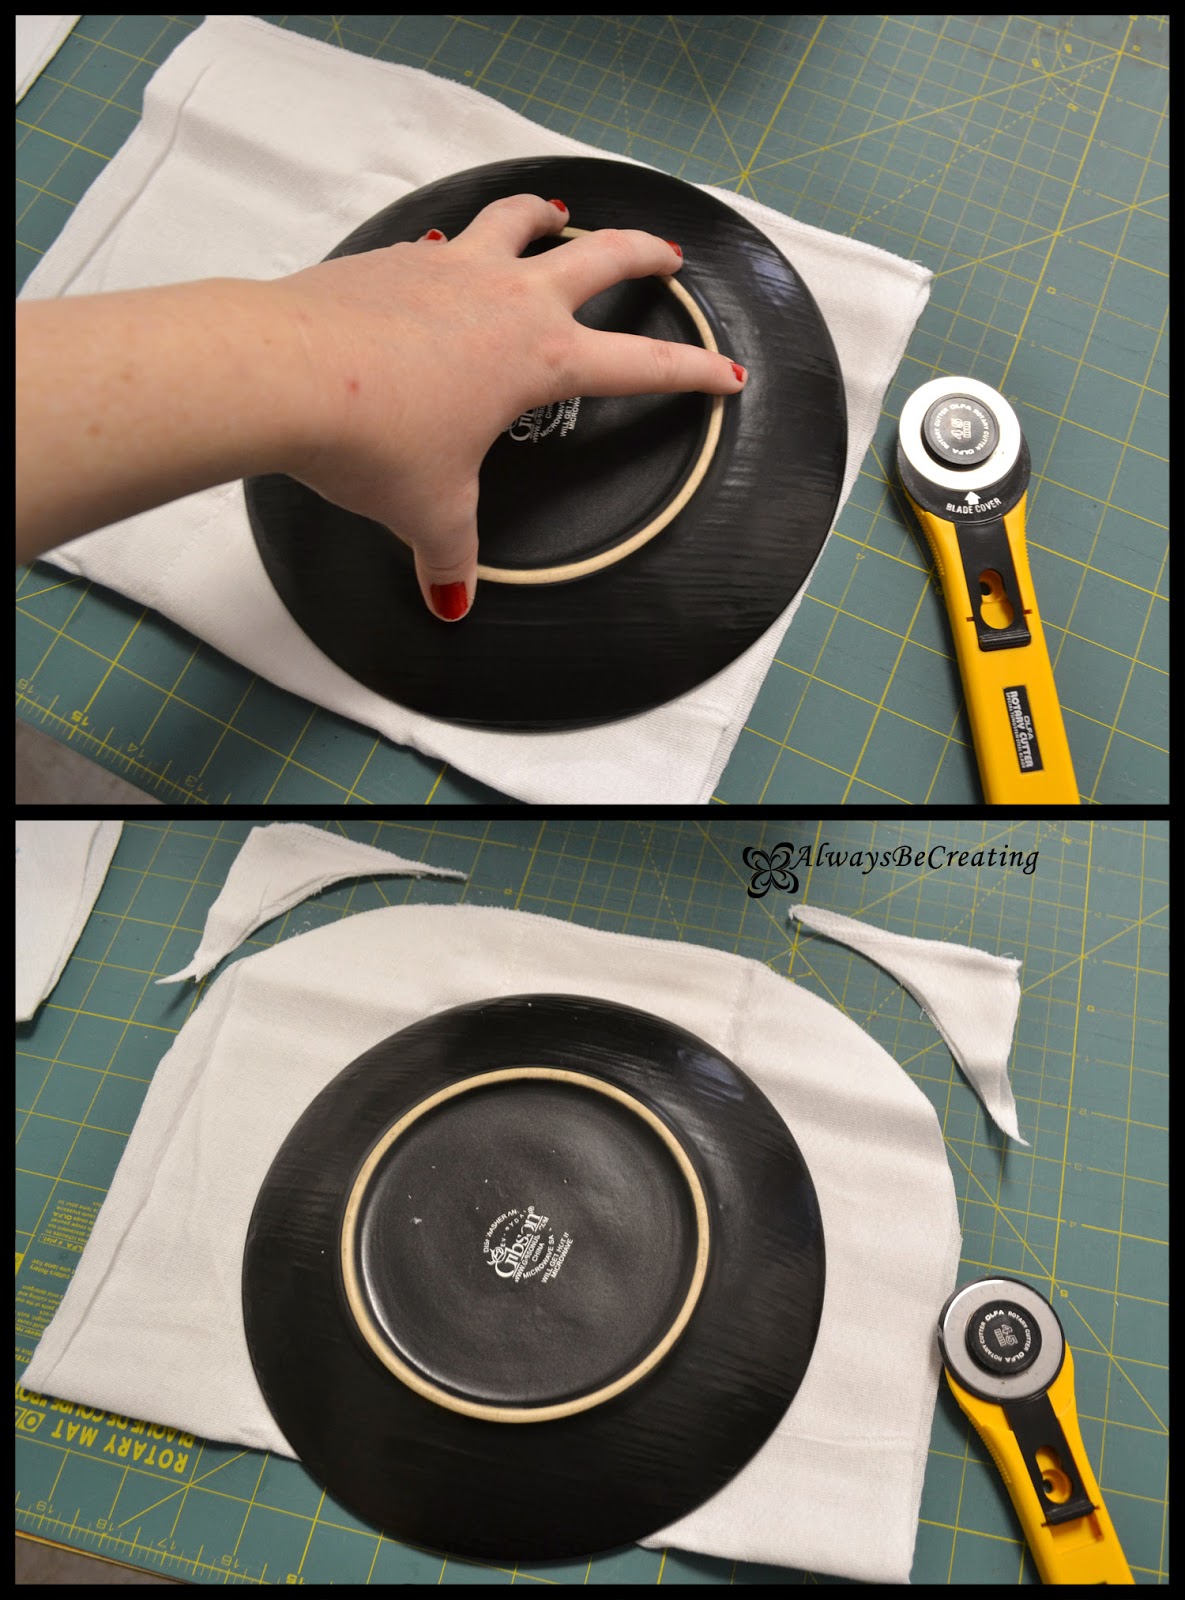
To add a little bit of style I round the corners using a plate or bowl. Just line it up where you want it and zip around the corner to trim.


Now add the ribbon. The center of the cloth diaper {the extra padding and stitch lines} are not always centered on the cloth diaper so simply use a clear ruler to help in drawing some straight and even lines as a guide for where the ribbon will be placed.


After I got the ribbon in place I folded the cloths in half and laid them on top of each other to make sure they were all lined up together and looking good.

When sewing the ribbons down I also like to use a contrasting color for the thread and use the serpentine stitch to add a little more design and character to the burp cloth.


Now add the binding around the burp cloth to give it a nice, fun and soft finish. You can find my tutorial for binding here.

And now they are done. As simple as that and a very absorbent burp cloth for all the messes the new little one can make.


Do not forget to enter the Spring Birthday Wish Giveaway. Ends midnight {est} the March 20th.

3.10.2014

Creating a Pellet Pillow

Have you seen the Yogibo? It is a great bean bag for the family room, bed room or reading nook. Lady A loves them and while our niece and nephew were out visiting us they got to play on some at our local library and Children's Museum. All the kids loved them and had a blast having Paul throw them into a pile of Yogibo bags.

It feels like we are bursting at the seems of our little apartment so there is no place for the giant bean bag but I still wanted to get Lady A one. I compromised a little bit and ended up buying a box of refill pellets. Do you see the size of that box? It's huge! So I'll be using the refill pellets for a couple of projects.


Here is the super simple project and one my daughter loves.

I took two pillowcases: one has Pooh Bear and a simple white one.

I measured out the two and made sure that the simple one was about 1/4"-1/2" smaller width than the Pooh Bear pillow case and that the length was a few inches shorter so that it would sit in the pillow case like a normal pillow.

Because I can be a bit of an A-type personality, I trimmed my white case so that it was nice and square. Then I stitched up all the sides leaving an opening about 3" wide to allow me to fill the case.

Since the pellets can be a bit of a challenge I decided to use a funnel made out of newspaper so that they would not get super static-y and fly away.

My husband helped me with this part, 4 hands were much better than 2 for this project. To help keep the newspaper funnel and pellet case from sliding apart I used two clips that I had laying around, this made it so much easier to fill the case.


Once you have the cas as full as you would like it, fold in the edges and top stitch to close the opening. Place in the themed pillowcase and viola!! Lady A loves her pillow. We got her a nice soft pillow for her bed but she still prefers to use this one at bedtime. I love when the things I make for others are loved!

Paul has even made good use out of the pillow a time or two!


These boxes were sold by weight, when I called no one could tell me the space or volume of the box so I ordered the larger box to be on the safe side. Since then I was able to suggest to the company to include the volume along with the weight and sure enough it was added that week. They had great customer service over the phone and at the shop we went to.

The 7lb box of pellets were A LOT more than I was planning on but that is ok because I have some great ideas for them....stay tuned!!!

3.06.2014

Quilt Binding

I always used to dread binding. My mom ~ well I do not think she loves binding but she LOVES the trick she learned to make binding that looks fantastic. Today I am sharing with you the steps and tricks I use to bind quilts, table runners and other projects. I use it all the time. Hopefully this picture tutorial will be just as useful to you as the one my mom gave me.

The notes in blue are a different way of doing the binding so that you can machine stitch the whole project instead of doing the hand blind stitch at the end.

Follow these steps to bind your quilt.

Step 1: Trim the excess batting and backing even with the quilt top.

Step 2: Fold your material for the bias binding. Cut the width you would like your strips along the folded side. I like to cut mine 2 1/4". If you have a puffy quilt you will want to cut it wider. Cut the point off of the ends of the strips so it is a rectangle.


Step 3: Sew your ends together to make one long strip. Place the strips right sides together at right angles and pin. Draw a line from the upper left-hand corner to the lower right-hand corner. Stitch on the line. Trim to a 1/4". Press the seams open. Press the long binding strip in half lengthwise, with the wrong side together {I usually skip ironing the strip in half lengthwise}.


Step 4: Place the raw edges of the binding strip next to the raw edge of the quilt leaving a 4"-5" tail {I suggest 7"-8" if there is room and for larger projects, it will be easier to finish}. Start in the middle of the bottom of the quilt on the front {I like to start on the back side, this way when I do my version of step 7, I am able to watch the front binding as I sew it to make sure it is nice and straight}. Pin in place with the tail hanging out. Sew along the edge with a 1/4" seam.


Step 5 {Corners}: As you come to the corner stop stitching 1/4" from the raw edge. Remove the quilt from your sewing machine. Fold your binding strip up at a 45 degree angle. Fold the strip back down so there is a fold at the upper edge. Begin sewing at the top edge of the quilt, continuing to the next corner. Go around all four corner. Once you get familiar with this step you can also lift the presser foot without fully removing the quilt to do the corners. {Once you get familiar with this step you can also lift the presser foot without fully removing the quilt to do the corners. It might be the fact that at this point I am ready to be done or that I found it faster for me to do this way, but I choose to keep it all right there on my machine}.


Step 6: After turning the last corner, stitch until you have about 7" to 8" open from the beginning and stop stitching {I find it easier, especially on bigger projects, to leave about 11"-12" of open space}. Make sure that your ends overlap. You will overlap the binding 1/4" smaller than the width of your binding. {If you did a 2 1/4" binding you will want it to overlap 2"}. Cut the binding strip straight across. Lay the quilt flat with whatever side has the binding sewn on it up. Place the unfolded, unstitched tails right side together at right angles and pin. Draw a line from the upper left-hand corner to the lower right-hand corner of the binding. Stitch along this line. Lay flat to check to make sure that it fits correctly. Carefully trim the seam allowance to 1/4" and finger press the seam open. Refold the binding in half. Pin binding to quilt. Finish stitching the binding to the quilt.


Step 7: Turn the binding to the back {or front in my case} of the quilt and blind stitch the folded edge in place, covering the machine stitches with the folded edge. Make sure you take a small blind stitch. {I like to finish the quilt by folding the binding to the front and then finishing with a serpentine stitch on top of the binding.}


Step 8: ENJOY!!!

Here are some blankets I made a while ago using this binding technique. I love how they turned out and the serpentine stitch gives it a great finishing touch.


This is a pretty intense tutorial and I tried to add as many photos as I thought would be helpful to fully explain the steps. If you have any questions leave me a comment and I will be sure to get back to you. I have my copy printed out and put in my binder with all the patterns so it is always available whenever I need it. If you would like a PDF version to print, you can find it here to download.

Linked up here:
Whimsy Wednesday @ SimplyDesigning.net
Link Party Palooza @  I Heart Nap Time
Tip Me Tuesday @ TipJunkie.com
Made by You Mondays @ SkipToMyLou.org
Link Party @ Remodelaholic.com
Inspire Me Wednesday @ 733blog.com
The Party Bunch @ ThirtyHandMadeDays.com
Show Me What Ya Got @ NotJustAHouseWife.net

2.05.2014

A Weekend of Crafting

This past weekend an email was sent out from our Relief Society President asking for donations. A family {not members of our church but within our ward boundaries} were at the hospital welcoming their second baby boy into their family while at the same time, the house they had just rented and moved into, was on fire. They lost everything! Could you even imagine the highs and lows they experienced in one day.

Lady A is the right age that we could have donated some items for their older boy but her stuff is girly and pink. A lot of the new born items we have are items we will be using in just a few months when Lady #2 gets here. So, I went to my scrap pile and decided to spend the weekend sewing.

Luckily I had one blankie left and plenty of scraps that could be used to make other items.


I love these self-binding blankies, they come together so fast, are the perfect size and handmade items are so nice to receive. 


These pouf squares are fun little sensory toys. Colorful patterns, soft fabric and ribbons with different textures. I like to leave the ribbons as loops and let moms decide if they want to cut them, they would simply cut then singe the edges to keep them from fraying. 


This is our nephew thoroughly enjoying his square. It puts a smile on my face when I hear about my handmade items being loved.


And finally...burp cloths. These cloth diapers from Gerber make such great burp cloths, they soak up everything. They are not much to look at so I simply dress them up a bit.


Everything was not too matchy-matchy but they all turned out great. There is something about being able to serve others, I always get so excited. Knowing/hoping that I was able to help lift someones burdens is makes the late nights worth it!

At Church on Sunday there was a corner of the Relief Society room with stacks of bins. Families donated tons of items, clothes that their boys had grown out of, diapers and items for the new born, toys for the older brother and on and on. How wonderful that everyone was able to come together and help out. It will never replace everything they lost but hopefully all this will help take some of the sting away. All the best to this family as they mover forward.

In the coming few weeks I will work on getting up the simple tutorials for all these items so you can make and share your own.

8.15.2013

Diapers for Dolls ~ Tutorial and Free Pattern


The other night as we were getting ready for bed, Lady A decided that she needed to get her babies ready for bed. She went through the last of the wipes making sure the babies were clean then we spent a half hour putting diapers on and off ... on and off.

I love watching her as she figures out new things on her own and tries to copy things that Paul and I do....but....It's time to make some diapers for her babies so we don't use all of hers up.

Flannel or Cotton material
Sewing machine and thread
Velcro {or snaps}
Scissors
Pattern
Optional: Ribbon

Click here to get my template, it has three sizes.

Size 1: Small dolls
Size 2: Cabbage Patch (mine is from the 80's)
Size 3: Homemade doll

Decide what size of diaper you need and cut out the pattern {I used some scrap canvas material so it would hold up as I use it over and over again}. 

I am going to add Velcro on but it was just a bit wider than the ribbon so I cut that down to size. The Velcro pieces ended up being 1" {inch} long.

I suggest cutting one piece from the fabric first {step 2} and placing it on the doll to check the size before cutting out all the diapers from the material.

Optional: Sew the ribbon to the the diaper {step 4}. I usually place it on the front of the outside fabric and this will be where I place one side of the sticky Velcro.

Get the opposite piece of Velcro ready by placing it on a piece of ribbon that is approx. 1.5" long. {step 5} Place the Velcro in the center so that there will be 1/4" seem allowance. Place on the back of the outside fabric with the Velcro up and the pattern of the ribbon down. Now place the right side of the inside fabric down.
Note: be sure to pin the loose pieces in place so they will stay where you want them until you sew.

Sew together with a 1/4" seem allowance leaving an opening approx. 3" wide along one side of the waist, trim off the corners so they will lay flat when you turn the diaper right side out {step 6 & 7}.

Not pictured~oops: {step 7.5} along the curved part for the legs make a couple of small snipes in the fabric {careful not to cut the stitches}. This will help it lay flat when you turn the diaper right side out.

Do a top stitch to help make everything look nice and crisp {step 8}.

Place Velcro on the front ribbon. {I placed mine in 1.5" in from the edge. It's not an exact science but I just placed the diaper on the baby doll and did a best guess.}

Trim down and finish the edge of the ribbon so it won't become unraveled {I used the singe technique}.

Do you sometimes giggle to yourself when you are so pleased with how a project turned out. I am uber please with these and showed them to everyone. My MIL's boss asked for some too for her grand-daughter so I have to get working on the next set.

And now we have enough diapers to fill her little hearts content.


8.07.2013

Wipes Case Cover

I needed to add a bit of style to my diaper bag so I decided to start with the wipes case. It seems like I have been using grey in everything lately but it seems to go with everything. This combination of yellow and grey from my material is great, made even better because it was in the remnant bin at Joann's so it was super cheap.


 Wipes Case
Cotton material
Felt sheet
Ribbon
Glue gun
Scissors
Template that you can down load from here.


Print the template and cut out the pattern for the material. Use it to cut two pieces of fabric.
Now cut the pattern down to the size for the felt piece and cute two pieces from the felt.

*This is a rough template and designed to help give the basic size and design you'll need.

Hot glue the felt to the top and bottom of the wipes case, keeping it centered.
Tips: To help keep the felt centered I used tape on either end and hot glued sections at a time. I kept my hot glue thin so it wouldn't be bump. At the corners cut a little triangle out so that it will lay flat then glue down the sides.

Hot glue the cotton fabric in place, trim any edges that need it. The order I did glued down the fabric was: back, front, sides, corners. Then trim any excess around the edges.

Now use the hot glue to place the ribbon around the edges.

Now there is a bit of color to the diaper bag. Yea!! From here you can add any embellishments you would like. Lady A loves to tear things apart so I opted not to add any embellishments to this one.

6.13.2013

Quick Fix ~ Heat Transfer

I have to admit, I have always been a bit timid to use no-sew permanent adhesive. Many years ago when I used it for other projects, the edges always seemed to lift and curl.

For baby showers, one of the items I love to give are hand made blankets. This cute one was meant for a friend when I noticed a little hole that would eventually fray and then be a perfect hole for a little girl to stick her finger in and tear it even bigger.

Here is my chance to get over my timidness about the heat bond.

 What you'll need:
No-sew Permanent Adhesive {I used Heat-n-Bond}
Extra Material
Pencil
Iron & Ironing Board
Scissors

Prep material as directed on package.

Cut a piece of patch material and adhesive.
*Tip: cut the adhesive piece just a bit smaller than the patch material so that as it is heated it will not stick to the ironing board.

Iron as directed on package.

Draw your desired shape and cute out the patch {mine was a heart}.

Proceed with adhering the patch as directed on package.

Pretty much, it was so super easy. I couldn't tell you what my hold up has been all this time. Simply didn't work years ago when I tried and so I have stayed away ever sense. Well, not any more!! This heat transfer material has opened up a whole world of possibilities for me. Yea!!

Keep Creating
~Mindy

4.24.2013

Bean Bag Bananza

Lady A went to nursery for the second time this past Sunday but for some reason she was not having it. In the middle of my Sunday School class {I teach the 9-10 year old kids} I could hear a scream from the hall, sure enough, I poke my head out and it was my kid, for everyone to hear.

After I was done teaching my class we both went back to the nursery for the last bit of church. There were a far number of kids and one of the choice tows were bean bags but there were not enough for all the kids. A benefit of sewing is that there are always scraps around so I decided we would make some more bean bags for the kids.

 16 Bags

 With your scraps cut out squares that are 5 1/2" x 5 1/2"

 With wrong sides together, stitch three and a half of the sides. I like to leave my opening in the middle of one side. For me, it makes it easier to stitch closed.

Take a random piece of paper to make a funnel. I found this was better than using a kitchen funnel because I could leave the opening wide enough to let the beans through.

Then I needed to take a photo and needed a third hand...and here came the bright idea, set the bag in a cup!! It works great to hold everything in place while pouring the beans in, lift the cone out and the job is done.
I tried a few different amounts and decided that 2/3 cup was the perfect amount, for me.

 Ya...I made 16 bean bags.

 Now simply pin the bag closed then sew it up and cut the thread.

Some for Lady A, some for the neighbors and the rest for the nursery kids.

Happy bean bag toss!!

3.10.2013

Birthday Score

I still love when my birthday comes around, even if I don't share my age, because it is MY day!! It's the day I joined my family, came into the world and the day that would lead to me having my own family.

This past week was Coupon Commotion at Joann's Crafts and Fabric and with today being my birthday, I splurged. Growing up my mom had the coolest pair of scissors. How do I know they were that great, because we were NOT allowed to touch them. They were my moms' and just for fabric. They had this case they slid into like a sword into a sheath. Well, I finally got my own Gingher shears.

Look at how nice and shinny they are. The case will be good in case they get left down so Lady A won't be able to get them open and play with them. They have a perfect weight in my hand. The bent handle makes them ideal for cutting on a surface like a table. The BEST part is the blade, OH the blade! Thread sees this blade coming and it melts away, they cut through the jeans {project forth coming} like a knife through butter.


I have arrived!

LinkWithin

Related Posts with Thumbnails