3.17.2014

Leprechaun Popcorn Treat

My favorite treat as of late is popcorn, sweet or salty, it does not matter. A little something to snack on while working on chores or watching a movie, it is just perfect.

Today I am sharing our Leprechaun Popcorn. It requires three ingredients but you can add anything you would like to help sweeten the pot.

Yum!
Items needed:
Cookie sheet
Tin foil {heavy duty would be best}
Cooking spray or butter
Small pot
Whisk
12 Cups popped popcorn {about 1/2 unpopped}
3 oz Lime Jell-o
14 oz can Sweetened Condensed Milk
1/2 bag of Mini M&M's

Place the tin foil on the cookie sheet being sure to cover the entire sheet and even fold over the edges. This will help keep the tin foil in place. Spray the entire sheet with a generous amount of cooking spray. You will be thankful you did later on when it is time to remove the popcorn. Trust me!

Pop the popcorn. Measure out 12 Cups making sure to leave behind any kernels that did not pop. No body likes to bit into a yummy treat and chomp down on a kernel. Ouch.

Place on the cookie sheet, put it in the oven and heat to 300˚. This will help keep the popcorn warm so when it is time to add the Jell-o mix, it will spread easier over the warm popcorn.

Mix the Jell-o and sweetened condensed milk on medium heat 4-5 minutes, stirring with a whisk. Stir the whole time because it has a tendency to burn on the bottom. My mix never boils but it does become a little thicker as it heats on the stove.

Remove the cookie sheet of popcorn from the oven and pour the Jell-o mix over it. Use a plastic spatula {I even put some cooking spray on that to help keep the mixture from sticking} to evenly mix. 

Bake at 300˚ for 20 minutes, stirring ever 5 minutes. This helps to keep the stuff on top from burning since it will all be rotated. Also make sure that you do not have high peaks of popcorn from stirring, those will burn pretty fast.

Remove from the oven after 20 minutes and let it cool. After it has cooled add the mini M&M's or bite size candy of choice. Then break apart into individual servings or place the whole thing in a bowl and enjoy! Store extra in an air tight container.

A couple for movie night

Tip: If you want a little salty mixed in with your treat you could try using lightly butter and salted microwave popcorn.

Hint: I like my Leprechaun Popcorn to be a bit chewy so cooking at a medium temperature and baking for only 20 minutes will help keep it soft. If you would like it to be more crunchy try cooking the Jell-o mix at a little higher temp or baking it an extra five minutes.

Some for the neighbors

Download a pdf of the recipe here.

Do not forget to enter the Spring Birthday Wish Giveaway. Ends midnight {est} the March 20th.
Burp Cloths out of Cloth Diapers ~ Tutorial

These burp cloths are the best. Since they are made from cloth diapers they are SUPER absorbent. But carrying around a cloth diaper is not all that cute so we dress them up with a bit of fabric and ribbon.

What you need:
Cloth diapers
Ribbon
Fabric Scraps
Rotary Cutter and Board {or Scissors}
Sewing Machine
Thread

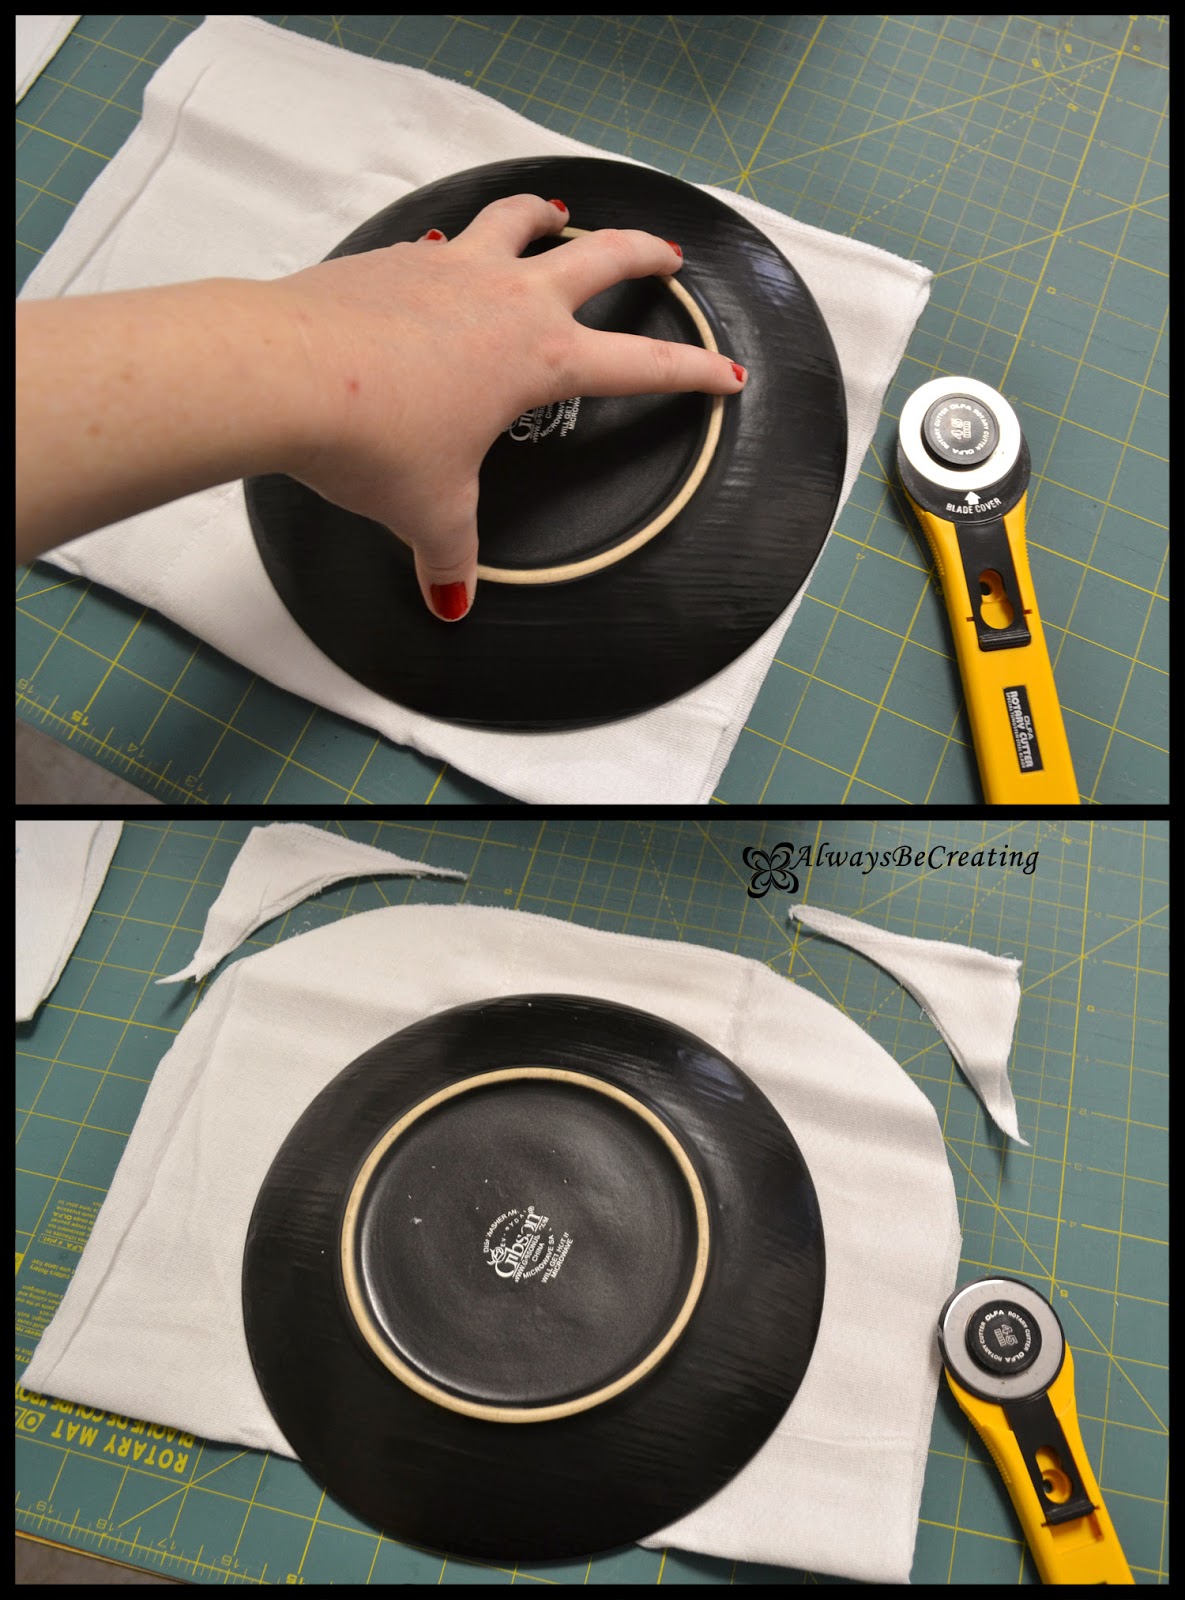
To add a little bit of style I round the corners using a plate or bowl. Just line it up where you want it and zip around the corner to trim.


Now add the ribbon. The center of the cloth diaper {the extra padding and stitch lines} are not always centered on the cloth diaper so simply use a clear ruler to help in drawing some straight and even lines as a guide for where the ribbon will be placed.


After I got the ribbon in place I folded the cloths in half and laid them on top of each other to make sure they were all lined up together and looking good.

When sewing the ribbons down I also like to use a contrasting color for the thread and use the serpentine stitch to add a little more design and character to the burp cloth.


Now add the binding around the burp cloth to give it a nice, fun and soft finish. You can find my tutorial for binding here.

And now they are done. As simple as that and a very absorbent burp cloth for all the messes the new little one can make.


Do not forget to enter the Spring Birthday Wish Giveaway. Ends midnight {est} the March 20th.

3.14.2014

My Birthday Wish + Giveaway

This week is my birthday week {we say week because with a toddler, being 34 weeks pregnant and my husband finishing up his Graduate degree we never know when we will actually have time together ;) }. Paul has been asking me for weeks what I would want and honestly, the things I want can not be purchased....I want more sleep, I want to not be sore any more, I want my body back. These are all things that will come but there is no rushing them, then it hit me. This has been a long and cold winter, today did not even get out of the teens, it was snowing and the sun was only out for about 10 minutes. My birthday wish is that Spring would come....tomorrow.

Since it doesn't look like that wish will be coming true this week, according to the weather channel, I thought it would be fun to do a Birthday Spring Giveaway on a whim. Just enter using the rafflecopter at the end of this post.


I love this pillow case cover, it puts a smile on my face every time I see it. LilyPillow is donating a 16" x 16" pillow case for our giveaway.

Visit her shop and check out all her other fun colors and fabric choices to help bring a bit of spring inside.

There is also a $25 Target Gift Card. Use it for yourself or to add more spring around your home.

Good luck everyone and here is hoping it is warm where you are!!

3.13.2014

My first time to guest-host a link party

We are happy to have a giveaway from Wren & Rumor as party of this week's link party! Be sure to enter after you link up your lovely posts! xo

Welcome to Link'n Blogs {#16} !
A place to link up your projects and make new friends. We are all about visiting links and following new bloggers here at Link'n Blogs. Remember to leave comments and PIN PIN PIN!
Cause sharing is caring. 

**Your links will show up on ALL blogs hosting the link party!**

Interested in guest hosting Link'n Blogs?!
I've created a spreadsheet where you can sign up to host a link party! It's a great way to get to know other bloggers, share a recent post with other party goers and pick the features. Sign up using the link below!

Grab my party button! 


I am sharing my St. Patrick's Day cupcake toppers. Use chocolate this year instead of paper! A free printable for the stencil is also included in the post!


St. Patrick's Day Chocolate Cupcake Toppers


HOST:
Katelyn from Learning, Creating, Living 


Katelyn is sharing an awesome DIY picture frame. I love the message to Enjoy Today!

Be sure to give some love to our guest hosts - you will love their creative blogs!


These the college girls are all about living a fabulous life on a budget. They are sharing a cute DIY pillow for Easter!


Are you a quilter or wanting to learn? Mindy shares a binding technique that you definitely need to PIN for future reference.


Here are this week's features:

3.10.2014

Creating a Pellet Pillow

Have you seen the Yogibo? It is a great bean bag for the family room, bed room or reading nook. Lady A loves them and while our niece and nephew were out visiting us they got to play on some at our local library and Children's Museum. All the kids loved them and had a blast having Paul throw them into a pile of Yogibo bags.

It feels like we are bursting at the seems of our little apartment so there is no place for the giant bean bag but I still wanted to get Lady A one. I compromised a little bit and ended up buying a box of refill pellets. Do you see the size of that box? It's huge! So I'll be using the refill pellets for a couple of projects.


Here is the super simple project and one my daughter loves.

I took two pillowcases: one has Pooh Bear and a simple white one.

I measured out the two and made sure that the simple one was about 1/4"-1/2" smaller width than the Pooh Bear pillow case and that the length was a few inches shorter so that it would sit in the pillow case like a normal pillow.

Because I can be a bit of an A-type personality, I trimmed my white case so that it was nice and square. Then I stitched up all the sides leaving an opening about 3" wide to allow me to fill the case.

Since the pellets can be a bit of a challenge I decided to use a funnel made out of newspaper so that they would not get super static-y and fly away.

My husband helped me with this part, 4 hands were much better than 2 for this project. To help keep the newspaper funnel and pellet case from sliding apart I used two clips that I had laying around, this made it so much easier to fill the case.


Once you have the cas as full as you would like it, fold in the edges and top stitch to close the opening. Place in the themed pillowcase and viola!! Lady A loves her pillow. We got her a nice soft pillow for her bed but she still prefers to use this one at bedtime. I love when the things I make for others are loved!

Paul has even made good use out of the pillow a time or two!


These boxes were sold by weight, when I called no one could tell me the space or volume of the box so I ordered the larger box to be on the safe side. Since then I was able to suggest to the company to include the volume along with the weight and sure enough it was added that week. They had great customer service over the phone and at the shop we went to.

The 7lb box of pellets were A LOT more than I was planning on but that is ok because I have some great ideas for them....stay tuned!!!

3.06.2014

Quilt Binding

I always used to dread binding. My mom ~ well I do not think she loves binding but she LOVES the trick she learned to make binding that looks fantastic. Today I am sharing with you the steps and tricks I use to bind quilts, table runners and other projects. I use it all the time. Hopefully this picture tutorial will be just as useful to you as the one my mom gave me.

The notes in blue are a different way of doing the binding so that you can machine stitch the whole project instead of doing the hand blind stitch at the end.

Follow these steps to bind your quilt.

Step 1: Trim the excess batting and backing even with the quilt top.

Step 2: Fold your material for the bias binding. Cut the width you would like your strips along the folded side. I like to cut mine 2 1/4". If you have a puffy quilt you will want to cut it wider. Cut the point off of the ends of the strips so it is a rectangle.


Step 3: Sew your ends together to make one long strip. Place the strips right sides together at right angles and pin. Draw a line from the upper left-hand corner to the lower right-hand corner. Stitch on the line. Trim to a 1/4". Press the seams open. Press the long binding strip in half lengthwise, with the wrong side together {I usually skip ironing the strip in half lengthwise}.


Step 4: Place the raw edges of the binding strip next to the raw edge of the quilt leaving a 4"-5" tail {I suggest 7"-8" if there is room and for larger projects, it will be easier to finish}. Start in the middle of the bottom of the quilt on the front {I like to start on the back side, this way when I do my version of step 7, I am able to watch the front binding as I sew it to make sure it is nice and straight}. Pin in place with the tail hanging out. Sew along the edge with a 1/4" seam.


Step 5 {Corners}: As you come to the corner stop stitching 1/4" from the raw edge. Remove the quilt from your sewing machine. Fold your binding strip up at a 45 degree angle. Fold the strip back down so there is a fold at the upper edge. Begin sewing at the top edge of the quilt, continuing to the next corner. Go around all four corner. Once you get familiar with this step you can also lift the presser foot without fully removing the quilt to do the corners. {Once you get familiar with this step you can also lift the presser foot without fully removing the quilt to do the corners. It might be the fact that at this point I am ready to be done or that I found it faster for me to do this way, but I choose to keep it all right there on my machine}.


Step 6: After turning the last corner, stitch until you have about 7" to 8" open from the beginning and stop stitching {I find it easier, especially on bigger projects, to leave about 11"-12" of open space}. Make sure that your ends overlap. You will overlap the binding 1/4" smaller than the width of your binding. {If you did a 2 1/4" binding you will want it to overlap 2"}. Cut the binding strip straight across. Lay the quilt flat with whatever side has the binding sewn on it up. Place the unfolded, unstitched tails right side together at right angles and pin. Draw a line from the upper left-hand corner to the lower right-hand corner of the binding. Stitch along this line. Lay flat to check to make sure that it fits correctly. Carefully trim the seam allowance to 1/4" and finger press the seam open. Refold the binding in half. Pin binding to quilt. Finish stitching the binding to the quilt.


Step 7: Turn the binding to the back {or front in my case} of the quilt and blind stitch the folded edge in place, covering the machine stitches with the folded edge. Make sure you take a small blind stitch. {I like to finish the quilt by folding the binding to the front and then finishing with a serpentine stitch on top of the binding.}


Step 8: ENJOY!!!

Here are some blankets I made a while ago using this binding technique. I love how they turned out and the serpentine stitch gives it a great finishing touch.


This is a pretty intense tutorial and I tried to add as many photos as I thought would be helpful to fully explain the steps. If you have any questions leave me a comment and I will be sure to get back to you. I have my copy printed out and put in my binder with all the patterns so it is always available whenever I need it. If you would like a PDF version to print, you can find it here to download.

Linked up here:
Whimsy Wednesday @ SimplyDesigning.net
Link Party Palooza @  I Heart Nap Time
Tip Me Tuesday @ TipJunkie.com
Made by You Mondays @ SkipToMyLou.org
Link Party @ Remodelaholic.com
Inspire Me Wednesday @ 733blog.com
The Party Bunch @ ThirtyHandMadeDays.com
Show Me What Ya Got @ NotJustAHouseWife.net

3.03.2014

49Fifty Project Recap for February

Here is a recap of the cards from this month and cleaning tips that I have to share with you.

Week six

http://49fifty.weebly.com/1/archives/02-2014/1.html

Week seven

http://49fifty.weebly.com/1/post/2014/02/thanks-coach.htmlhttp://49fifty.weebly.com/1/post/2014/02/a-spotless-microwave-in-15-minutes.html 
Week eight
http://49fifty.weebly.com/1/post/2014/02/box-tops-for-educationfor-our-niece-and-nephew.htmlhttp://49fifty.weebly.com/1/post/2014/02/how-to-clean-the-sticky-off-a-jar.html


Week nine

http://49fifty.weebly.com/1/post/2014/02/grandpas-work-shed.htmlhttp://49fifty.weebly.com/1/post/2014/02/cleaning-the-gunk-off-of-a-glass-baking-dish.html


LinkWithin

Related Posts with Thumbnails