Showing posts with label Fabric. Show all posts

11.25.2015

Fabric Scrap Twine

Who needs something to do with some of their fabric scraps?


Try making some fabric twine with it!!

There is a project I wanted to do for the girls room.


: : : : : : : : : MATERIALS/SUPPLIES : : : : : : : : :
Scrap Fabric

: : : : : : : : : TOOLS : : : : : : : : :
Cutting Mat

: : : : : : : : : INSTRUCTIONS : : : : : : : : :
I am sure there doesn't really need to be instructions here but I'll list a simple step by step so I can share a tip or two.


Cut your fabric scraps into 1" {inch} strips.

TIP: If the fabric I was using was super thin I cut wider strips. If the fabric was thick I cut thinner strips.


Take two strips, line the ends up and connect by tying the ends in a knot. 

TIP: When twisting the twine together it is easier if you can anchor the end of the fabric straps. This way it will hold steady as you twist the fabric strips. I used a clip and my pant leg when first starting until it was long enough to start wrapping around the spool.


Take each strip and twist in the same direction {I twist right} then take the strips and twist them, one over the other, in the other direction {left}.

TIP: I found it easier if I 'twisted' shorter sections together instead of trying to do longer sections.


When one of the fabric scraps reaches the end, simply overlap with the next piece of fabric, twist to hold together then continue winding the twine.

TIP: It works best if the fabric scraps are different lengths so they do not end and need to have new pieces added at the same time.


I did two sets of twine for different projects I have in mind. This was a really easy project and the end product is great. This fabric scrap twine can be used in so many ways like packaging gifts and using for art/craft projects.


This is a great activity to do after a long day, the kids are finally in bed and you just need a little something to do while you sit and binge watch your favorite series on Netflix. Seriously, it will take some time so be prepared.


3.06.2014

Quilt Binding

I always used to dread binding. My mom ~ well I do not think she loves binding but she LOVES the trick she learned to make binding that looks fantastic. Today I am sharing with you the steps and tricks I use to bind quilts, table runners and other projects. I use it all the time. Hopefully this picture tutorial will be just as useful to you as the one my mom gave me.

The notes in blue are a different way of doing the binding so that you can machine stitch the whole project instead of doing the hand blind stitch at the end.

Follow these steps to bind your quilt.

Step 1: Trim the excess batting and backing even with the quilt top.

Step 2: Fold your material for the bias binding. Cut the width you would like your strips along the folded side. I like to cut mine 2 1/4". If you have a puffy quilt you will want to cut it wider. Cut the point off of the ends of the strips so it is a rectangle.


Step 3: Sew your ends together to make one long strip. Place the strips right sides together at right angles and pin. Draw a line from the upper left-hand corner to the lower right-hand corner. Stitch on the line. Trim to a 1/4". Press the seams open. Press the long binding strip in half lengthwise, with the wrong side together {I usually skip ironing the strip in half lengthwise}.


Step 4: Place the raw edges of the binding strip next to the raw edge of the quilt leaving a 4"-5" tail {I suggest 7"-8" if there is room and for larger projects, it will be easier to finish}. Start in the middle of the bottom of the quilt on the front {I like to start on the back side, this way when I do my version of step 7, I am able to watch the front binding as I sew it to make sure it is nice and straight}. Pin in place with the tail hanging out. Sew along the edge with a 1/4" seam.


Step 5 {Corners}: As you come to the corner stop stitching 1/4" from the raw edge. Remove the quilt from your sewing machine. Fold your binding strip up at a 45 degree angle. Fold the strip back down so there is a fold at the upper edge. Begin sewing at the top edge of the quilt, continuing to the next corner. Go around all four corner. Once you get familiar with this step you can also lift the presser foot without fully removing the quilt to do the corners. {Once you get familiar with this step you can also lift the presser foot without fully removing the quilt to do the corners. It might be the fact that at this point I am ready to be done or that I found it faster for me to do this way, but I choose to keep it all right there on my machine}.


Step 6: After turning the last corner, stitch until you have about 7" to 8" open from the beginning and stop stitching {I find it easier, especially on bigger projects, to leave about 11"-12" of open space}. Make sure that your ends overlap. You will overlap the binding 1/4" smaller than the width of your binding. {If you did a 2 1/4" binding you will want it to overlap 2"}. Cut the binding strip straight across. Lay the quilt flat with whatever side has the binding sewn on it up. Place the unfolded, unstitched tails right side together at right angles and pin. Draw a line from the upper left-hand corner to the lower right-hand corner of the binding. Stitch along this line. Lay flat to check to make sure that it fits correctly. Carefully trim the seam allowance to 1/4" and finger press the seam open. Refold the binding in half. Pin binding to quilt. Finish stitching the binding to the quilt.


Step 7: Turn the binding to the back {or front in my case} of the quilt and blind stitch the folded edge in place, covering the machine stitches with the folded edge. Make sure you take a small blind stitch. {I like to finish the quilt by folding the binding to the front and then finishing with a serpentine stitch on top of the binding.}


Step 8: ENJOY!!!

Here are some blankets I made a while ago using this binding technique. I love how they turned out and the serpentine stitch gives it a great finishing touch.


This is a pretty intense tutorial and I tried to add as many photos as I thought would be helpful to fully explain the steps. If you have any questions leave me a comment and I will be sure to get back to you. I have my copy printed out and put in my binder with all the patterns so it is always available whenever I need it. If you would like a PDF version to print, you can find it here to download.

Linked up here:
Whimsy Wednesday @ SimplyDesigning.net
Link Party Palooza @  I Heart Nap Time
Tip Me Tuesday @ TipJunkie.com
Made by You Mondays @ SkipToMyLou.org
Link Party @ Remodelaholic.com
Inspire Me Wednesday @ 733blog.com
The Party Bunch @ ThirtyHandMadeDays.com
Show Me What Ya Got @ NotJustAHouseWife.net

2.05.2014

A Weekend of Crafting

This past weekend an email was sent out from our Relief Society President asking for donations. A family {not members of our church but within our ward boundaries} were at the hospital welcoming their second baby boy into their family while at the same time, the house they had just rented and moved into, was on fire. They lost everything! Could you even imagine the highs and lows they experienced in one day.

Lady A is the right age that we could have donated some items for their older boy but her stuff is girly and pink. A lot of the new born items we have are items we will be using in just a few months when Lady #2 gets here. So, I went to my scrap pile and decided to spend the weekend sewing.

Luckily I had one blankie left and plenty of scraps that could be used to make other items.


I love these self-binding blankies, they come together so fast, are the perfect size and handmade items are so nice to receive. 


These pouf squares are fun little sensory toys. Colorful patterns, soft fabric and ribbons with different textures. I like to leave the ribbons as loops and let moms decide if they want to cut them, they would simply cut then singe the edges to keep them from fraying. 


This is our nephew thoroughly enjoying his square. It puts a smile on my face when I hear about my handmade items being loved.


And finally...burp cloths. These cloth diapers from Gerber make such great burp cloths, they soak up everything. They are not much to look at so I simply dress them up a bit.


Everything was not too matchy-matchy but they all turned out great. There is something about being able to serve others, I always get so excited. Knowing/hoping that I was able to help lift someones burdens is makes the late nights worth it!

At Church on Sunday there was a corner of the Relief Society room with stacks of bins. Families donated tons of items, clothes that their boys had grown out of, diapers and items for the new born, toys for the older brother and on and on. How wonderful that everyone was able to come together and help out. It will never replace everything they lost but hopefully all this will help take some of the sting away. All the best to this family as they mover forward.

In the coming few weeks I will work on getting up the simple tutorials for all these items so you can make and share your own.

5.21.2013

Image Transfer Onto Fabric Using a Gel Medium

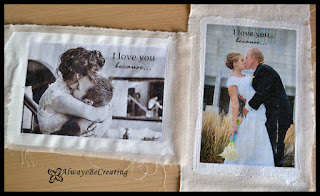
 How great did these images turn out?!?
I love them!

These were super easy but will take time because they need to set overnight.

Image transfer tutorial: Using a gel medium to transfer an image onto fabric.

Materials Needed:
Image printed on a laser printer {or a magazine clipping}
Fabric {Plexiglas, stretched canvas boards, pieces of wood}
Gel Medium {I used non-water based acrylic paint and modeling paste}
Sponge brush 
Scissors
Wax Paper
Tape
Water Spray Bottle
Towel
Acrylic Coating Spray {oops, not in the photo}


Cut out the images. Cut fabric pieces to size. Mine are approx 6" x 9".

*To prepare the image I added some text "I love you because..." then flipped it to print. I use Photo Shop but this can also be done in Picasa and most photo editing programs available. If your image doesn't have a right/wrong way, skip this step and just print your image.


To prep the area, tape a piece of wax paper down then tape the fabric on top of the wax paper. The Acrylic Paint spreads easily but the Modeling Paste stays pretty thick. To help know exactly where to apply the gel so to be able to work fast enough before it started to dry, place tick marks to help know exactly how big of an area to apply to the fabric.

*The wax paper is used to keep any of the gel medium from getting onto the table as it might soak through the fabric.


Apply the gel medium to the fabric then immediately place the image face down and press with fingers to make sure that the entire image presses into the gel medium. 

Be sure to press the edges down, excess gel medium will press out from underneath the image.

Before moving onto the next step, be sure that the gel medium has time to dry completely. I recommend letting it set over night.


Now grab your water bottle {or bowl with water and sponge to apply water to image}, towel and photo.

1 ~ Get the paper wet. {I let it sit for about 30 seconds or so, this will help the paper soften up}
2-3 ~ Start rubbing the paper with your finger tips. It will ball up and rub off. {You will have to keep the paper wet as you go}
4 ~ Every once in a while I would dab the image with the towel to get the paper residue off and see how well the image is coming along. {Using an image with so much white takes a little bit more care since it will blend with the white background of the gel medium, so...be careful not to rub too much}

Repeat until all the paper has been rubbed off the image.

*The image looks great while it is still a bit damp but as it dries, any paper residue left behind will become very noticeable.

Use a coating over the image. This will put a nice finish on the image and get rid of the paper residue look. I used an Acrylic Coating gloss finish in a spray can but something like Mod Podge would work as well.

I love how these images turned out! Eeek!

For the B/W image I used the Acrylic Paint. This gave the image a soft aged look. Photo by Michelle Andersen Photography. Photo courtesy of Adiel.


For the coloured image I used the Modeling Paste. It dries a bit faster and in those spots the image lifts up when taking the paper off. The over all image, however, stays more crisp so it is ideal for images with a lot of detail. Photo courtesy of Manda Jane Photography

Go Create!
~Mindy

4.24.2013

Bean Bag Bananza

Lady A went to nursery for the second time this past Sunday but for some reason she was not having it. In the middle of my Sunday School class {I teach the 9-10 year old kids} I could hear a scream from the hall, sure enough, I poke my head out and it was my kid, for everyone to hear.

After I was done teaching my class we both went back to the nursery for the last bit of church. There were a far number of kids and one of the choice tows were bean bags but there were not enough for all the kids. A benefit of sewing is that there are always scraps around so I decided we would make some more bean bags for the kids.

 16 Bags

 With your scraps cut out squares that are 5 1/2" x 5 1/2"

 With wrong sides together, stitch three and a half of the sides. I like to leave my opening in the middle of one side. For me, it makes it easier to stitch closed.

Take a random piece of paper to make a funnel. I found this was better than using a kitchen funnel because I could leave the opening wide enough to let the beans through.

Then I needed to take a photo and needed a third hand...and here came the bright idea, set the bag in a cup!! It works great to hold everything in place while pouring the beans in, lift the cone out and the job is done.
I tried a few different amounts and decided that 2/3 cup was the perfect amount, for me.

 Ya...I made 16 bean bags.

 Now simply pin the bag closed then sew it up and cut the thread.

Some for Lady A, some for the neighbors and the rest for the nursery kids.

Happy bean bag toss!!

3.07.2013

Image Transfer

I love playing around with photos and so I thought I would do a series on transferring images to different surfaces and share my findings with you {the good and the bad}.

Materials Needed:
Words and Shamrock PDF printed on a laser printer {download here or come up with your own}
Material {cotton works great}
Nail polish remover {not just any, look further down to see my explanation}
Sponge brush
Spoon


*Remember this will be a worn or vintage look, the transfer won't be crisp. It is best done with monotone images or images that don't have a great deal of detail.

Cut the image out leaving as much white space around it as possible.


Lay down an extra piece of cardstock, cardboard or anything you might have laying around, secure it with tape. Place the material on the cardstock face up {make sure it is flat and tight, secure it with tape} then place the text or image face down in desired location and secure it with tape.}
*From my material I cut pieces a bit larger than I knew I would want them and placed my text or image in the center. This would give me a bit of extra wiggle room and allow me to cut down to size.


With sponge brush or cotton ball apply a generous amount of nail polish remover to the paper over the text or image.
*Instead of covering the hole text or image at once, I did it one letter at a time. This way I could keep up with the nail polish remover before it dried.
*You can see in my image I used the Wal-mart brand nail polish remover, nothing too fancy or expensive. But I did find that the 'Regular' didn't work, it was the 'Strengthening' that ended up working like a champ. There are two extra ingredients listed, they are: benzophenone-1 and propylene glycol.


With the back of the spoon press and rub firmly across the text or image. The paper and material will shift so use your other hand to hold them firmly as they start to shift.
*Tip: You are applying a liquid to paper so try to work fast, don't take a brake in the middle of a section. Too much liquid and too much rubbing will dissolve/tear the paper and you'll have to start over. Too much rubbing will also cause the paper to be 'ground' into the material and leave paper behind with transfer. If this happens let the transfer sit and completely dry, then use a towel to get the paper residue wet and rub away with your finger. DON'T press hard or you will lift up the text/image transfer too.


*Tip: I had to repeat these last two steps a couple of times for every section of the text or image. Check  your transfer by lifting up one section of the tape and pulling the paper away from the material.


Once you are happy with your results, take the paper completely off.

I found that the larger the image, the more vintage it looked. Working with a smaller area, like the word 'IN' from my tutorial, it is easier to get most of the image to transfer and be a bit more crisp.

I am so excited about how it turned out. I think the text worked a lot better than the larger shamrock.

Check back to see the final project I use these image transfers for.

3.06.2013

Create Your Own Pillow Form

I love that there are pillow forms to purchase so all those fun pillow covers can be removed and washed, or changed, when needed. Every once in awhile I need or want a pillow of a not so standard shape or size. Now I'm going to share my tutorial for creating my own pillow forms.

Items needed:
Muslin (any color, I usually go with white. If your cover is going to be darker, I suggest getting a darker cotton fabric)
Fiberfill
Sewing machine
Thread
Ruler
Cutting mat
Rotary cutter

Pre-wash material.

Decide what size you want {for this particular project my cover will be 15" x 10"} then add 1/4" all the way around {my final measurement is 15.5" x 10.5"} and cut two. 


Line up the two pieces. In the middle of one side place marks for a width that will allow for your hand to fit in {mine is a 4" opening}.

Because this pillow will go inside of the pillow cover it needs to be just a bit smaller. This will allow for the cover to be placed on and taken off easier. Starting at the bottom 'opening' mark sew around the pillow form using a 3/8" seam allowance until you reach the top 'opening' mark.
*If you want you can also back stitch once or twice on either side of your 'opening' to help keep the seem tight.


*Tip: When getting to a corner sew up until you think you will need to change directions. I even measure to make sure the last stitch is where it needs to be. Leave the needle down, lift the foot and rotate your material. This will help so that the corners of the pillow form will be nice and sharp.

*If you also choose too, you can serge around where the straight stitch is. For a simple pillow form I will just use my zig-zag stitch.


Now turn the pillow form right-side out. Just reach in the opening and pull the right-side out. Then reach back in and use your finger, pencil with eraser or round tip scissors to push out the corners to make them nice and crisp.


Fill the form with Fiberfill to make your pillow form as full as you want.
*I reach in and make sure that some of the fill gets into the corners to help shape the pillow form.

Once you have enough fill in your pillow form push it down a bit to give yourself working room to sew the 'opening' closed. Pull the two sides on either side of the 'opening' and line up the sides of the opening, finger press and even place pins if you would like. Sew right at the edge of the opening from the top to bottom to sew the pillow form closed. On this one I missed a little section, if you do too, simple take it back to your machine and sew it closed.

With this stitch on the outside {even though it will go inside a pillow cover} I still want it to look nice so I simply tie the thread ends into a square knot and cut off the extra.

Voila ~ Pillow form!!

LinkWithin

Related Posts with Thumbnails