Showing posts with label Traditions. Show all posts

11.29.2015

11 Advent Calendars that can be Made Up in A Night

Ok, I am a bit late to the party so I need a quick, easy advent calendar that I can make up in an evening. The girls are still really young so we need something simple, not too flashy, or they will just want to do it all in one day.


On my quest to start our own family traditions and find some ideas for simple advent calendars, I put together a quick list with some of the ones I found.

Now, keep in mind that a few of these could look pretty involved BUT if you tweak them a little, and put your own spin on them you could get fun and simple all in one. That is the best part of doing a project yourself, making it your own!

Kraft Paper
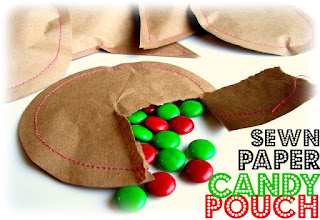
Sewn Treat Bags by PeppermintPlum

Another Kraft Paper calendar by CanadianLiving

How many toilet paper rolls do you have on hand?
{You could also use cardstock to roll up and make some tubes}


Pick and Choose by MessForLess

Printables
I love the simplicity with the presentation of this one by MaileBelles
You could make it even easier by placing hand written cards in the envelopes


Christmas Story Printable by RedBird-Blue

Wall Chart by ThePaintedHive

**********
I haven't ever seen anyone else use acetone to transfer an image before but I can tell you it really does work
Here is the process.
Here is my project.
**********

Vintage Advent Calendar by EllaClaireInspired
This one would be really cute even without the embellishments

I hope you found something to inspire you. Remember, it doesn't have to be elaborate to be fun. Just make it your own!

11.24.2015

23 Variations on Traditional Thanksgiving Dishes

Some of my favorite things for Thanksgiving dinner are the stuffing/dressing, cornbread, party potatoes, eggs, bread rolls and dessert. So I thought I would put together a list of variations on these great family tradition dishes. These all look so yummy, maybe you can find a new one to add to your Thanksgiving meal.

Dressing/Stuffing

 From SixSisterStuff this stuffing looks fantastic

 Find this Bountiful Harvest Sausage & Cranberry Dressing at ItsYummi

 A fun take for this traditional dish from ASpicyPerspective

ThePioneerWoman has a great traditional dressing

Cornbread and Pudding

 Corn Casserole from Seededatthetable

Grandmothers Buttermilk Cornbread on AllRecipes

 This Corn Pudding from CupcakesandKaleChips looks wonderful.

Oh my goodness....all of these Potatoes look Amazing!!

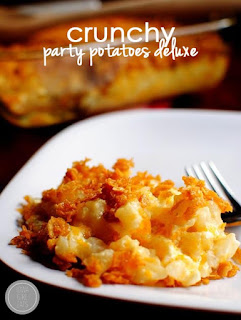
 IowaGirlEats has wonderful looking Crunchy Party Potatoes Deluxe

 A Cheesy Hashbrown Casserole from TableForTwoBlog

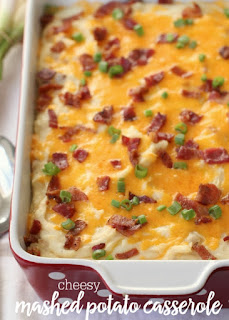
Mashed Potatoes and bacon from LilLuna.....Yum!

 Steph at TheCulinaryLife shares a Garlic Mashed Potato Recipe

Wonderfully buttery Mashed Potatoes from AFamilyFeast

Sweet Potato Casserole with Pecan Streusel from CiaoChowBambina

Deviled Eggs

 A yummy traditional Deviled Egg from Recipe-Diaries

RealHouseMoms has a great take on Deviled Eggs

Rolls and Butter

 Garlic, Herb and Cheese Bread Rolls from HandleTheHeat

These Honey Butter Pumpkin Dinner Rolls are from AverieCooks 

TheFoodCharlatan shares a wonderful Cinnamon Honey Butter

Dessert

Apple Pie from SweetLittleBlueBird

This Pumpkin Layered Dessert from FoodFunFamily

Pumpkin Twists from Deliciously Sprinkled

From the CanadianFamily a Pumpkin Praline Trifle

This Apple Snickers Trifle from DessertedPlanet

Do you have a favorite family dish that is a must have? This year maybe try to add something new, I would love to take a bit of every one of these dishes.

It looks like we will be staying home this year, my Aunt called and mentioned that some of the kids have been sick {terrible sick, I feel bad for them}, so we are hoping to find some time during winter break to go up and see them. This list is going to come in handy. Now I can choose a few and go pick up the ingredients we need and still pull off a good meal.

1.02.2015

New Years Traditions

With the New Year comes new traditions. Now that Lady A is a bit older and able to participate a little more in family activities we have had a lot of fun coming up with our own family traditions, especially since we live away from the rest of our family and won't always be able to make it out for the big events and holidays.

I'm not much of one for New Years Eve events, trying to keep my toddler up until midnight does not sound fun right now. She would be so tired and fussy by the time midnight came and the following day we would all still be paying for it.

But it is still a good reason to celebrate so for now we will celebrate on New Years Day!

We are new to Kentucky, we got here the weekend before the college semester started in August. While the winter has been pretty mild compared to what we are used to {we are from Utah and spent the last three years in Connecticut for Grad School} but we are told that the cold comes mostly in January. Here is my mug and saying for the year.


We all can use a little pep talk every once in a while.


Lady A joined in and created her own as well!
We need to encourage those little creative minds


The back detail


Paul helped her a little bit.
She wanted to use the mug I had done a little trial on. The gold dots were "oh, pretty!"

SUPPLIES
Paint Pens / Sharpie Markers
Cheap White Mug {I got mine from Wal-mart}
Vinyl {optional}
Silhouette Portrait {optional}
Saying, Quote, Shapes etc. {optional}

INSTRUCTIONS
I do not care for my handwriting on the mugs, it just never turns out the way I want. Instead I busted out my Silhouette Portrait and quickly cut out a little saying. 


Clean the surface you are going to be placing your design. I used a cotton ball and rubbing alcohol and went over the area once to wipe away any dirt and oils on the mugs.

Place your stickers, shapes, or vinyl where you want it. Now so to town with your paint pens and markers to create your one and only mug.


I used CraftSmart paint pens. I had more colors on hand with the markers so Lady A decided to use them.

Bake the dish int eh oven by placing it on a cookie tray. With your mug in the oven set it to 425 degrees, once the temperature is reached bake it for 30 minutes. Prop the door open, turn the oven off and let it your oven cool with your mug still in it.


A close up of the back detail.


I love how they turned out. Lady A is pretty pleased with herself too! Now that she is getting older and wants to join me in my creative activities I am so excited to see her creative personality emerge.

TIPS: 
I took two days to do mine because Lady A wanted me to wait so that she could finish her master piece before we placed them in the oven. When using a paint pen to fill in or around a letters and shapes, I would recommend taking them vinyl off before the paint has time to dry too much. Taking it off in the morning after the paint had time to dry and get tacky pulled up some of the paint from my letters so they don't look as smooth as I would like.

On the dishes I have made so far I have found that the Paint Pen stays great to wash in the dishwasher on the top shelf. Sharpie marker is best washed by hand. Do Not scrub! Use a soft washcloth and mild soap


Here is another Sharpie marker project with different tips and tricks.


I would love to hear from you and see your projects. Leave a comment or #AlwaysCreate on your photos. Find me on Instagram {@AlwaysCreate} and follow along for behind the scenes and fun little extras.

2.21.2014

Our New Valentine Tradition

Paul is in the theatre department as a grad student and has a show that opens up next week, which means for the next two weeks we will hardly see him. So Valentine dinner was moved to the following week at lunch time and we decorated cookies instead of making a big fancy meal.Now that we have finally had our Valentine lunch I can share it with you all.

"I Love You Because..." I love this saying for so many reasons. It causes people to think about why they love someone, suddenly the word 'Love' can not be thrown around but causes you to think about what you 'Love' about the other person.....and it is always nice to hear what it is about you that your partner loves.

Here is our little lunch time Valentine bar.
The wall of mismatch picture frames with photos from while we were dating, anniversary trips, family, holidays and other meaningful events {we share this wall with our neighbors and their staircase is on this wall, the picture frames are constantly crooked, it drives me crazy.} My new sign along with our garland to hang our hearts on. And of course, a bunch of sweet treats. Paul wanted chocolate covered strawberries but it seems everywhere stops selling them the day after Valentines, so I got him his next favorite, raspberry fill donuts.


For our new Valentine tradition I made the burlap sign and cut out some hearts. While Lady A played in the sprinkles and we decorated cookies, trying to keep her out of the frosting, we also wrote on the hearts what it is about the other, or our little girl, that we love. Then I bound them together for a little keepsake that will become part of our Valentine Decor over the coming years. When Lady A and Lady #2 are old enough they will join in the fun too and can look back at what mom and dad wrote about why we love them so much.

The tutorial for the burlap sign can be found here.


Check out some of my other simple Valentine crafts:
Love is the tie ..... chalk board printable

I Love You Because....Burlap Panel Tutorial

Have you seen these fun new Burlap Panels from Michaels? As soon as I walked past them I was in love and wanted to try them out right away. This package had three 8" x 10" flat panels and with a 40% off coupon, super reasonable in price.

This is the year of starting new traditions and this panel will go along perfectly with a new tradition I want to start. More on that later.....first lets talk about how I created this project.


Design your sign in Silhouette Studio {unfortunately I do not have the designer edition so I can not create a .SVG file to share with you all. Instead I have a .Studio file you can download from here. If you use my file on another project I would love to see it so be sure to link back and give me credit for my design. This is the first time I am trying to share a file so PLEASE let me know if it does not work.}

As you can see I did not center mine very well but this was a first time cutting on vinyl too! A lot of firsts in this post...YEA! Get you vinyl cut and gather you other items for your project.

I used:
Black and Red Liquitex Acrylic Color
Sponge Brushes
Burlap Panel
Silhouette Portrait


Weed out the vinyl sign after cutting it and place it on the burlap panel. As with a lot of firsts there is some trial and error. I was able to line the sides up but then used a clear ruler to help me center my saying from top to bottom.

Note: When lifting off the transfer paper from the vinyl take your time. The little pieces for the letter will lift with the transfer paper. Also be sure to take your finger or something else and trace all the edges of your cutout.


Put a bit of paint on the sponge brush and dab onto the burlap.

Note: The burlap has loose fibers so the vinyl won't always create a perfect 'seal' this is why dabbing instead of brushing is the way to go. If you brush the paint will push under the vinyl a bit and will not give you such a crisp line, but that might be what you are going for. Dabbing will also allow more paint to sink into the burlap so that your image will be more saturated.

If you find yourself in the same situation as me {the cutout is super close to one edge} you can use masking tape to extend the edge then you will not have to worry so much about your paint going over.


Pill the vinyl off once the paint is mostly dry. The reason to pull it up while it is still a bit tacky is so that when the vinyl is lifted the paint will separate easier and not come up with vinyl, making you design look choppy.


See how I used my burlap panel for our new Valentine tradition here.

LinkWithin

Related Posts with Thumbnails