11.04.2010

Cute Little Santa

Oh my goodness, I'm in love.

For the Holiday Season I decided that I wanted to try and make a Santa Hat. After looking on line I found a pattern that I thought would work. Boy was I wrong. I don't know if I misunderstood the pattern or if it was the pattern it's self but it was a NO GO. So instead I decided to design my own. I LOVE it! My neighbor was wonderful enough to let me take some pictures or her little boy with the hat on. He was going to stay asleep no matter what so we took some pictures anyways.


Look at how cute he is. I must say, I really like the Santa Hat too!

11.02.2010

HOPE Festival

This year at the HOPE Festival I took a number of custom orders. My big hit this year were the Down Town Head Wraps. Here are a couple of the custom orders. I also had a lady order a beanie for here grand-daughter. I love how they all turned out. Let me know what you think.

These fun wraps are what I'm making for Christmas gifts this year.
They'll go perfect with the scarves from last year.


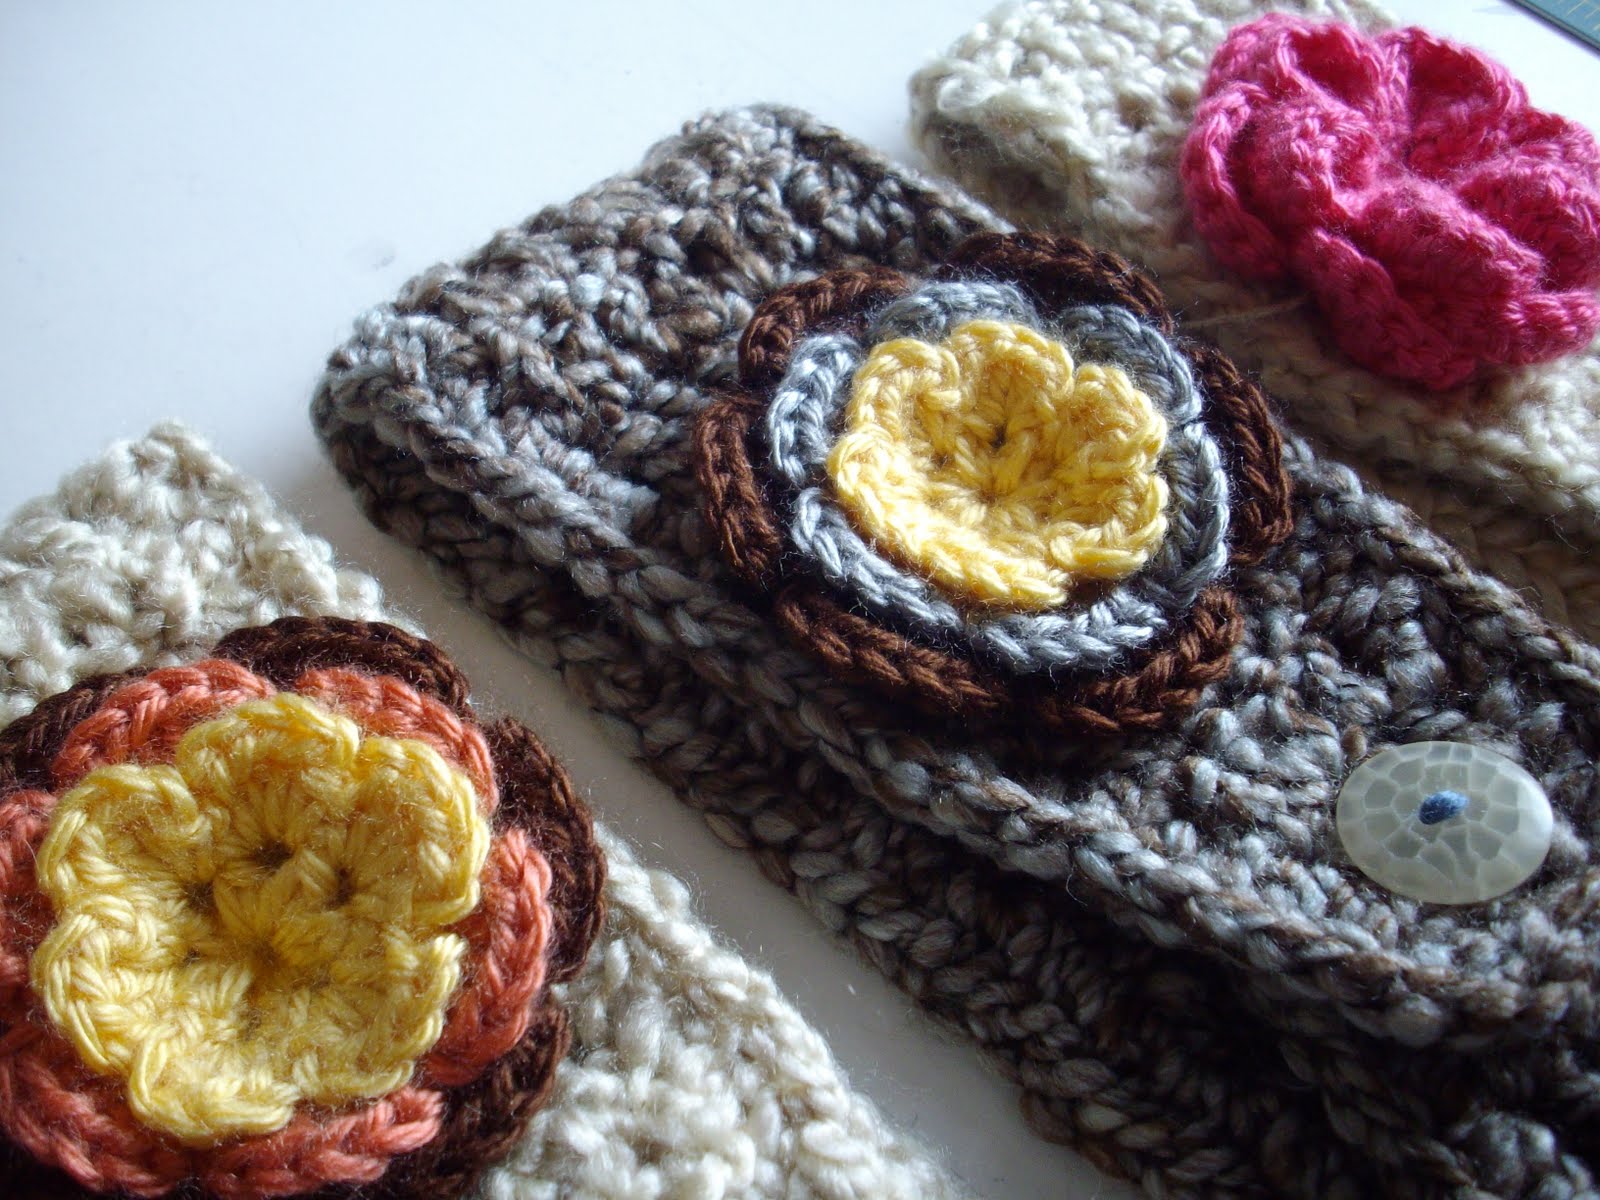
This is a fun new beanie a just started making and they were a great hit as well.

10.14.2010

Personal Notepad

I created some simple order forms to take with me when I go to the HOPE Festival on Oct. 27th. To help keep everything together I wanted to put it all together in a notepad but I didn't want to pay for something so simple that I was sure I could do myself. So here it is - so simple and would be a fun craft to do with your kids {my niece and nephew}.

You'll need: paper, stamp and ink set, cutter of some sort, glue and some REALLY heavy books.


First you will need to create you design. I used a computer program since I was making order forms but this would be great to use stamps. Just get your favorite set and some varying ink pads. I printed mine first and added a guideline to the first page to help me cute in the right spot. If you are using stamps it might be easier to cut your paper to the desired size for the notepad.


After you have you notepad papers cut with their designs on them you are going to line them up. Make sure the edges that you want the glue to be on {in my case the top} is lined up as straight and flat as possible. Then you'll take your heavy books and place as close to the edge to be glued. This helps keep the notepad tight and keeps the glue from seeping into the separate sheets.
*Note with my books the binding edges didn't really lay flat on my papers so I turned them so the straight edge of the cover was right up to the edge.


Next, use the sponge to add the glue to the top of the flattened notepad papers. You can use your fingers or whatever else you might have around, this was just the easiest for me. After adding the first coat let it dry and add a second coat. My layers were pretty thick so I only needed 2 layers but add more if you think it's too thin.


Tada: your own personal notepad. If you are wanting more than one pad, stack up the paper in one pile. After the glue binding is completely dry, divide your notepad and just pull apart.


If you work on this tutorial I would love to see what you came up with!!

10.11.2010

10 Goals for 10.10.10

I put this post on our personal blog but because so many of the goals had to do with creating and crafting I decided to post it here as well.

Paul pointed out to me that it is 10.10.10. At the beginning of the year we were a bit slow to come up with goals for this year so to make up for that I am going to list ten {10} goals that I want to complete before the end of 2010. Lists always help me keep track of everything so here is my list.

~ Loose weight. I never really struggled with weight or trying to look like the Hollywood now girl but it is something I have caught myself thinking more of now, since I've been married {Paul loves big meals and I never wanted anything to go to waste, so I ate it and it all went to my waste}. I have a certain goal in mind but I have never tried to loose weight so I don't know how my body will react to it. For now I will leave this one at "loose some weight" and it could carry into next year.

~ Finish my projects. I'm sure I could go around the house counting all the projects that I need to finish {that number could be pretty high}. Instead I will list a few off the top of my head that I really do want to finish by the end of the year and before we move.

Window Treatments
Table Runner
Picture Collage
Homemade Christmas Gifts
~ Read the Book of Mormon. This is the Virtue Project for the YW's Personal Progress and it would just be a good one to do.
~ Clean the Fridge. This serves double duty because it needs to be done and I will have to do it since we will be moving shortly as well.
~ Continue Attending the Temple. We set a goal for our Temple attendance earlier this year and have been able to make it and I want to continue with that.
~ Sort through my closet. I'll leave this one until closer to the end. If I loose the weight I want to then I will get to keep a lot of these items. Wink, Wink!!
~ Finish my Personal Progress. I started it with my YW and want to finish it here with them even though I have been released.
~ DI and De-junk. We have a constant DI box so that we can put stuff in it as we go. I really need to do this with all the stuff we have in the spare room/office/craft space {one room...many purposes}.
~ Meal Planning. We have food storage items that I would rather use then toss out or have to pack and take with us when it is time to move. I want to plan our meals so that we can use up as much of it as possible. This will take some creative meal planning and patience to use it all.
~ Levi Quilt. I'm not including this with "finish projects" because I haven't actually started it. I made one for a great friend of mine as a wedding present and didn't want to give it away when I finished it. I loved the flannel on the back that made it so nice and soft and how wonderfully sturdy and heavy it was since it was made out of jeans. Fantastic to curl up in. I have always wanted one for myself and it is time to get busy and make mine.

On Saturday my SIL and brother and their little girl came up so that she could take some family photos for us. She was wonderful enough to come up on such short notice. It was a lot of fun and she did a wonderful job.
Here is a sneak peak at the photos.Bentley LOVES Paul and Paul loves him right back!

9.27.2010

Scarves ~ Four Fun New Styles

Game Day Scarf

With my husband in his last semester I have an overwhelming desire to attend a game before we leave. To attend the game I’ll need some game day attire. Well, here is a fun, flirty and warm scarf.

With this purchase you will receive a Game Day Scarf {approx. 100 inches} you choose the colors. Leave a note to seller at time of purchase and let me know what color you would like for your Game Day Scarf.

Alais Scarf

I have an afghan blanket made with this weave stitch and have been trying to figure it out for some time. Well I finally figured it out and thought it would be fun to make a scarf. It's a simple stitch but adds just enough character that this scarf can be worn with any outfit.

With this purchase you will receive a Alais Scarf {approx. 70" x 4 3/4"} in grey heather/sunshine or you can choose the colors. Leave a note to seller at time of purchase and let me know what color you would like for your Alais Scarf.

Blue Fuzzy Scarf

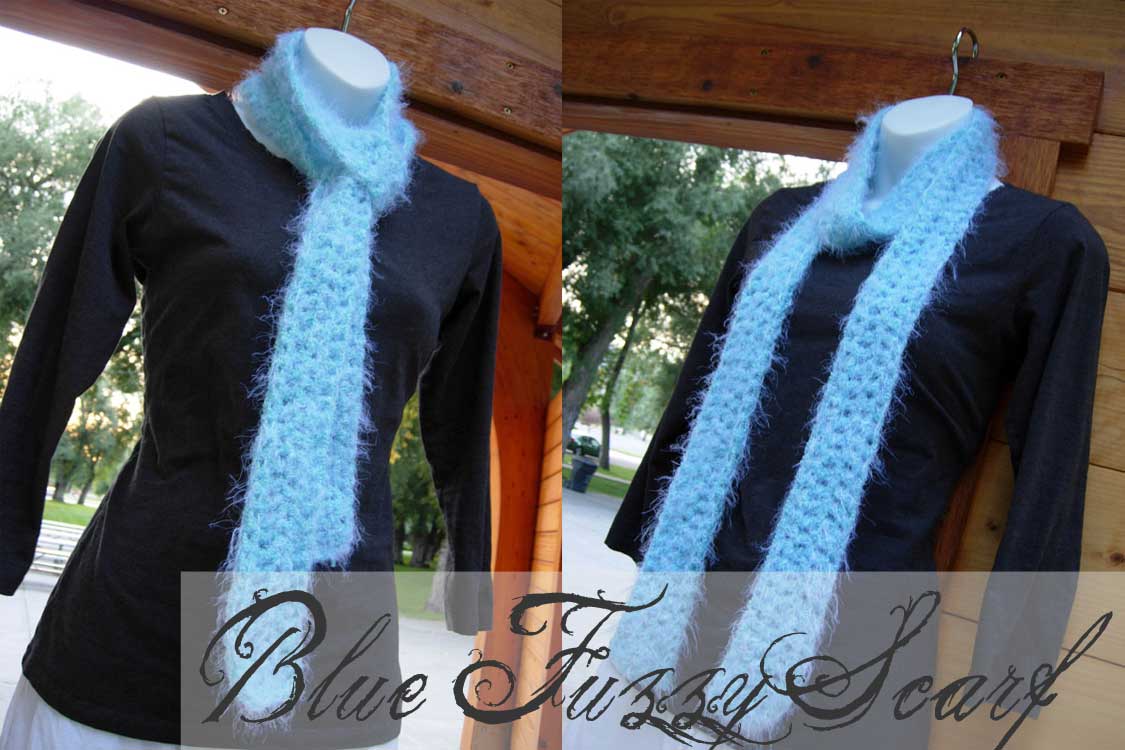
Oh so soft!! This yarn is so soft, it almost feels like it will just puddle in your hand, I love the feel of it up against my cheek. Long and slim this is the perfect accent piece and will make you feel oh so cozy as soon as you put it on.

With this purchase you will receive The Blue Fuzzy Scarf {approx. 74" x 2 1/2"} in soft blue.

Square Cluster Scarf

This is a fun cluster pattern that adds volume and character to the scarf. Oh so soft and warm and this is a great scarf for those colder days.

With this purchase you will receive a Square Cluster Scarf {approx. 82" x 3"} in regal earth. This yarn comes in a number of colors, if you are looking for a specific color send me an e-mail or leave me a note. I'll let you know if I have the color available to me and would be happy to do a custom order for you.

9.02.2010

Neapolitan Floral Wedding Invitation


I designed my own wedding invitations and this one is a take off of it. The colors definitely remind me of Neapolitan ice cream. With the soft colors the design is simple and elegant while still remaining sophisticated. The font color for the names is taken from the photo to keep a consistent color scheme.

With the purchase of this listing, you will receive the high quality 300 dpi digital jpeg file that you can print yourself.

The announcement measures 5x7 inches but can be formatted to a 4x6 size. If larger prints are desired please convo me to set up a custom order.

~CUSTOMIZATION
On this design, the following customization options are available:
-font
-font color
-wording
-theme colors

~PROCESS
-Upon purchase, please email your information to alwaysbecreating.designs [!at] gmail.com or in the notes to seller
-Within 24-48 hours, I will send you a proof for your review.
-Upon completion of the design process, and your approval- I will email you the final file.

~PACKAGES
Invitation packages are also available!! Check them out.
http://www.etsy.com/shop_policy.php?user_id=10920771

~Optional Printing
Send me a convo to inquire about printing and cost.

If you like my style, but don't see what you are looking for contact me! I love custom orders!

8.27.2010

Lace and Love

Lace and Love

Ok. Every time I come up with a new design it seems that is my favorite. This design was inspired by the lace trim around the bottom of a skirt. I simplified it and added some color but I love how it turned out. Black and white is a timeless and elegant combination and there is just the subtle addition of color.

With the purchase of this listing, you will receive the high quality 300 dpi digital jpeg file that you can print yourself.

The announcement measures 5x7 inches but can be formatted to a 4x6 size. If larger prints are desired please convo me to set up a custom order.

Love Birds Wedding Invitation ~ Change

Well as I spent more time looking at the Love Birds Wedding Invitation I was feeling like there was something not finished. The heading box needed a little something to break it up so this is what I came up with. I hope you enjoy!

There is a touch more elegance and it feels finished now. I love it.

8.25.2010

Love Birds Wedding Invitation

Love Birds Wedding Invitation

The original idea for the love birds came from a custom order I had. The gal was looking for recipe cards to go along with the theme of her friends wedding. I was so excited about how they turned out and the customer loved them as well. The Love Birds invitation has a simple and elegant feel you are sure to enjoy and so will your family and friends!

With the purchase of this listing, you will receive the high quality 300 dpi digital jpeg file that you can print yourself.

The announcement measures 5x7 inches but can be formatted to a 4x6 size. If larger prints are desired please convo me to set up a custom order.

To go along with this announcement there are also Bridal Shower Recipe Cards. Check them out here. Everyone loves to know their work is appreciated, here is what my customer had to say...

"Thank you! Thank you!! Thank you!!
The recipe cards were absolutely perfect -
They went over so well at the Bridal Shower, the bride LOVED them.
Thank you so much for taking the time to make them
and then hurry and send them.
I definitely will visit your shop again..."

~CUSTOMIZATION
On this design, the following customization options are available:
-font
-font color
-wording
-theme colors
~PROCESS
-Upon purchase, please email your information to alwaysbecreating.designs [!at] gmail.com or in the notes to seller
-Within 24-48 hours, I will send you a proof for your review.
-Upon completion of the design process, and your approval- I will email you the final file.

~PACKAGESWedding packages are also available!!
-Sweet Pea ~ Your choice of all ready designed invitation plus two other cards of your choice {Thank You's, Save the Date, RSVP, Direction/Maps, Reception cards, etc.} $27.50
-Iris ~ Custom Designed Invitation plus two other cards of your choice {Thank You's, Save the Date, RSVP, Direction/Maps, Reception cards, etc.} $30.00
-Amaryllis ~ Your choice of all ready designed invitation plus three other cards of your choice {Thank You's, Save the Date, RSVP, Direction/Maps, Reception cards, etc.} $35.00
-Calla Lillie ~ Custom Designed Invitation plus three other cards of your choice {Thank You's, Save the Date, RSVP, Direction/Maps, Reception cards, etc.} $37.50

If you like my style, but don't see what you are looking for contact me! I love custom orders!

Chandelier Wedding Invitation

Chandelier Wedding Invitation

The look of a silhouette chandelier is a simple yet elegant design feature and I have enjoyed working on this one. Even with the design in one solid color the detail of the chandelier really stands out against the background but doesn't shout.

With the purchase of this listing, you will receive the high quality 300 dpi digital jpeg file that you can print yourself.

The announcement measures 5x7 inches but can be formatted to a 4x6 size. If larger prints are desired please convo me to set up a custom order.

~CUSTOMIZATION
On this design, the following customization options are available:
-font
-font color
-wording
-theme colors

~PROCESS
-Upon purchase, please email your information to alwaysbecreating.designs [!at] gmail.com or in the notes to seller
-Within 24-48 hours, I will send you a proof for your review.
-Upon completion of the design process, and your approval- I will email you the final file.

~PACKAGES
Wedding packages are also available!!
-Sweet Pea ~ Your choice of all ready designed invitation plus two other cards of your choice {Thank You's, Save the Date, RSVP, Direction/Maps, Reception cards, etc.} $27.50
-Iris ~ Custom Designed Invitation plus two other cards of your choice {Thank You's, Save the Date, RSVP, Direction/Maps, Reception cards, etc.} $30.00
-Amaryllis ~ Your choice of all ready designed invitation plus three other cards of your choice {Thank You's, Save the Date, RSVP, Direction/Maps, Reception cards, etc.} $35.00
-Calla Lillie ~ Custom Designed Invitation plus three other cards of your choice {Thank You's, Save the Date, RSVP, Direction/Maps, Reception cards, etc.} $37.50

If you like my style, but don't see what you are looking for contact me! I love custom orders!

8.08.2010

Monster Mash ~ Halloween Party Invite

Here is another fun Halloween Invite.

I enjoy the play of the Halloween colors of black and orange. Fall is such a fun time to gather with friends and family. What better way to get a group together than a costume party.

Final dimension of the card is 6x6 inches or 5x5 inches when matted on black card stock. Each card is finished with eyelets and grass twine. Card stock and font colors can also be changed.

If you like the design but need a different theme leave me a comment or visit my ETSY shop and send me a convo.


6x6 cards are $1.75/ea
5x5 cards are $1.25/ea
Minimum quantity order of 10 cards

8.07.2010

Fall is Coming

I went into my local craft store the other day to look for a couple of items and all the fun fall items are out. I love the colors of fall, they are such warm colors that make you feel wrapped up in a nice cozy blanket. This inspired me to work on some fall projects.


I love these frames!!
They are so much fun to rearrange for every holiday.


The Black and White flower is the pattern that I designed.
I think the Green flower with the little bead in the middle turned out so great.

I am so excited I finally learned how to do flowers they are going on everything.

8.05.2010

My Perfect Flower

Well, I have been looking for a flower pattern to use and add to my beanies but I haven’t been able to find one that is what I am looking for. The ones I have found either don’t have a pattern or one that makes no sense to me. After playing around with a couple of patterns and understanding how a flower pattern works ~ I finally came up with my own. I love how it turned out. It works perfect with the beanies and I’m sure it will work great on the headbands. I have been thinking about using a giant button in the center or getting some beads and putting a cluster in the center.

What do you think?.....

8.02.2010

Alphabet Blocks

Our niece and nephew came to visit for the weekend {ok, it was the weekend of July 24th} and you know what that means....CRAFT TIME!!

In my church I was called as Camp Director for the Young Women. I have been so busy with that, running around, getting things ready, that by the time our niece and nephew came up I was drained. I had NO idea what craft we could do with them. Then it dawned on me ~ one of the activities we will be doing at camp is making alphabet blocks. Just like with the rag flip flops, this was one that I have not ever done before, so I was going to take this chance to try it out and see how it went.

First we went to a local hardware store and purchased some 2x2 pine. My husband took it and cut it all into square blocks. Now that we had a huge pile of blocks we needed to sand them to get rid of the rough edges and round the corners.


We have this perfect piece of lawn next to our town house so we spread out there in the shade and got busy. Bentley {my mini schnauzer} wanted to be out where all the action was as well. It was a perfect day for a craft outside. As I am sure you can guess I have a quite a selection of colors for spray paint. We put some old carpet tile squares upside down to use as our surface ~ the underneath side was perfect for what we were doing.

Uncle Paul did the spray painting.

Then Bailly and Gabe got to take turns painting any colors that could not be sprayed on. Paul had the idea for some crazy spatter look for his blocks, Bailly wanted to use white and purple, while Gabe wanted to use all the colors that the others where using. I was worried about his turning into some kind of colorful mess, but I actually really like how it turned out.

Look at the concentration on their faces.

We had other things planned for the rest of the evening so we set the blocks out to dry.

The next day we got out a stamp set that uses paint. All you do is add a little bit of paint to the alphabet stamp instead of ink. Paul used a brush for his and I didn't have time to finish Bentley's blocks. Look at how fun they turned out. They were both really excited about their craft and we always love having them up for the weekend.

7.21.2010

Rag Flip Flops

Girls Camp is a time when the Young Women in a ward get together, with the leaders, and do a summer camp. It has always been one of my most favorite activities. The memories from my camps when I was in Young Women's have stayed with me. I love singing around the camp fire, hiking, being in nature and the crafts/activities that our leaders had for us were always great.

This year, being camp director, my goal was to make sure that everything we give the girls will be things that they can continue to use once they are back from camp. These things will be a subtle reminder of their time at camp, the Spirit they felt there and the memories they made. We also asked the girls what things they would like to do {and would like NOT to do}. It was mentioned that they wanted to do rag flip flops.

Me, myself and I have never made them but I could not imagine that it would be too hard. I called up my cousin {she is a sewing/quilting machine} and we talked about how I could go about it.

Here it is......

Find any scrap material you have lying around or get a couple of quarter squares from your local fabric store. The scrap will need to be made into 1"x8" pieces. You will also need scissors, a ruler and a pair of flip flops.

1st Step: I took all my material and cut them into 8" lengths.


2nd Step:
Then at the top of each I cut in about a 1/2". Then I tore the fabric where I had cut it. There you have it, a huge pile of 1"x8" scraps. Each flip flop took 29 strips. Depending on the length of the straps on your own flip flops ~ you may need more or less. Make sure to tare enough strips!


3rd Step:
I went down the strap and tied all the fabric strips in double knots. I'm sure you could do a single but I felt the double knot would hold better and it made the ends just a bit shorter instead of having so much fabric hang off.


There you have it. Camp Flip Flops!!!

7.20.2010

Organize

As I am sure you have gathered, I love to create things ~ easy, hard, simple, intricate ~ whatever it is, I always find a release in creating and designing. One thing I love to do is sew, it's one of those skills that my mom made sure we knew how to do growing up that has turned into a hobby. When I was in high school I designed clothes. The past couple of years the spark for quilting has been rekindled and someone can never have too many bags. For the past couple of years I have been designing patterns for the perfect bag. I have come to find that there is no 'perfect' bag, just a perfect bag for each situation.

I have this small old binder that I have been putting my crocheting patterns in along with templates for quilts and other little nick-knacks. I was just using page protectors to toss everything in if I couldn't put a hole punch in to. It worked out pretty well to hold all those things and keep them in one spot. The only problem is that everything sinks to the bottom and the binder becomes lopsided.


How I fixed the problem was this. I took those page protectors and sewed pockets into them.

1st Step: take a thin piece of cardboard that fits into the page protector and draw a line on it as to where you want to make the pockets for the lower sections.


2nd Step: Take an exacto and cut along that line. {If you stitch before you cut the extra openings it hard to then cute it without going through the other side.}


3rd Step: When setting up my machine I put the length of the stitch to almost as long as it would go. If the stitches are too close together then as the needle goes through it will end up perferating the page protector and make it easier for it to tear along the stitches.

4th Step: Since the page protector is clear it was easy to look at the guides on my machine. If I was stitching where a cut was I left an 1/8th in seem allowance.


On the one's where I wanted to do a vertical stitch I took a piece of masking tape and placed it further in on the arm as my guide.


5th Step: Back stitching is out of the question, again, because we don't want to perforate the page protector to the point that it tears. I pulled both piece of thread to the back and simply tied them in a knot.


Final Step: Fill and stay organized!!! The binder has tabs that I have used to seperate the different types of mediums {for example crocheting and sewing}. These 'new' page protectors help me to keep my instructions and templates organized with everything else as well!!


I hope you enjoyed the tutorial.

As always ~ with every tutorial, if you like the idea but would rather purchase, leave me a comment. I'll set up a sale on my ETSY shop.

LinkWithin

Related Posts with Thumbnails