Showing posts with label Frames. Show all posts

11.18.2015

Create a Silhouette of Your Kiddo Using Photoshop

I have wanted to try creating silhouettes of my girls and this is what I came up with.

I remember doing these as kids. We would place a flashlight on the edge of a counter or chair, stand in front of it to cast our profile onto a paper hanging on the wall. Then someone would trace our shadow, it was not a perfect system. Depending on how close you were to the flash light your silhouette could end up pretty big, too far away and it would be smaller but fuzzy and some detail would be lost.


One day I was working at the desk and I caught a glimpse of LadyA with her cute pony tail. That's it! I'll do a silhouette for her, she will love it, we can even use it for Christmas ornaments. And she did!

There are a lot of ways to go about creating a silhouette. Here is how I did it on my computer with Photoshop. I am by no means a top expert but I am excited to share with you some of the techniques and keyboard shortcuts I use.

Did you know that Amazon has a section for Subscription Software? I know, I had no idea either!! Right now they have a free 30 day subscription for Adobe Photoshop then you can go month to month or do a 12 month subscription.

Warning: this project could take a little bit longer than you think as you follow along the first time, but then you will be a professional and can wiz through making the next ones, just like when I thought you how to bring a cut file from Adobe Illustrator into Silhouette Studio.

Alright, here it is. This might be a bit long but I am trying to be VERY thorough.

: : : : : : : : How To : : : : : : : : 

1. Once the kiddo has their hair done and a shirt on {if you want a collar at the base of their neck} have them stand in front of a contrasting background. Our backdrop was a yellow set of drapes, the light coming in helped create a good contrast. The problem area was the end of the ponytail and the moving boxes but the rest of the image has a great contrast.
   

2. Upload and open the image in Photoshop.
Change the levels of the image.
Go to: --> Image --> Adjustments --> Levels
Use the Input Levels grid to play with the contrast of the your image by moving the black and white levels to the middle until you like the contrast achieved.


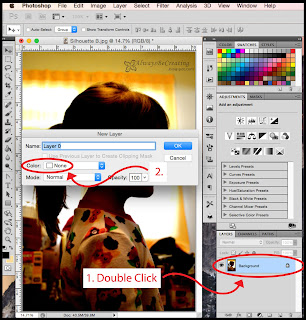
NOTE: At some point you will need to unlock the photo layer. Double click on the layer, set color to 'None' and click ok. This will allow parts that need to be deleted, to be completely removed instead of just changing it to an overall color wash.


3. Change the image to Black & White.
Go to: --> Image --> Adjustments --> Black & White.
Change the different levels until you get a good contrast. I changed the yellow because of the drapes and red to increase the contrast with her skin.


4. Now use a combination of the Rectangular Marquee Tool and the Magic Wand Tool to select all the background image that is not needed.

*First use the Rectangular Marquee Tool to select the big parts of the image that will be deleted.

*Now use the Magic Wand Tool and click around the image to finish selecting background. This helps to select items with odd shaped edges, ie: around the face and hair.

NOTE: After making the first initial selection with the Rectangular Marquee Tool, hold down 'shift' on the keyboard. This will allow you to add more to the original selection.

NOTE: If you select something that you do not want selected {which can easily happen using the Magic Wand}, release the 'shift' key and press CTRL Z to undo your last step. Then press 'shift' again to continue selecting the background.


5. It's time to fine tune the selection. At the bottom of the toolbar click the Edit Mode button. I like this to help fine tune my selections. Using the Paintbrush with either black or white {change the size of the brush stroke up at the top left side of your screen or I use the '[' and ']' on the keyboard to decrease or increase the size of the brush.

When white is being used, anything you click on will clear the pink away. If black is being used than anything you click on will appear in pink.

Click on the Edit Mode button from the side tool bar to go back to the Standard Mode.


6. Click the 'delete' button on the keyboard and everything that is selected will be removed. Then turn off the selection by clicking CTRL D on the keyboard.

Use the move arrow to move the silhouette if you would like to where you want it on the page.

Create a new layer and move to the bottom of layers.
--> Over on the layers tool box is a little button on the bottom to create a new layer then just drag the new layer to the bottom of the stack.

NOTE: Because the photo layer is unlocked, the background will be completely cleared. This will allow you to do some other edits but we will not get into them right now.

Use the paint bucket to drop white {or color of your choice} into the bottom layer.

NOTE: Make sure you have selected the correct layer that you want to work on to finish the project.


7. Create a new layer. Make sure it is the top layer.

While on the original image layer use the Magic Wand to select the empty space around the silhouette image. Then change the selection to the inverse.
Go to: --> Select --> Inverse

Switch to top layer, use the paint bucket and black {or color of your choice} to drop black into the selected silhouette space.

Deselect silhouette.

Now you can go in with the eraser or paintbrush and help fine tune any areas that might need it.


Now you are done!!


When I save my files for a project like this I will save it as a .jpg to print as well as a PSD. The PSD file will keep the different layers and then I can go in and try different things on it if I want to, such as adding text, color, etc.

NOTE: Be sure to save your image as you go along so that you won't loose any of the work you have already done.

Don't forget to stop by Amazon to check out their Subscription Software and get a free 30 day trial of Photoshop.

The great thing about doing this project digitally is that you can use the silhouette in so many different ways. Share your silhouette project with me in Instagram. Be sure to tag me in your post and add #PhotoShopSilhouette.

6.10.2013

Love Notes Picture Frame ~ Take Two


I love when I finish a project and get to share it with all of you. These frames turned out great and were so simple to put together.

Two more family wedding presents. I was holding out for the right frames and wouldn't you know that I found the perfect ones at Wal-mart for $3!

 
What you need:
Frame
Photo
Pattern Paper {card stock works great}
Spray Mount
X-acto knife and/or Scissors
Metal Ruler
Cutting Mat
Masking Tape
Dry Erase Marker

The frame advertises that it has spots for two 4"x6" photos, that's a lie, it is 3.5"x 5.5". I already had my 4x6 photo picked out and ready to go so I had to cut the opening a bit but no biggie.

Spray mount the front of the cardboard mat and place face down on the back side of your patterned paper.
{American Crafts - Take Note - Pink Pearl}
{American Crafts - Classic Calico - Frequency}

*Tip: I held the cardboard mat and patterned paper up to the window {kind of like a light box affect} and marked roughly where I wanted it to line up.

Cut off the excess around the cardboard mat and cut out the opening where you want the photo to go.

*Tip: On the wrong side I marked the four corners for the photo opening by making little cuts with the x-acto knife. Then on the right side I used the metal ruler as a guide to make a nice straight cut for the photo opening.

It looks a little low tech but I used masking tape to place the photos. This would hold it nice and tight and I wouldn't worry about a liquid glue warping the material as it soaked in. This will also allow the couples receiving these frames to change out the photos without worrying about ruining the cardboard mat.

They are done and wonderful! A good sign that they are perfect is when I want to keep them for myself instead of giving them away.

I used an image transfer technique that you can find here.


Go Create!!
Mindy

5.06.2013

Love Notes Picture Frame

I am so excited to finally share my project with you!!


This frame was designed for Paul's cousin as a wedding gift. She had some decor windows at her reception, one with a phrase and another with a scripture quote. This was designed to match them and I have to say, I am pretty pleased with the way it turned out.


What you need:
Frame
Photo
Ribbon
Hot Glue
E6000
Dry Erase Marker


With the glass and back of the frame in place, set the image on top of the glass where you would like it then make simple marks at the corners so you know where to place the image once you have glue on it.

Put E6000 glue on the back of the image, I used a toothpick to help spread it around. You won't need a thick layer, just make sure the whole surface is covered. Place and spread a thin amount of E6000 on the glass within the marks.

With the glass out of the frame and on a flat surface place and hold the image down
*When the E6000 is placed on both surfaces the bond will be a lot stronger.


I used 3/8" ribbon and cut a 20" piece. At the top of the frame, use the glue gun to adhere the ends of the ribbon to the underside of the glass opening.
*I used the hot glue gun here because it would dry a lot faster.


To add a little personality to the ribbon I added a bow.
1. Place two folds in the ribbon approx. 5 1/2" apart.
2. Cut a second piece of ribbon that will be long enough to wrap around the bow. Glue the two folded corners to the end of the small piece of ribbon.
3. Place a small drop of glue down where the two fold meet and press the center of the loop down to make the bow.
4. Wrap and glue the smaller piece of ribbon around the bow.
*I used the hot glue gun here because it would dry a lot faster.
DONE!!


Using the same technique, spread E6000 around the inside of the frame where the glass will rest. Carefully place the glass in the frame {make sure it is facing the right way and not upside down} and press the glass into the glue.
*As you are placing the glass, watch where it is going so the image will be centered as you place the glass. If the glass is set in the glue then wiggled around, the edges will get all gunky and be seen from the front.


I love it!!!
Hopefully they will too.


If you want to create your own frame with the crackle technique, check it out here.


I used an image transfer technique that you can find here.


3.11.2013

Baby Birth Frame

When our little girl was born I wanted to be sure to have something with her little feet prints.

I took the first verse of a favorite primary song 'I am a Child of God' and added Lady A's info. The Nurses were great and able to get some wonderful foot prints for me. Look at all those creases in her feet.

When she was first born this is the song I would sing as the two of us were figuring each other out. We now sing 'I am a Child of God,' at least once a night, before bedtime.

Download here. There are tick marks to cut the pdf to an 8" x 10". I would suggest filling in the blanks {the ones that you can} and then with a pencil draw a very soft line {that can be erased} along the bottom using the tick marks so that the nurses will know where the foot prints need to fit into. I printed out 4 {four}: one for me, one for each grandma and one to make a mistake on, with those little squirmy feet sometimes it takes more than one try. They did so great that all four turned out and so now Lady A has one for her book.


*This frame was given to us as a wedding present and I absolutely love it. When I put the footprints in I found out that with the extra detail molding in the frame it is more 7.5" x 9.5" but I haven't been able to find a new frame for it that I like so I will keep it in here until I do. On the PDF download I also tightened everything up a bit so if your frame is the same, you won't have the same problem.

I love how it turned out and hope that when Lady A is old enough, she will love it too.

There are seven different color schemes with editable fields to enter your childs' name, birth date, city and state, and Parents. If you don't see the colors you want shoot me an e-mail or leave a comment. I would be happy to help you out.


***UPDATE***
{4 June 2013}
Oh my goodness is my face red. I have been looking at the one I did for Lady A over the past year and half. I finally found the perfect frame for it and as I went to swap frames....I saw a typo. AHH! On the third line it is supposed to say 'an' not 'and'. I have fixed the typo and attached the new file to links above.


Get Creating!
~Mindy

8.07.2010

Fall is Coming

I went into my local craft store the other day to look for a couple of items and all the fun fall items are out. I love the colors of fall, they are such warm colors that make you feel wrapped up in a nice cozy blanket. This inspired me to work on some fall projects.


I love these frames!!
They are so much fun to rearrange for every holiday.


The Black and White flower is the pattern that I designed.
I think the Green flower with the little bead in the middle turned out so great.

I am so excited I finally learned how to do flowers they are going on everything.

1.08.2010

A Different Take

I have this card up for sell in my Etsy store. The lady who purchased it had a cute picture of her little baby boy but needed a different color other than orange ~ it would not work with her photo. This is what we came up with. I just wanted to show the difference just a couple of changes could make. The color was changed to red and a note was added to the bottom.

Thanks for allowing me to work on the Announcement Card for baby Kade.
Enjoy!!!


11.07.2009

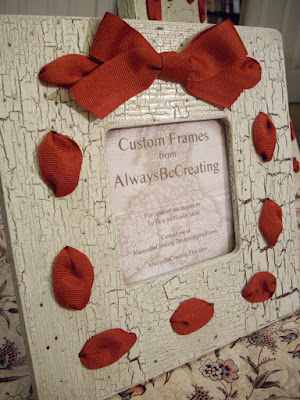
Any Season Crackle Paint - Ribbon 8x8 Frames

I am finally getting these up after the H.O.P.E. Festival. There were a couple of people who wanted them but had class, needed to get more cash or for other reasons were not able to purchase before I left so now they are up to purchase.

These frames took a bit of time to make but I could not be more please about how they turned out. The wooden frame has been stained so where the paint has cracked it provides the dark background. The ribbon has been woven into the frame to provide more of an accent. The frame is self standing, can be placed in picture stand or, if the ribbon is extra long, can be hung. By simply changing the color of the ribbon the frame can fit any season or occasion.

Frame measures 8x8 inches and has a 3.5x3.5 inch photo opening.

Listing includes one frame and red ribbon already weaved into frame.

I love to make wall pieces in triplicates. This way they can be sure to match and makes a full set. If you would like to purchase all three, convo me at my etsy shop and I will set up a custom order of you.

Enjoy!!!!


9.22.2009

Fun Frames

I made these frames a while ago but never got around to posting about them. The idea came from a sister-in-law who has done similar things for gifts and to frames in her house. They were fun to make and a bit different from the other things I've done so far. I love to make wall art pieces in triplicates.

Enjoy.

Chic

Spring

Fun!!!!!!

LinkWithin

Related Posts with Thumbnails