Showing posts with label Fall. Show all posts

11.24.2015

23 Variations on Traditional Thanksgiving Dishes

Some of my favorite things for Thanksgiving dinner are the stuffing/dressing, cornbread, party potatoes, eggs, bread rolls and dessert. So I thought I would put together a list of variations on these great family tradition dishes. These all look so yummy, maybe you can find a new one to add to your Thanksgiving meal.

Dressing/Stuffing

 From SixSisterStuff this stuffing looks fantastic

 Find this Bountiful Harvest Sausage & Cranberry Dressing at ItsYummi

 A fun take for this traditional dish from ASpicyPerspective

ThePioneerWoman has a great traditional dressing

Cornbread and Pudding

 Corn Casserole from Seededatthetable

Grandmothers Buttermilk Cornbread on AllRecipes

 This Corn Pudding from CupcakesandKaleChips looks wonderful.

Oh my goodness....all of these Potatoes look Amazing!!

 IowaGirlEats has wonderful looking Crunchy Party Potatoes Deluxe

 A Cheesy Hashbrown Casserole from TableForTwoBlog

Mashed Potatoes and bacon from LilLuna.....Yum!

 Steph at TheCulinaryLife shares a Garlic Mashed Potato Recipe

Wonderfully buttery Mashed Potatoes from AFamilyFeast

Sweet Potato Casserole with Pecan Streusel from CiaoChowBambina

Deviled Eggs

 A yummy traditional Deviled Egg from Recipe-Diaries

RealHouseMoms has a great take on Deviled Eggs

Rolls and Butter

 Garlic, Herb and Cheese Bread Rolls from HandleTheHeat

These Honey Butter Pumpkin Dinner Rolls are from AverieCooks 

TheFoodCharlatan shares a wonderful Cinnamon Honey Butter

Dessert

Apple Pie from SweetLittleBlueBird

This Pumpkin Layered Dessert from FoodFunFamily

Pumpkin Twists from Deliciously Sprinkled

From the CanadianFamily a Pumpkin Praline Trifle

This Apple Snickers Trifle from DessertedPlanet

Do you have a favorite family dish that is a must have? This year maybe try to add something new, I would love to take a bit of every one of these dishes.

It looks like we will be staying home this year, my Aunt called and mentioned that some of the kids have been sick {terrible sick, I feel bad for them}, so we are hoping to find some time during winter break to go up and see them. This list is going to come in handy. Now I can choose a few and go pick up the ingredients we need and still pull off a good meal.

11.23.2015

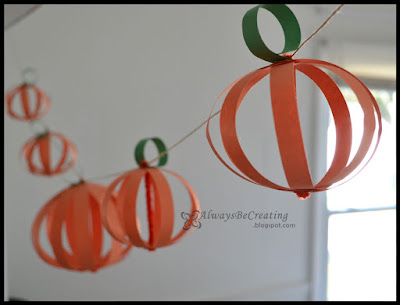
Fan Pumpkin Garland


Here is a simple and cute garland that can be made in 30 minutes.


My daughters thought they looked great hanging across our walkway arch and I am excited to share them with you.


This is one craft that you can do with the kids, it will probably be easiest if you do the prep work first, then have the kiddos join you.


MATERIALS/SUPPLIES
Construction Paper {cardstock or patterned paper}
Pipe Cleaners {orange and green}

NOTE: I did green paper and pipe cleaners so I could try them both out and see which one I liked better for the stem.

TOOLS
Wire snips
Tiny hole punch {I used a Provo Craft Silent Setter that has 3 sizes of punches}
Paper cutter


INSTRUCTIONS
Cut the paper into strips. I did 6"x1/2" and 8"x3/4".

Roll the green paper around a pen or pencil. Find a way to secure it. This will add a spiral to the stem.

Cut the pipe cleaners. I cut a few different lengths so I could test them out and see which one I liked.

Punch a hole at either end of the orange strips and one end of the green srips.

TIP: To do larger pumpkins I would suggest using a thicker paper, like cardstock. The paper strips started to get saggy the longer the pumpkin was hanging on the garland.

TIP: If you have little kids who want to help, I would suggest getting all the prep and cutting done first, then have them join you. wink, wink.


Grab eight {8} small orange strips or 12 larger orange strips, line up the ends and feed either end of the pipe cleaner through the holes on either ends of the paper strips.

Put a little roll and fold in the bottom of the pipe cleaner {it will keep the paper strips from coming off}. Add the green spiral piece of paper of paper to the top then roll and fold the top of the pipe cleaner.


Now fan out the paper strips to create a full circle.


To hang them on the twine garland take the top of pipe cleaner that has been folded over and hook it onto the twine.


TaDa!!!! Done and Done.

Hang them as garland or us them on a shelf as a display.

Share your fan pumpkin with me on Instagram. Be sure to tag me in your post and add #FanPumpkin


I tried doing a pumpkin with double the amount of strips and I did not like it as much for this project. You can use the picture above to see what they looked like.

1.07.2015

Two Ingredient - Super Moist Pumpkin Cookies

I have gotten into a baking mood lately but with Paul being so busy with work and two little girls who get all my attention, there is not a whole lot of time to spend in the kitchen.

I found the remedy for that. Cake box cookies!!!


These are so easy to make, very moist and work great when an extra surprise is tossed in {craisins, chocolate chips, nuts, etc.}.


Add some cream cheese frosting and a craisin on top to dress it up a bit.


White chocolate chips are a family favorite here. When the chips melt and caramelize a little, well, it’s just simply delicious.


INGREDIENTS
Duncan Hines Spice Cake Mix
One can {15 oz} Pumpkin
Any additions {craisins, chocolate chips, nuts, etc.}

*You can also double the recipe if you need more and they turn out great as well

SUPPLIES
Cookie sheets
Baking mats
Hand Mixer or Wooden Spoon

INSTRUCTIONS
Preheat oven to 375 degrees. Place baking mats or parchment paper on cookie sheets.


Mix the spice cake mix with the pumpkin. Once it's completely mixed, it will be sticky, add any extras you want. I didn't measure specifically but I usually added about 1 C -1 1/2 C of white chocolate chips. It just depends on your mood.


Drop table spoon sized balls onto the cooking mat and bake for 11-13 minutes {depending on your oven}. I usually flatten them out a little because they don't really spread out as they bake. When I first started making these I would poke with a toothpick to make sure it came out clean.


Yum!

Another bonus to cake box cookies is the amount it makes. Usually I can get around 3 dozen snack sized cookies that will last us a week or so…..you know, as long as I don’t make them when I’m hungry and eat most of the first batch.


I would love to hear from you and see your projects. Leave a comment or #AlwaysCreate on your photos. Find me on Instagram {@AlwaysCreate} and follow along for behind the scenes and fun little extras.

10.16.2012

Lady A's Birthday Outfit

I wanted to get some pictures for Lady A's birthday with the wonderful fall colors out here in New England. Since I am not too familiar with the area I had a friend come with me. I love this little out-fit and even more excited about the top.

This is my first re-purpose design and I could not be more please with how it turned out.

After all day shopping I finally found everything I was looking for: Boots, skirt and a top. The top was a tank top, size 2T, it was too big and too cold for her to wear it so I had to do a little work to it.

First I cut the ruffle off around the bottom. I wasn't too worried about the bottom of the shirt rolling or fraying since her pictures were going to be done the next day but you can roll the bottom once or twice to put a hem at the bottom of the shirt.

I took the extra ruffles and used them to make sleeves and a piece to the front to make it go a little higher.

For the cap sleeves I cut two pieces about 6" long. Look at the picture to see where I have drawn a dotted line. After lining up the center of the 6" ruffle to the top o the shoulder I pinned the rest of the sleeve lining up the invisible line with the seem of the arm hole. Then I simply sewed right along the existing seem. 

I used some extra material, felt and mesh material to add a little flare dress up the cute little shirt and match her hair clip I made

I am sorry to say that Lady A dropped the camera so all the photos to go along with this tutorial were lost. There will be plenty of other re-purposed shirt tutorials but here are some photos of the our little girl in her fun little birthday outfit.

 She was NOT going to give up her blanket!


9.11.2012

Cowl Scarf Pattern ~ Simple

Fall is coming and what better time then know to get ready for the cooler weather!! You can never have too many scarfs so today I am going to share with you the simple cowl I made.

My brother likes to crochet his beanies for the slopes and over the summer he gave me a huge bag of yarn. That is where the yarn came for this pattern and unfortunately I don't know exactly what type of yarn I used, but I do believe it was some kind of baby soft yarn.

I wanted the cowl to have a loose, open feel with the stitches and for that I used a larger hook than what I am sure was recommended on the label.


Supplies:
Scissors
Hook of your choice {I used 'N'}
Yarn {I was using stuff given to me but I imagine it was about three {3} half skeins of yarn.}

Start with a chainless foundation stitch {cfs}. You can find the instructions here. This is a great stitch to use when starting a project, where using a simple chain stitch to start, will not give enough stretch.

RND 1: CA 200 cfs, sl st to first cfs to form ring.
RND 2: ch 2, dc in same st from previous row, *dc in next st,* repeat * 197 times, sl st to second sc of ch 2.
RND 3: CB ch 1, sc in same st from previous row, *sc in next st,* repeat * 197 times, sl st to ch 1.
RND 4: ch 2, dc in same st from previous row, *dc in next st,* repeat * 197 times, sl st to second sc of ch 2.
RND 5: CC ch 1, sc in same st from previous row, *sc in next st,* repeat * 197 times, sl st to ch 1.
RND 6: ch 2, dc in same st from previous row, *dc in next st,* repeat * 197 times, sl st to second sc of ch 2.
RND 7: CB ch 1, sc in same st from previous row, *sc in next st,* repeat * 197 times, sl st to ch 1.
RND 8: ch 2, dc in same st from previous row, *dc in next st,* repeat * 197 times, sl st to second sc of ch 2.
RND 9: ch 2, dc in same st from previous row, *dc in next st,* repeat * 197 times, sl st to second sc of ch 2.
RND 10: ch 2, dc in same st from previous row, *dc in next st,* repeat * 197 times, sl st to second sc of ch 2.
RND 11: ch 1, sc in same st from previous row, *sc in next st,* repeat * 197 times, sl st to ch 1.
RND 12: CC ch 2, dc in same st from previous row, *dc in next st,* repeat * 197 times, sl st to second sc of ch 2.
RND 13:  ch 1, sc in same st from previous row, *sc in next st,* repeat * 197 times, sl st to ch 1.
RND 14: CB ch 2, dc in same st from previous row, *dc in next st,* repeat * 197 times, sl st to second sc of ch 2.
RND 15:  ch 1, sc in same st from previous row, *sc in next st,* repeat * 197 times, sl st to ch 1.
RND 16: CA ch 2, dc in same st from previous row, *dc in next st,* repeat * 197 times, sl st to second sc of ch 2.
RND 17:  ch 1, sc in same st from previous row, *sc in next st,* repeat * 197 times, sl st to ch 1.
RND 18: ch 1, turn {now the inside of the scarf is outside and facing you}, *sc in next st,* repeat * 198 times, sl st to ch 1.
RND 19:  ch 1, *hdc in next st,* repeat * 198 times, sl st to ch 1. Finish.
The edges were curling and that is why I decided to do those last two rows. Now to do the same to the other edge.
Keep cowl turned inside out and attach yarn color of your choice to RND 1.
RND -1: ch 1, *sc in next st,* repeat * 198 times, sl st to ch 1.
RND -2:  ch 1, *hdc in next st,* repeat * 198 times, sl st to ch 1. Finish.

With this pattern it is simple enough to make it as thick or thin as you would like. Mine ended up being approx. 7" in width. I love that it is very light and definitely cozy enough and keeps me warm on walks when the even chill is in the air.

Next time I think I'll try to do a shawl that will wrap around my shoulders.

LinkWithin

Related Posts with Thumbnails