Showing posts with label Treats. Show all posts

11.24.2015

23 Variations on Traditional Thanksgiving Dishes

Some of my favorite things for Thanksgiving dinner are the stuffing/dressing, cornbread, party potatoes, eggs, bread rolls and dessert. So I thought I would put together a list of variations on these great family tradition dishes. These all look so yummy, maybe you can find a new one to add to your Thanksgiving meal.

Dressing/Stuffing

 From SixSisterStuff this stuffing looks fantastic

 Find this Bountiful Harvest Sausage & Cranberry Dressing at ItsYummi

 A fun take for this traditional dish from ASpicyPerspective

ThePioneerWoman has a great traditional dressing

Cornbread and Pudding

 Corn Casserole from Seededatthetable

Grandmothers Buttermilk Cornbread on AllRecipes

 This Corn Pudding from CupcakesandKaleChips looks wonderful.

Oh my goodness....all of these Potatoes look Amazing!!

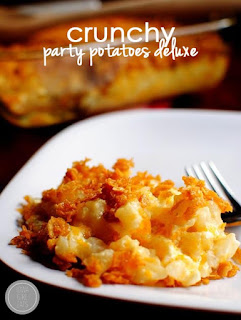
 IowaGirlEats has wonderful looking Crunchy Party Potatoes Deluxe

 A Cheesy Hashbrown Casserole from TableForTwoBlog

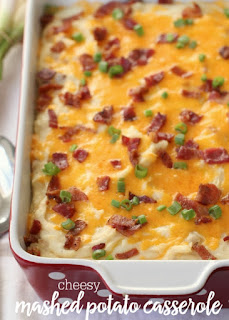
Mashed Potatoes and bacon from LilLuna.....Yum!

 Steph at TheCulinaryLife shares a Garlic Mashed Potato Recipe

Wonderfully buttery Mashed Potatoes from AFamilyFeast

Sweet Potato Casserole with Pecan Streusel from CiaoChowBambina

Deviled Eggs

 A yummy traditional Deviled Egg from Recipe-Diaries

RealHouseMoms has a great take on Deviled Eggs

Rolls and Butter

 Garlic, Herb and Cheese Bread Rolls from HandleTheHeat

These Honey Butter Pumpkin Dinner Rolls are from AverieCooks 

TheFoodCharlatan shares a wonderful Cinnamon Honey Butter

Dessert

Apple Pie from SweetLittleBlueBird

This Pumpkin Layered Dessert from FoodFunFamily

Pumpkin Twists from Deliciously Sprinkled

From the CanadianFamily a Pumpkin Praline Trifle

This Apple Snickers Trifle from DessertedPlanet

Do you have a favorite family dish that is a must have? This year maybe try to add something new, I would love to take a bit of every one of these dishes.

It looks like we will be staying home this year, my Aunt called and mentioned that some of the kids have been sick {terrible sick, I feel bad for them}, so we are hoping to find some time during winter break to go up and see them. This list is going to come in handy. Now I can choose a few and go pick up the ingredients we need and still pull off a good meal.

4.19.2014

Bunny Ear Cupcake Toppers

After a Dr. visit the other day it is clear that this baby is not coming soon and we will probably have to wait another week or longer. NOT the news I wanted to get!

So I need something to get my mind off of the pain my body is in. There is a community Easter Egg Hunt this weekend and they are wanting some goodies to hand out. I am making cupcakes and going to use the same Bunny Ears printable from my Some Bunny Loves You ~ Easter Thank Yous as a template for cupcake toppers.

Update: I created another printable so you can do ears that over lap or are separate.

What you need:
Candy Melts
Squeeze Bottles
Printable {ears together or ears apart}
Shortening / Coconut Oil {optional}
Wax Paper
Tape
Cupcakes, frosted and ready to decorate


I have tried to melt these before with little success, they usually would dry out and seem to burn instead, both in the microwave or using a double boiler system. After some thought and searching around on the Internet I decided the Candy Melts needed a little something to help keep them creamy and soft as they were microwaved, hence, the shortening or coconut oil.

Tape down the printable of the ears and tape wax paper over it {wax side up}. If you are doing more than one sheet of ears I would suggest printing out as many copies as you need, it makes it easier than having to stop and move everything to place another sheet of wax paper. You are also working against the clock and don't want the candy melts to start to solidify in the squeeze bottle.

I used about half the bag of candy melts and made four dozen ears {barely}.

Place the candy melts in a microwave safe bowl. Microwave for a minute {the instructions on the bag suggest using 50% power, I used my normal power setting}. After the first minute add between 1/4-1/2 TBS of shortening and stir in with the candy melts. Microwave 30 seconds at a time and be sure to stir in between every 30 second burst. Spoon the liquid candy melts in to the squeeze bottle and go to town.

Tip: Do one color at a time so the candy melts do not solidify while you switch between colors.
I only had butter flavored shortening so I used coconut oil instead to mix with the white candy melts {I wanted the white to stay as white as possible} and it worked just as well.


Take the pink and trace the inside of the bunny ears. By the time you get the white candy melts ready the pink will be set up enough so you can start tracing the outside of the ears.

Note: This is my first time doing free hand cupcake toppers and my first time getting the candy melts to melt successfully. Win ~ Win!! You can tell I am not a professional but I am pretty pleased with how they turned out.

Tip: Make sure the second color over laps the first just enough to make good contact. This way when you lift them off the wax paper they won't fall apart.
If doing a silhouette {ie, the white part and leaving the inside empty} I would suggest making sure to use a nice thick line {nothing to extreme}, enough so that the ears do not snap in half when you remove them from the wax paper.


Now set up the station and get busy.
Eyes: Chocolate Chips
Ears: You just made them you connoisseur of confections
Mouth {whiskers}: Coconut Shavings
& Nose: Pink Sixlets
The Reece's Pieces Eggs are for me to snake on while busy at work!


And there you have it! You are now a professional at getting Candy Melts to melt perfectly every time and you have some fun Bunny Cupcakes to share with family and friends.

Um...I finished these pretty late last night, all I had was my kitchen lighting so these last photos are a bit yellow. Please don't hold that against me. Trying to put these together during the day with a curious and busy toddler would have been nuts.


Here is an idea of how many we made. After all the taste testing and little fingers grabbing the bunny ears, we ended up donating 40 to the community Easter Egg Hunt this morning. Can you see on some of the ears I had enough white left over to place a line down the center and help to separate the ears into two? There was not enough white to do all of them but either way works for me.


I saved three for us and so I could get some better photos of them in the day light. Not going to lie, I am pretty pleased with how they turned out. It also helps when others complement you on your work.


Can you tell I am loving my spring and Easter decor too. Some friends brought me the flowers yesterday and I still love my plate, so they made it in the photo shoot.

3.17.2014

Leprechaun Popcorn Treat

My favorite treat as of late is popcorn, sweet or salty, it does not matter. A little something to snack on while working on chores or watching a movie, it is just perfect.

Today I am sharing our Leprechaun Popcorn. It requires three ingredients but you can add anything you would like to help sweeten the pot.

Yum!
Items needed:
Cookie sheet
Tin foil {heavy duty would be best}
Cooking spray or butter
Small pot
Whisk
12 Cups popped popcorn {about 1/2 unpopped}
3 oz Lime Jell-o
14 oz can Sweetened Condensed Milk
1/2 bag of Mini M&M's

Place the tin foil on the cookie sheet being sure to cover the entire sheet and even fold over the edges. This will help keep the tin foil in place. Spray the entire sheet with a generous amount of cooking spray. You will be thankful you did later on when it is time to remove the popcorn. Trust me!

Pop the popcorn. Measure out 12 Cups making sure to leave behind any kernels that did not pop. No body likes to bit into a yummy treat and chomp down on a kernel. Ouch.

Place on the cookie sheet, put it in the oven and heat to 300˚. This will help keep the popcorn warm so when it is time to add the Jell-o mix, it will spread easier over the warm popcorn.

Mix the Jell-o and sweetened condensed milk on medium heat 4-5 minutes, stirring with a whisk. Stir the whole time because it has a tendency to burn on the bottom. My mix never boils but it does become a little thicker as it heats on the stove.

Remove the cookie sheet of popcorn from the oven and pour the Jell-o mix over it. Use a plastic spatula {I even put some cooking spray on that to help keep the mixture from sticking} to evenly mix. 

Bake at 300˚ for 20 minutes, stirring ever 5 minutes. This helps to keep the stuff on top from burning since it will all be rotated. Also make sure that you do not have high peaks of popcorn from stirring, those will burn pretty fast.

Remove from the oven after 20 minutes and let it cool. After it has cooled add the mini M&M's or bite size candy of choice. Then break apart into individual servings or place the whole thing in a bowl and enjoy! Store extra in an air tight container.

A couple for movie night

Tip: If you want a little salty mixed in with your treat you could try using lightly butter and salted microwave popcorn.

Hint: I like my Leprechaun Popcorn to be a bit chewy so cooking at a medium temperature and baking for only 20 minutes will help keep it soft. If you would like it to be more crunchy try cooking the Jell-o mix at a little higher temp or baking it an extra five minutes.

Some for the neighbors

Download a pdf of the recipe here.

Do not forget to enter the Spring Birthday Wish Giveaway. Ends midnight {est} the March 20th.

1.14.2014

Freezer Microwave Popcorn

Growing up we always made air-pop popcorn. When I moved out to go to college the convenience of the microwave bag was hard to beat. The over processed butter would get old....nothing beats just melted butter poured on freshly popped pop-corn with a sprinkle of salt.

I was so excited when my sister suggested that I make my own microwave popcorn. It is more like air-pop, but does not require that I take out the air-popper and it is the perfect size for one or two people.

Here is what you will need: paper lunch bags, tape, popcorn and this fun printable that you can download for free here.

It will take a little bit of trial and error to figure out the amount of kernels and time needed to pop per bag so that you will be left with the fewest amount of un-popped kernels and the stuff already popped does not start to burn.
  • 1/3 C kernels
  • Pour them in the bag {I place them in without opening the bag up since the bag will need to be flat}.
  • Now roll the bag where the fold are.
  • Fold the top over and tape shut. I like to place a label on them so that I am sure to use the oldest first when I go to pop a bag.


When it is time to pop, simply unroll the bag and use the tape piece to pinch the opening of the bag closed {this will keep the popcorn from falling out of the bag when it is popped}.

I hit the popcorn button on the microwave and add 30 seconds. The key to popping popcorn is listening for when the pops have approx. 3 seconds between them. This is a perfect time to pull the bag out, getting the most of the kernels popped and keeping it from burning.

LinkWithin

Related Posts with Thumbnails